
Designlet: Managing Google Cloud VMware Engine APIs with Postman
Introduction
Automation is a key component of IT orchestration. It helps drive IT efficiency and helps enable an organization’s digital transformation. As IT organizations grow in both size and complexity, there are a limited number of resources to focus on infrastructure administration. Application updates, OS patches, and the ordering, provisioning, configuration, and deploying of systems can present an unmanageable burden for IT. A solid infrastructure automation framework can help reduce this burden and allow IT to scale with business growth.
Every organization wants efficient, scalable, and reliable IT infrastructure. Automation tools can increase agility, enhance employee productivity, and reduce security attack surfaces. They do this by eliminating manual errors though standardization of process and governance policies. The most important component to automating IT infrastructure is having an interface that can be controlled programmatically.
The two most common example are:
- Command Line Interface (CLI)
- Application Programing Interface (API)
With a recent update to the Google Cloud VMware engine offering, both options are now available to interact with your GCVE Private Cloud.
Options to interact with Google Cloud VMware Engine:
Cloud Console (GUI) – The cloud console is the first and most used tool to interact with your Private Cloud. It provides the easiest user experience and is a great place to start your management.
gcloud CLI tool – The gcloud cli is part of the Google SDK and give operators a command line to interact with Google Cloud Services. The following blog outlines using the gcloud CLI to interact with your Private Cloud - https://vmc.techzone.vmware.com/use-gcloud-cli-manage-google-cloud-vmware-engine
VMware Engine APIs - The Google VMware Engine API lets you programmatically manage VMware environments.
Scope of the Document
This document will focus on VMware Engine APIs. These restful APIs allow you to manage deploy task as well as Day-2 Operations on your Private Clouds.
In order to interact with APIs you need a client capable of sending the appropriate calls to the server endpoint. The two most common API clients are cURL (Command Line) and Postman (UI). The examples in this document will use Postman to interact with the GCVE APIs.
Topics covered:
- Authenticating Postman to Google Cloud Platform APIs
- Creating OAuth 2 token in Google Cloud
- Configure Postman to authenticate to Google Cloud APIs
- Creating a VMware Engine Network
- Deploy a Private Cloud
- Adding node to Private Cloud
- Check status of an operation
Prerequisites
The following prerequisites ensure your Google Cloud environment is enabled for APIs and you have collected the information needed to build your APIs.
- Enable VMware engine APIs on your Google Project
- Sufficient Node quota to deploy a Private Cloud (3 nodes minimum)
- Region information to deploy resources
- Project name to deploy resources
- Private Cloud Name
- Cluster Name
- Management CIDR range (/24 or larger) This CiDR range will be carved up and used when deploying your Private Cloud. Ensure you pick a CIDR large enough to cover future expansion.
- Postman installed on your device
Authenticating Postman to Google Cloud Platform APIs
- Create OAuth 2 token in Google Cloud
- Configure Postman to use OAuth 2 token for secure communication when executing APIs
Creating OAuth 2 token in Google Cloud
- Login to the Google Cloud Console
- Navigate APIs and Services > OAuth consent screen > Select “Internal” and Click Create
- Fill out the “OAuth consent screen” web form with the following details:
- App Name - GCVE APIs
- User support email - <your email address>
- Authorized domain 1 – oauth.pstmn.io
- Authorized domain 2 – getpostman.com
- Authorized domain 3 – google.com
- Developer contact email address – <your email address>
- Click “Save and Continue” 3 times, leaving all fields blank. This will complete the “OAuth Consent screen” configuration
- Navigate APIs and Services > Credentials > Create Credentials > Create OAuth client ID
- Fill out the “Create OAuth client ID” web form with the following details
- Application – Web Application
- Name – Postman Auth
- Authorized URI 1 - https://console.cloud.google.com/apis/credentials/oauthclient
- Authorized URI 2 - https://www.getpostman.com/oauth2/callback
- Click Create
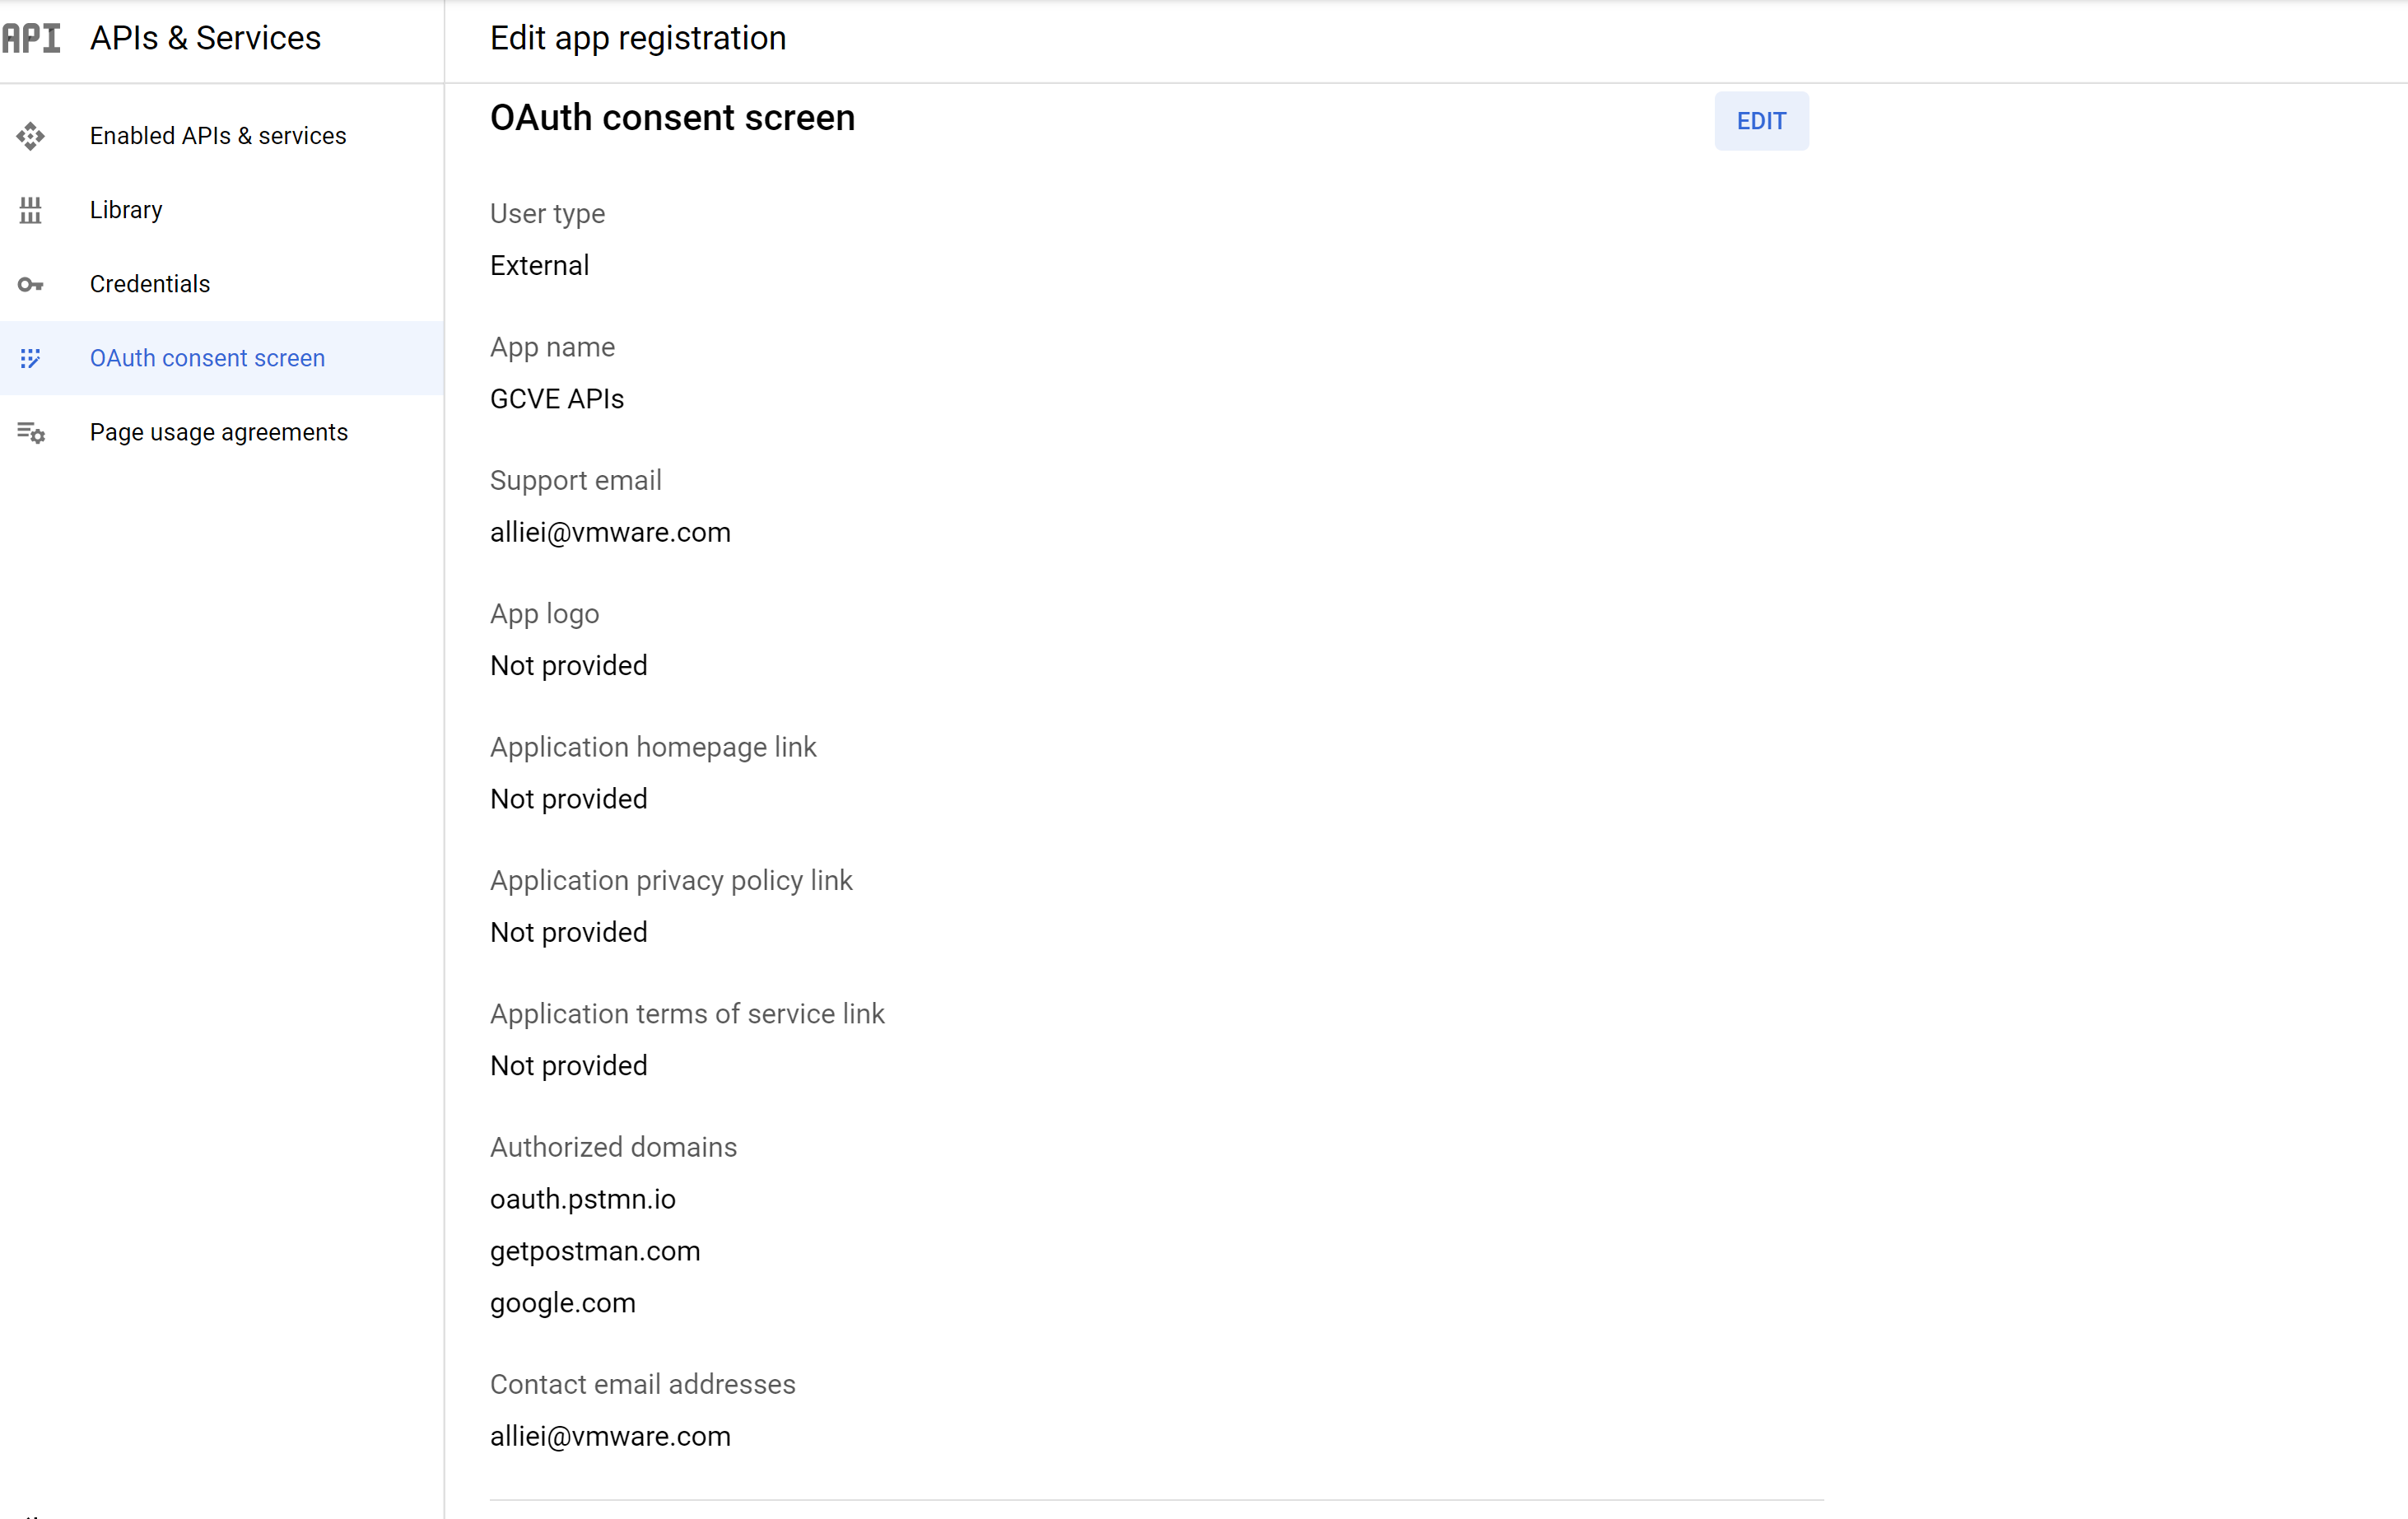
Figure 1 - OAuth Consent screen inputs
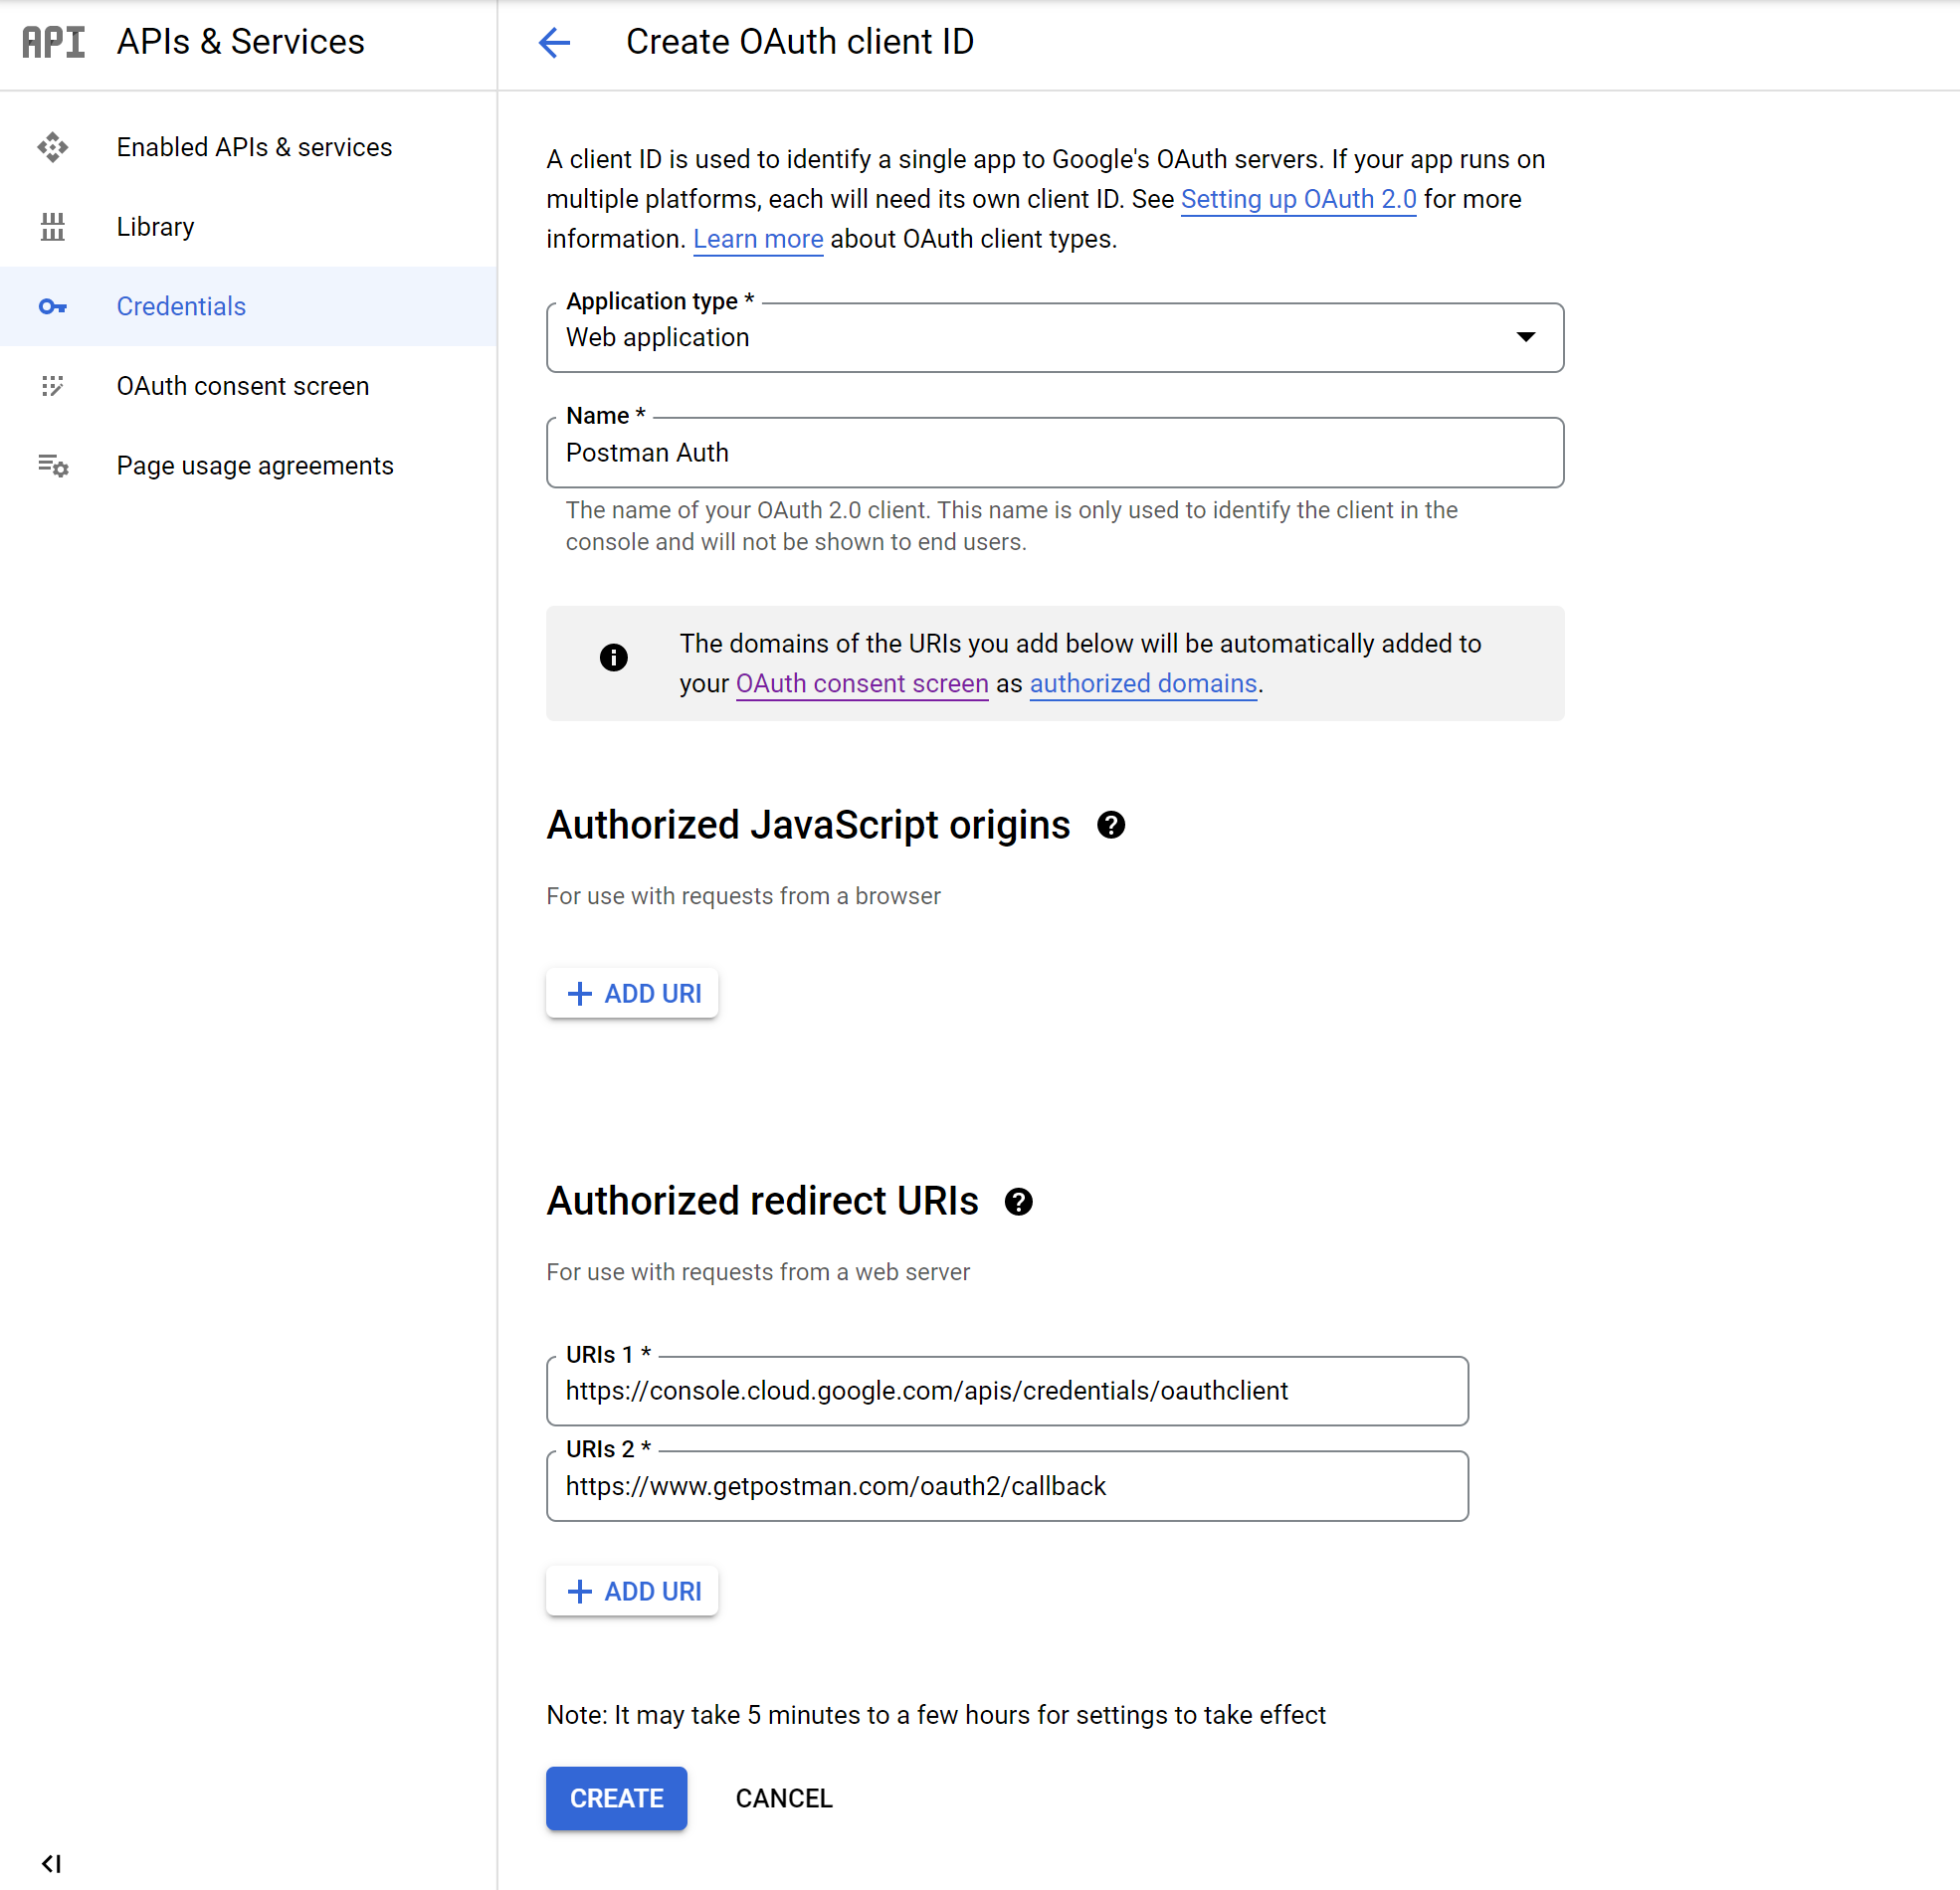
Figure 2 – Create OAuth Client ID screen inputs
- This will return your Client ID and Client Secret; these will be used in Postman to connect to GCP
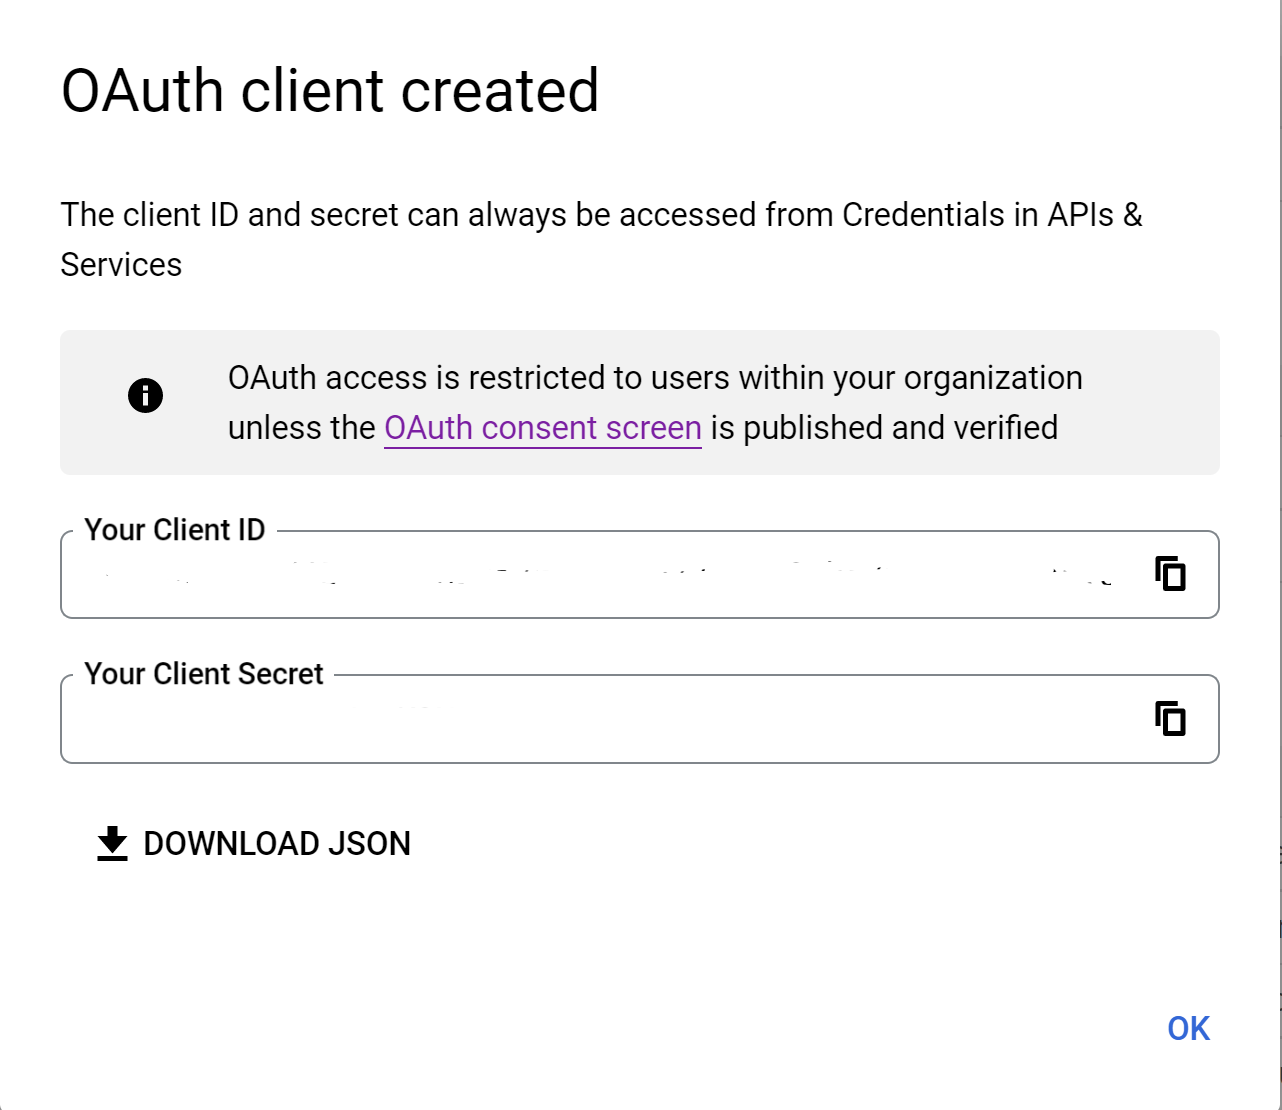
Figure 3 - GCP returns OAuth ID and Secret
Configure Postman to authenticate to Google Cloud APIs
You will now use the OAuth 2 Token created in the previous step to configure authentication in Postman. The following steps will assume you are using a dedicated Postman Collection for your Google Cloud VMware engine APIs.
- Select your Collection and click the Authorization Tab.
- In the Type drop down select OAuth 2
- Fill in the following fields (Any additional field will be left as defaults):
- Token Name – GCP Token
- Callback URL – https://www.getpostman.com/oauth2/callback
- Auth URL - https://www.getpostman.com/oauth2/callback
- Access Token URL - https://www.getpostman.com/oauth2/callback
- Client ID – Recorded from step 5 (Recommend using a variable)
- Client Secret - Recorded from step 5 (Recommend using a variable)
- Scope - https://www.getpostman.com/oauth2/callback
- Click Get New Access Token
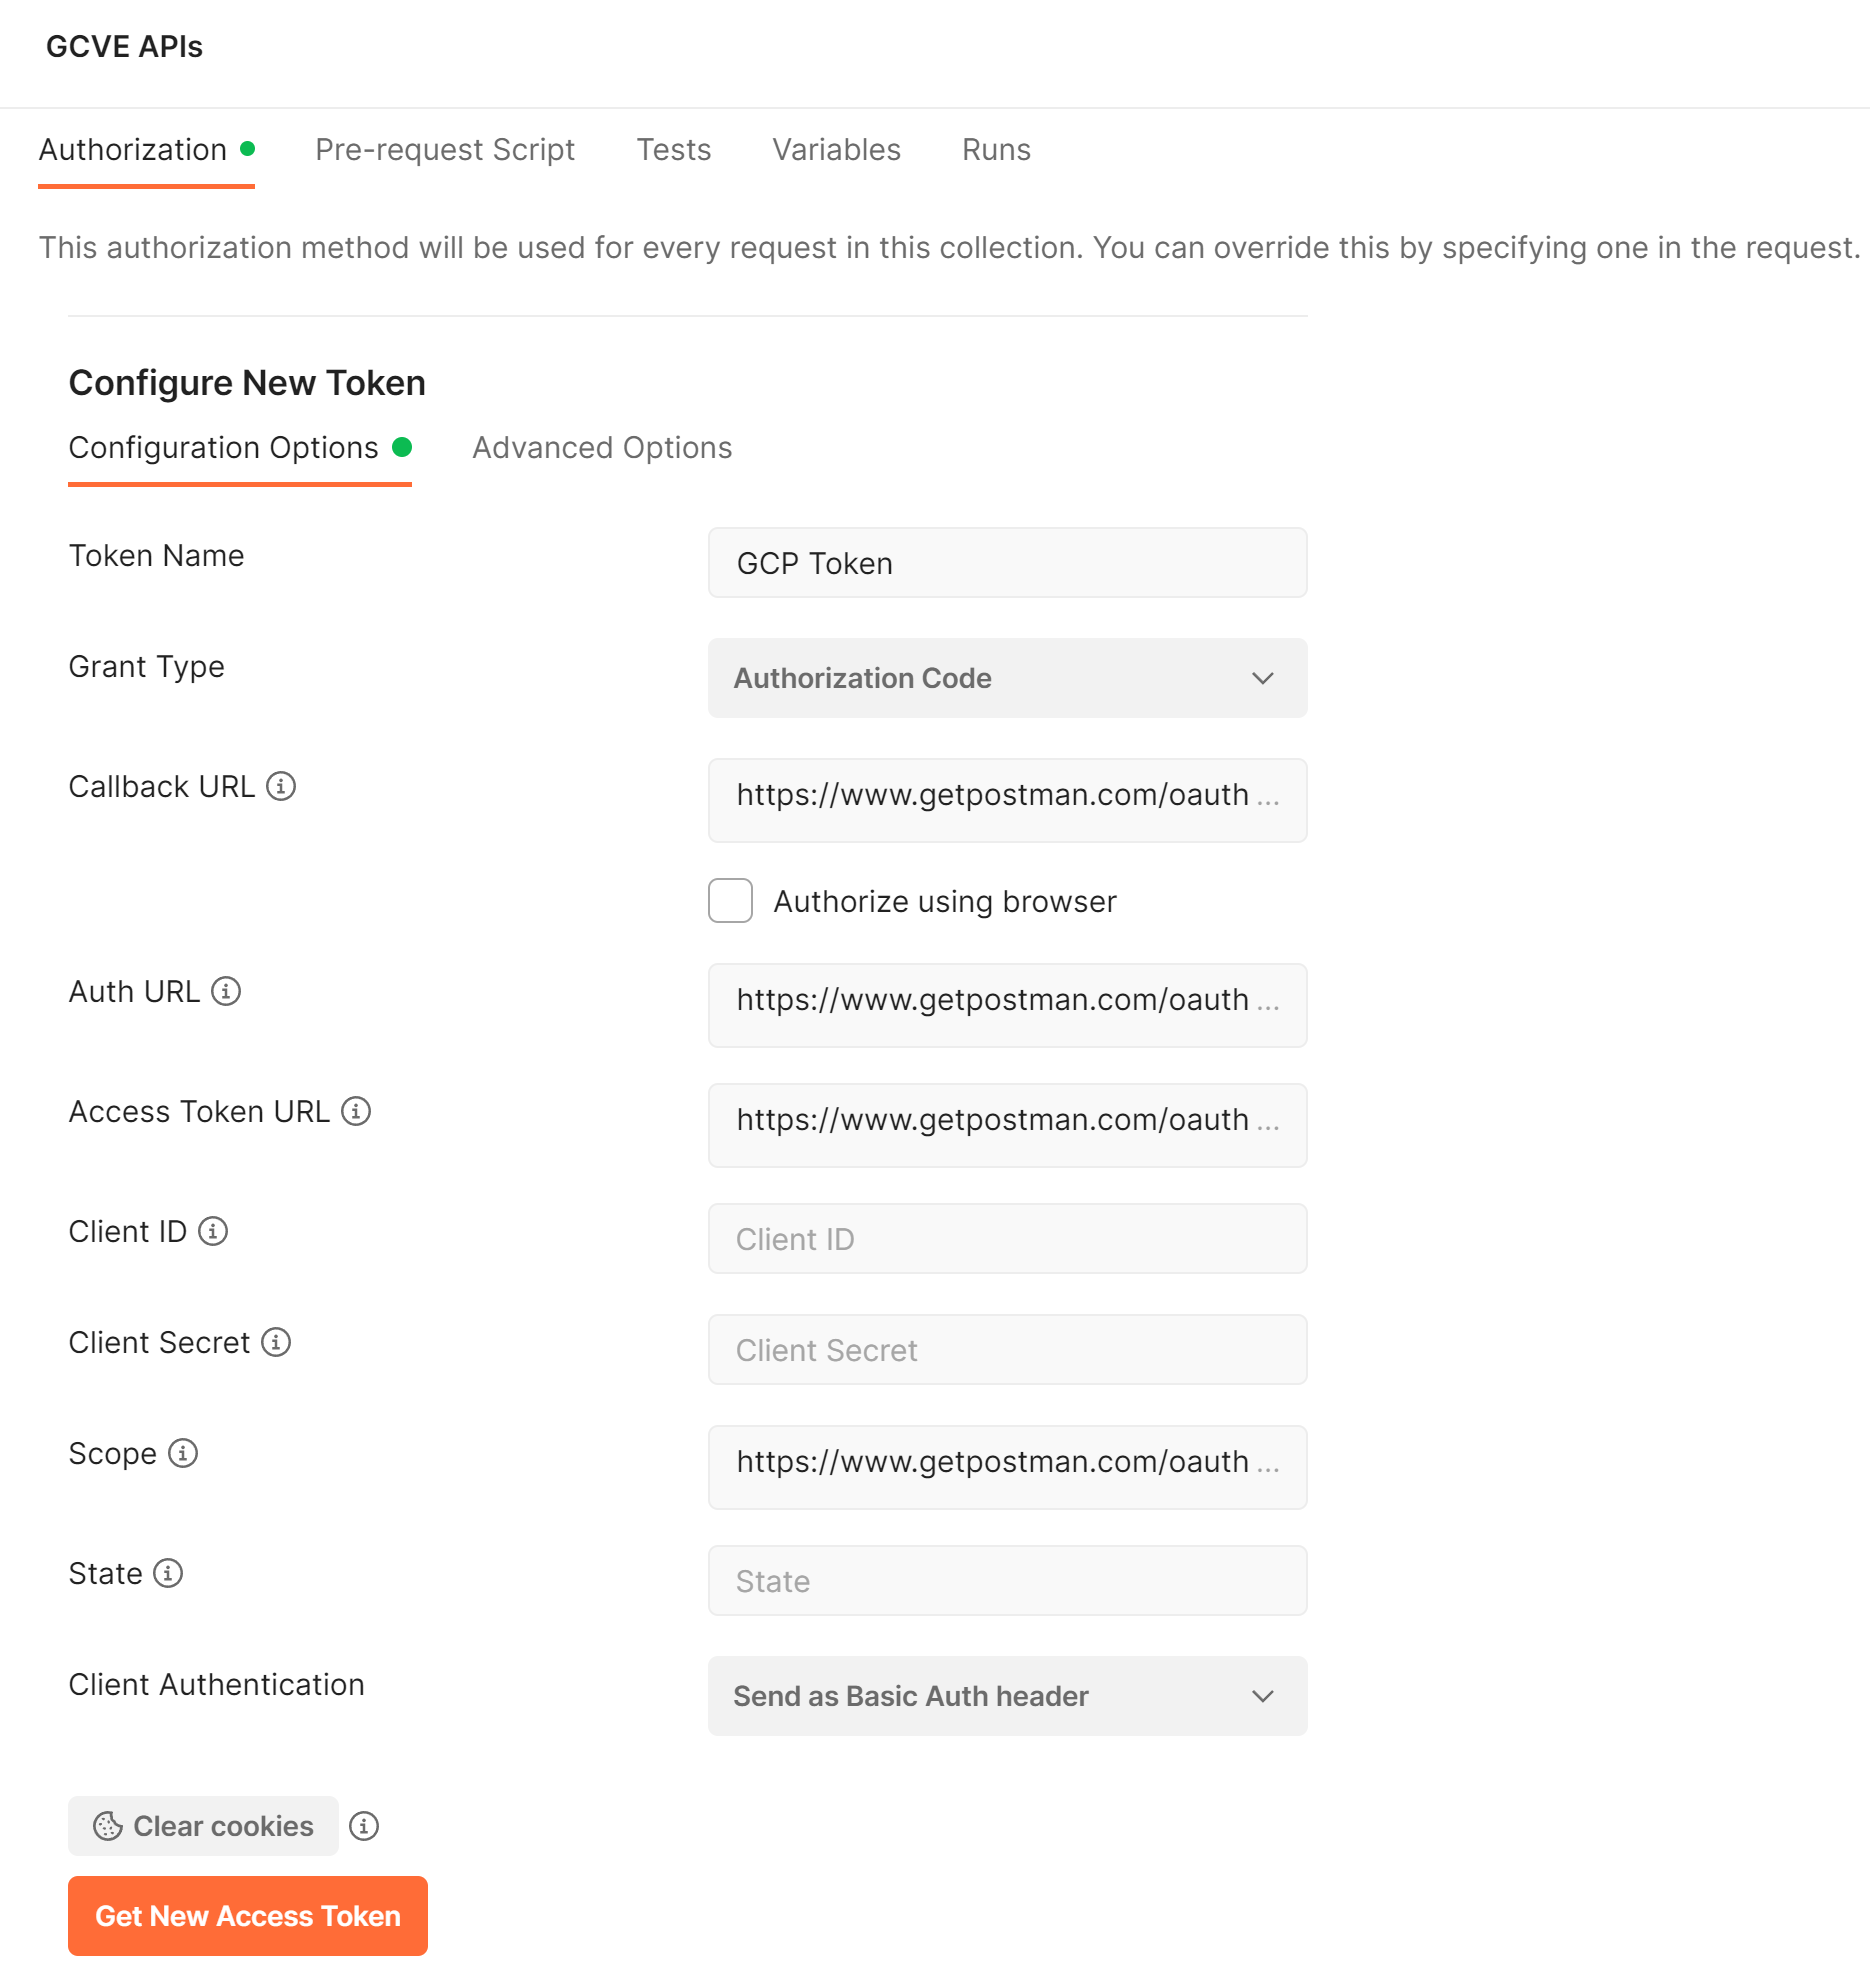
Figure 4 - Postman Authorization screen populated with inputs
- This will trigger authentication / login to Google Cloud Platform. You will see a pop-up window and need to select your appropriate Google account.
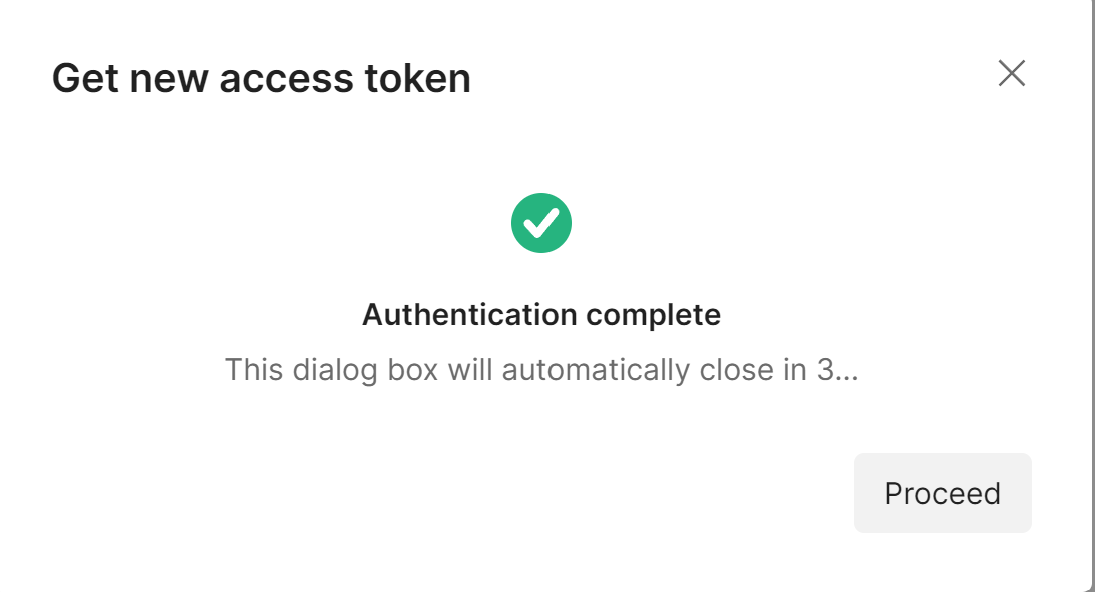
Figure 5 - Confirmation of authorization to GCP
- Once Authentication completes, you will receive an additional pop-up window that shows the token you received from Google. This will be used as part of subsequent API calls.
- Click Use Token
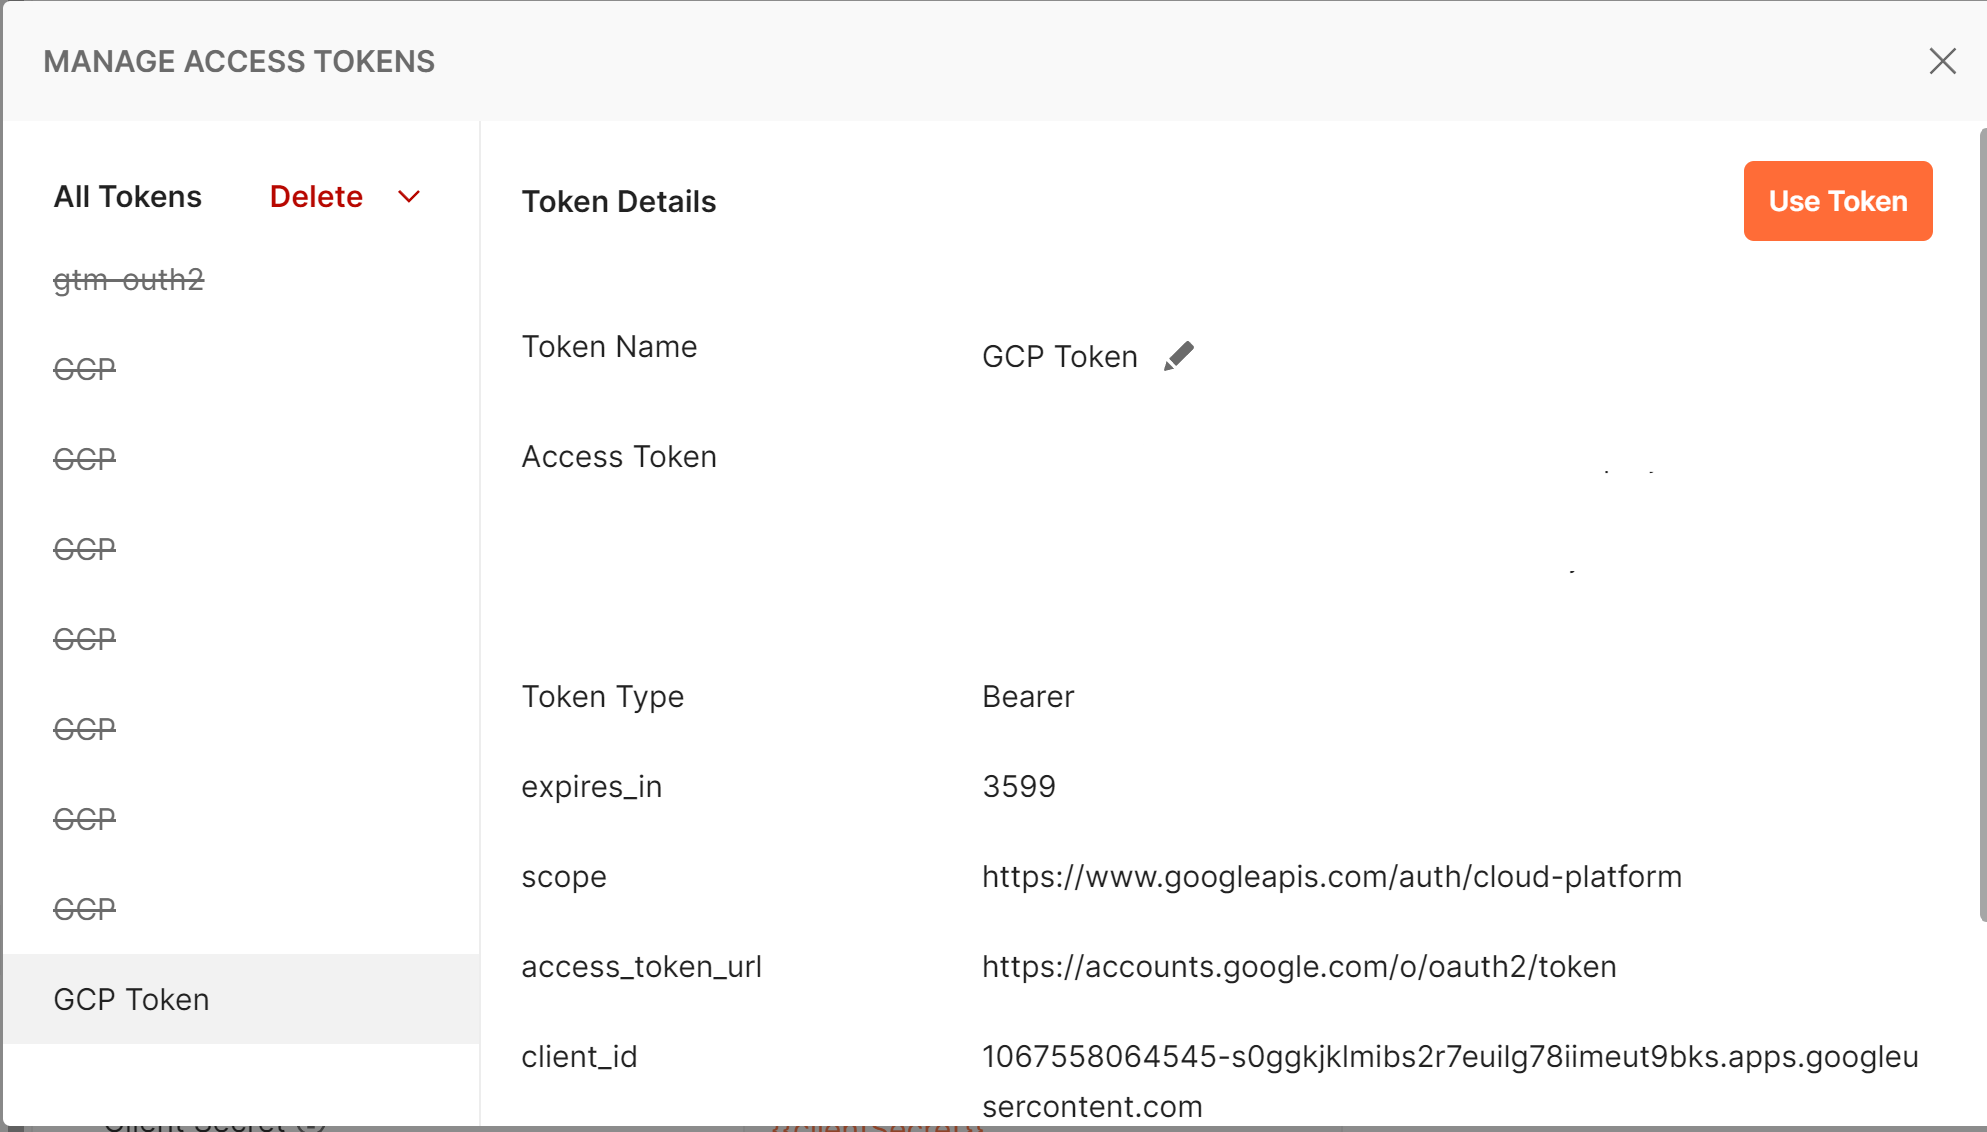
Figure 6 - Access token received from GCP
This completes the authentication process between your Postman Client and Google Cloud APIs. You are now ready to begin managing your GCVE environments.
Creating a VMware Engine Network
GCVE Private Clouds use a VMware Engine network to provide network connectivity between private clouds, Google Cloud Virtual Private Cloud networks, and on-premises networks. Each Private Cloud must have a VMware Engine network attached to it at deployment. This network is described as the Intranet-VPC and is the network that is peered to a customer VPC.
Additional reading on VMware Engine Networks can be found here: https://cloud.google.com/vmware-engine/docs/networking/vmware-engine-network
*NOTE* Create all API requests in the Postman collection you previously configured with Authorization.
Examples used in this step:
(When building your request, please note that some of these examples may be used in the endpoint, while other may be contained in the body)
- VMware Engine Network name = gcve-network
- VMware Engine Network type = standard
Steps to Create a VMware engine Network with APIs
- Create a new API request – In this example, the name of the VMware engine network is “gcve-network”.
{
"type":"standard"
}
- Click Send. You should receive a Status 200 OK, indicating the call was accepted by the server
- This API will return a response body that includes the value “done”.
- “done” = false (VMware Engine Network creation in progress)
- “done” = true (VMware Engine Network creation complete)
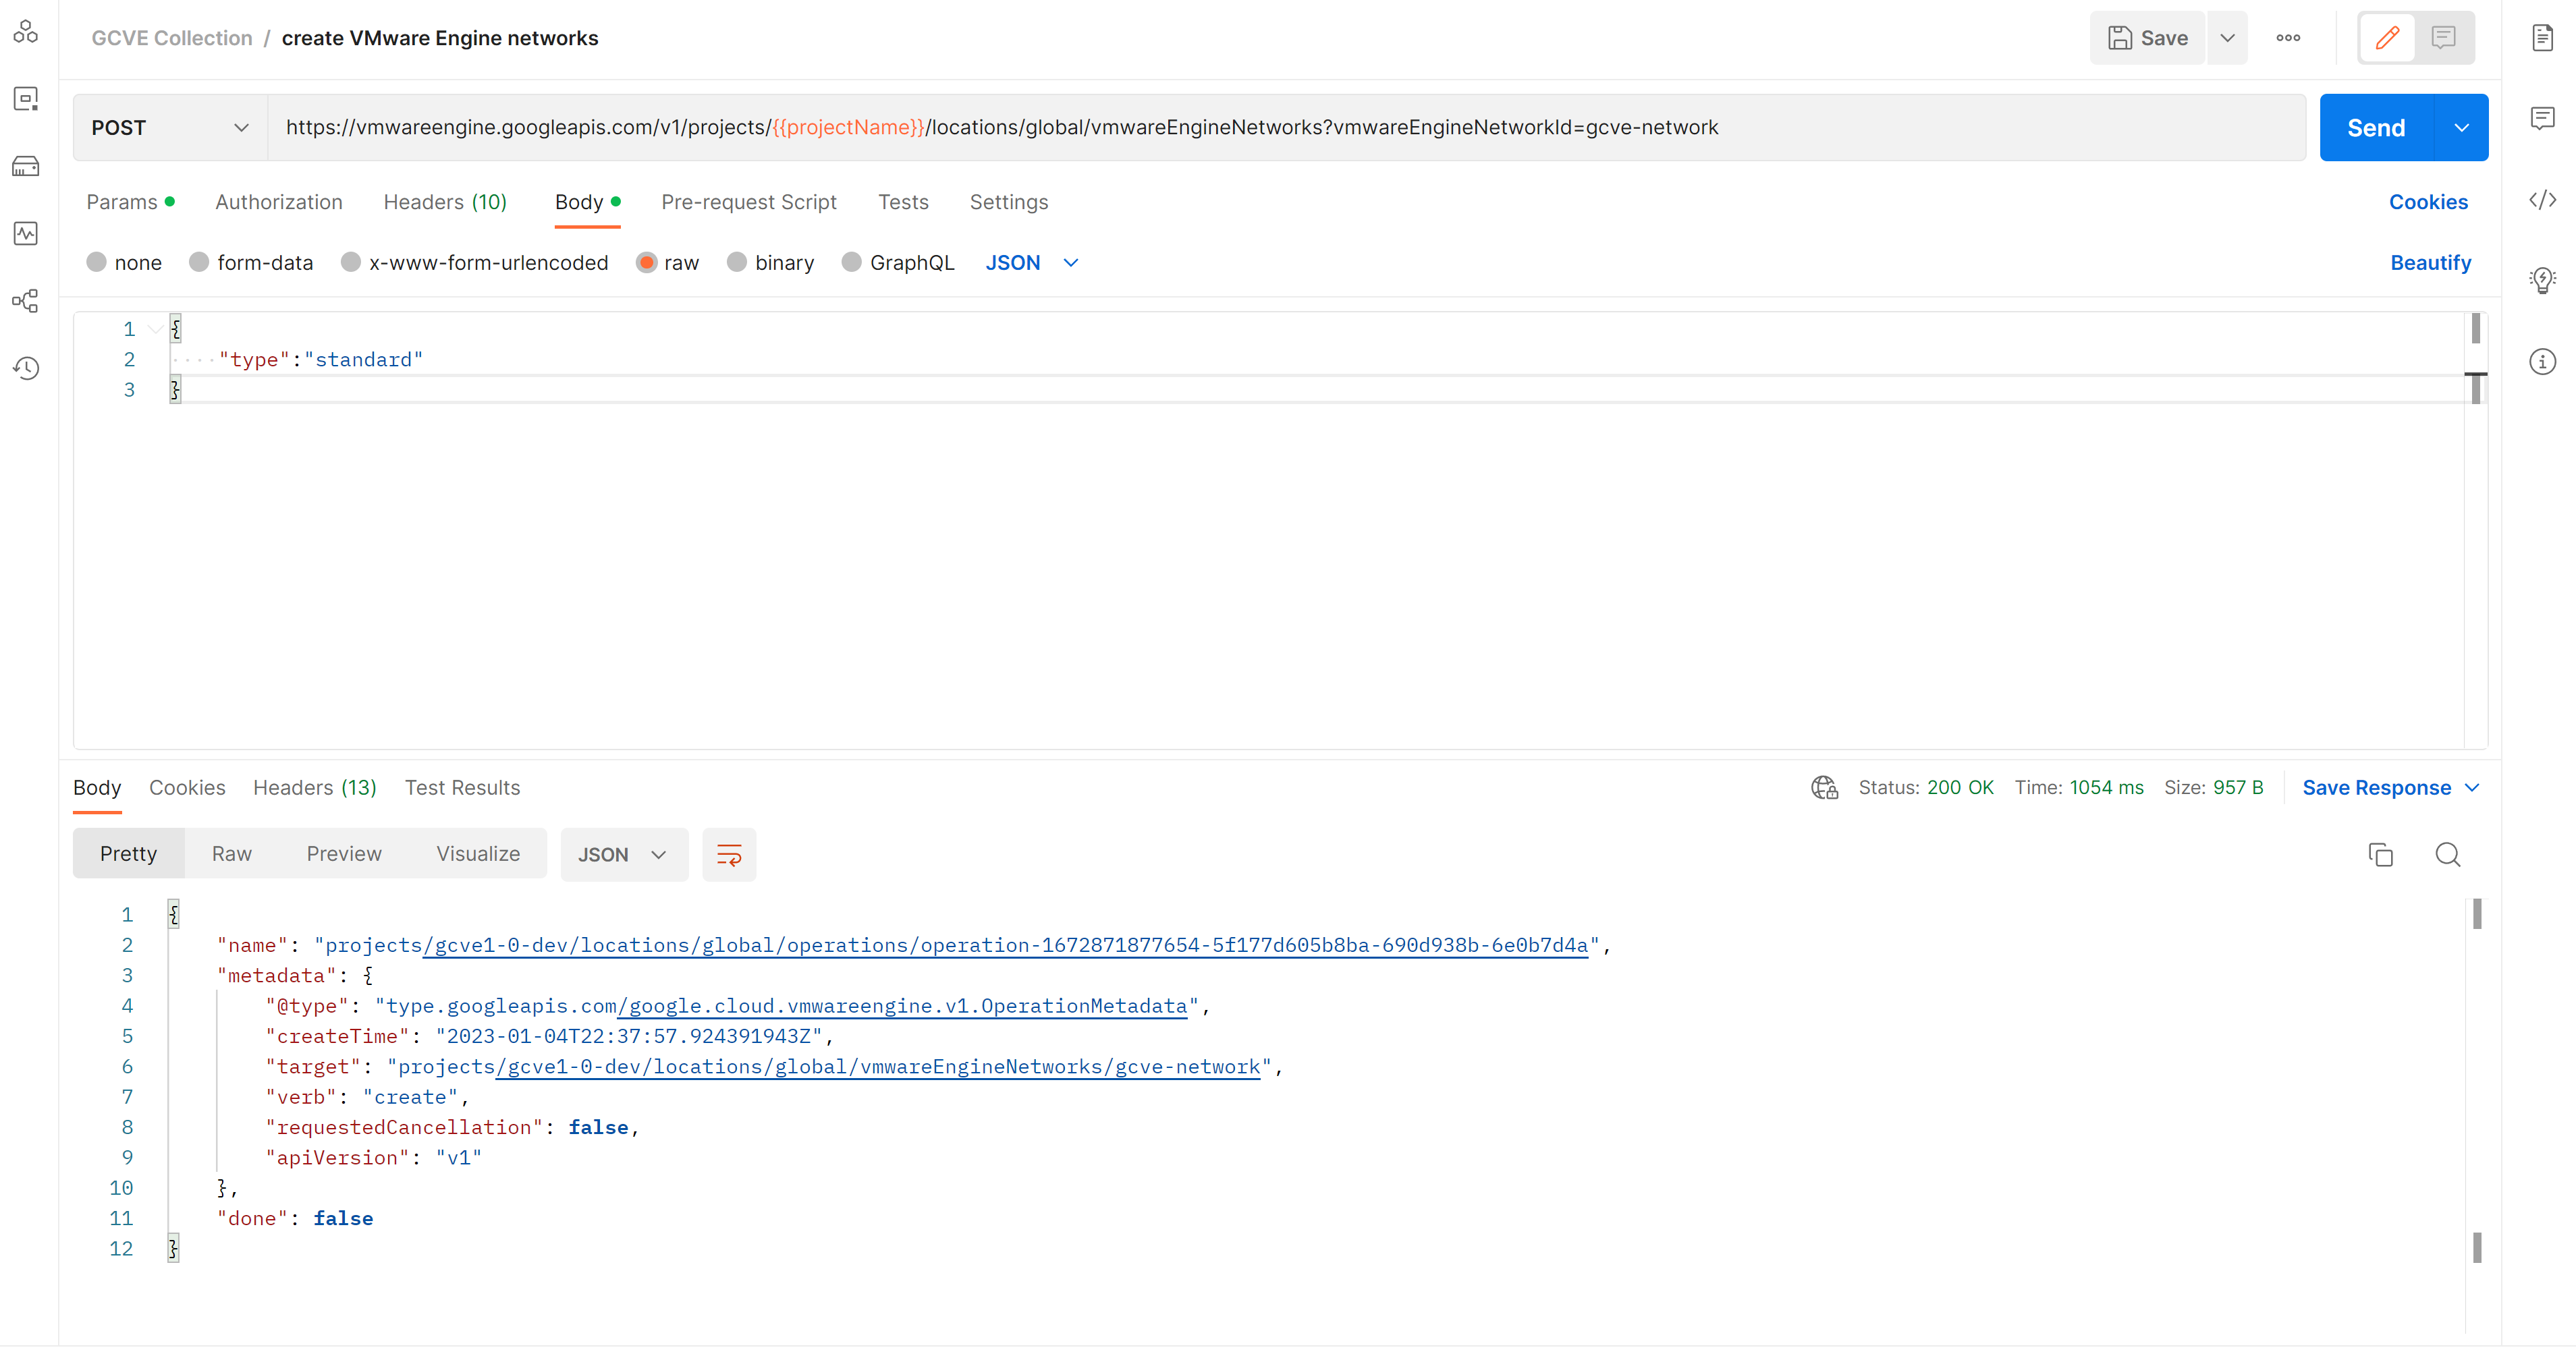
Figure 7 – VMware Engine Network API call, and response from server
Once complete, you will have a VMware Engine network names “gcve-network”. This will be used in the next step when deploying a Private Cloud.
Deploy a Private Cloud
Now that you have your VMware Engine network created, you are ready to deploy a GCVE Private Cloud. This will be executed a single POST API request. Before you make the request, ensure you have met all the prerequisites and documented the values.
Examples used in this step:
(When building your request, please note that some of these examples may be used in the endpoint, while other may be contained in the body)
- Private Cloud Name = gcve-pc1
- Management Cluster name = management-cluster
- Node Count (3 minimum) = 3
- VMware Engine Eetwork = gcve-network (created in previous step)
- Management CIDR range = 192.168.10.0/24
- Zone to deploy Private Cloud = asia-southeast1-a
Steps to Deploy a Private Cloud with APIs
- Create a new API request – In this request, you will use examples previously documented
{
"networkConfig":{
"vmwareEngineNetwork":"projects/gcve1-0-dev/locations/global/vmwareEngineNetworks/gcve-network",
"managementCidr":"192.168.10.0/24"
},
"managementCluster":{
"clusterId": "management-cluster",
"nodeTypeId": "standard-72",
"nodeCount": 3
}
}
- Click Send. You should receive a Status 200 OK, indicating the call was accepted by the server
- The creation process will take a couple of hours to complete. You can check status by referring to the Check Status of an operation section in this document
- This API will return a response body that includes the value “done”.
- “done” = false (Private Cloud creation in progress)
- “done” = true (Private Cloud creation complete)
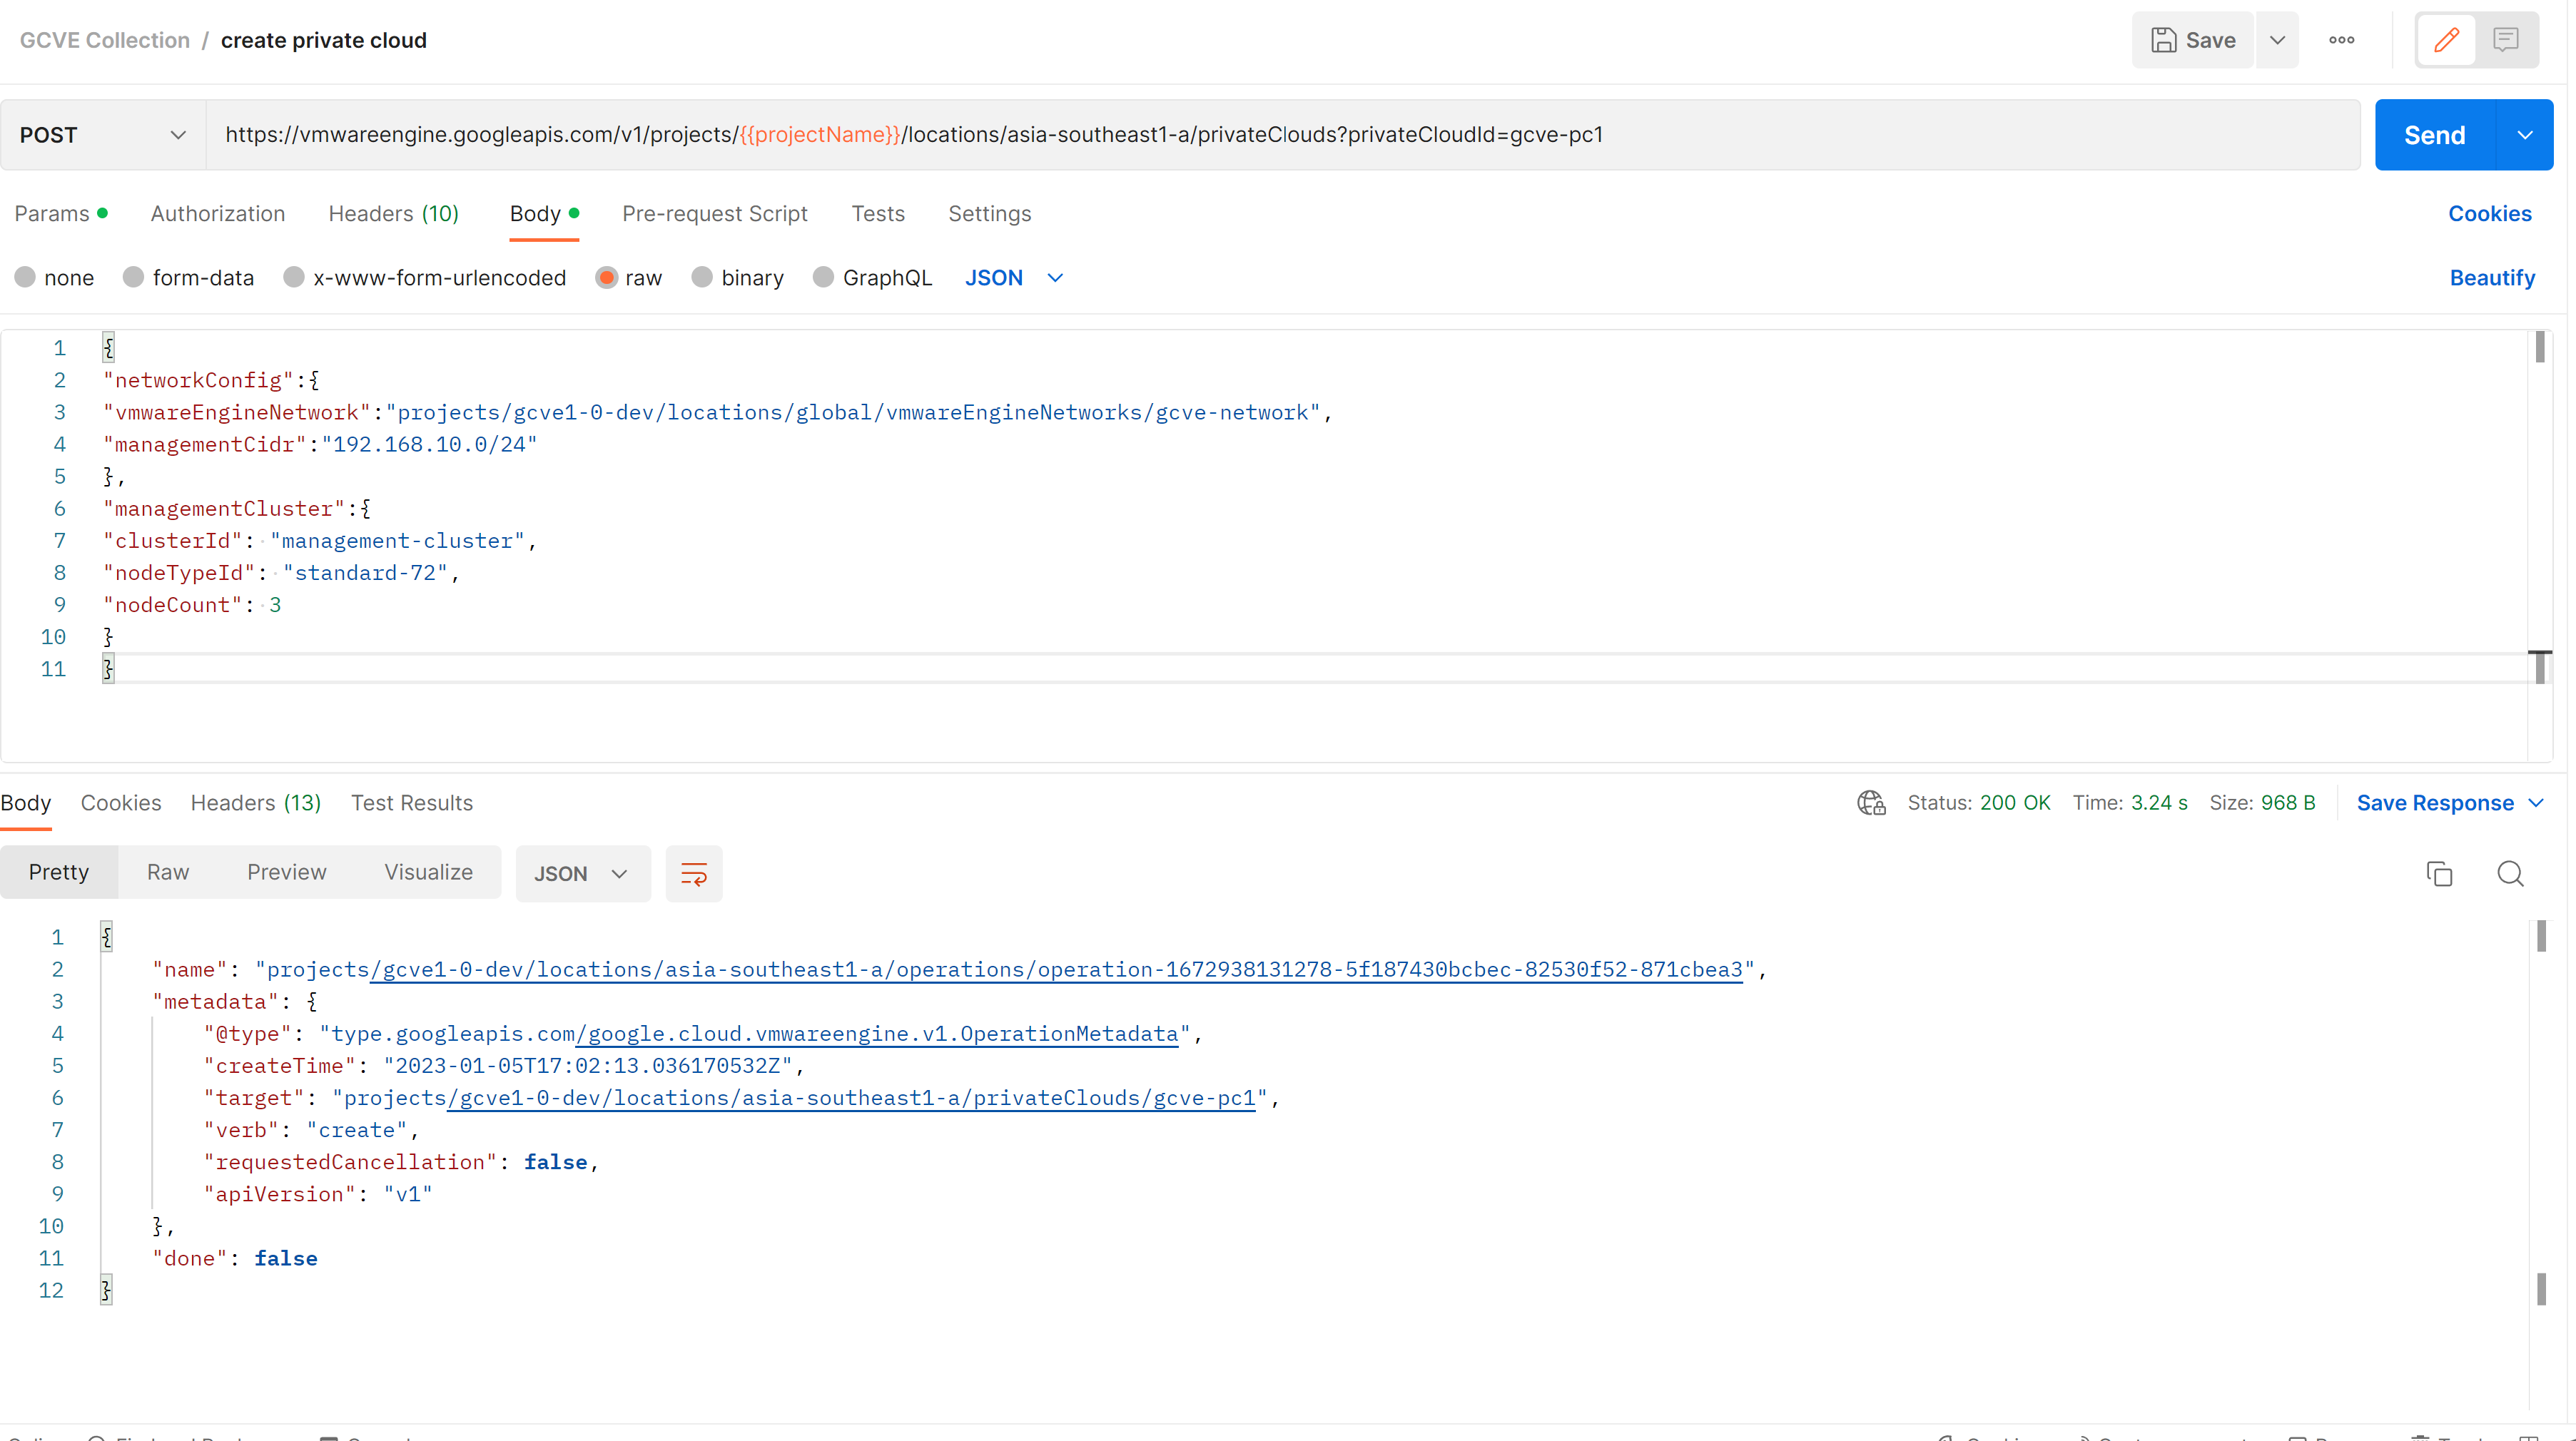
Figure 8 - Deploy a Private Cloud API call, and response from server
Adding Node to a Private Cloud
Once you have deployed a Private Cloud, you may want to add nodes as a Day-2 operation. In this step you will see how to add a node to an existing Private Cloud
Examples used in this step:
(When building your request, please note that some of these examples may be used in the endpoint, while other may be contained in the body)
- Private Cloud Name = gcve-pc1
- Management Cluster name = management-cluster
- Updated Node Count (4 minimum) = 4
- Private Cloud Zone = asia-southeast1-a
Steps to add a node to a Private Cloud with APIs
- Create a new API request – In this request, you will use the examples previously documented
{
"nodeCount": 4
}
- Click Send. You should receive a Status 200 OK, indicating the call was accepted by the server.
- This API will return a response body that includes the value “done”
- “done” = false (node addition in progress)
- “done” = true (node addition complete)
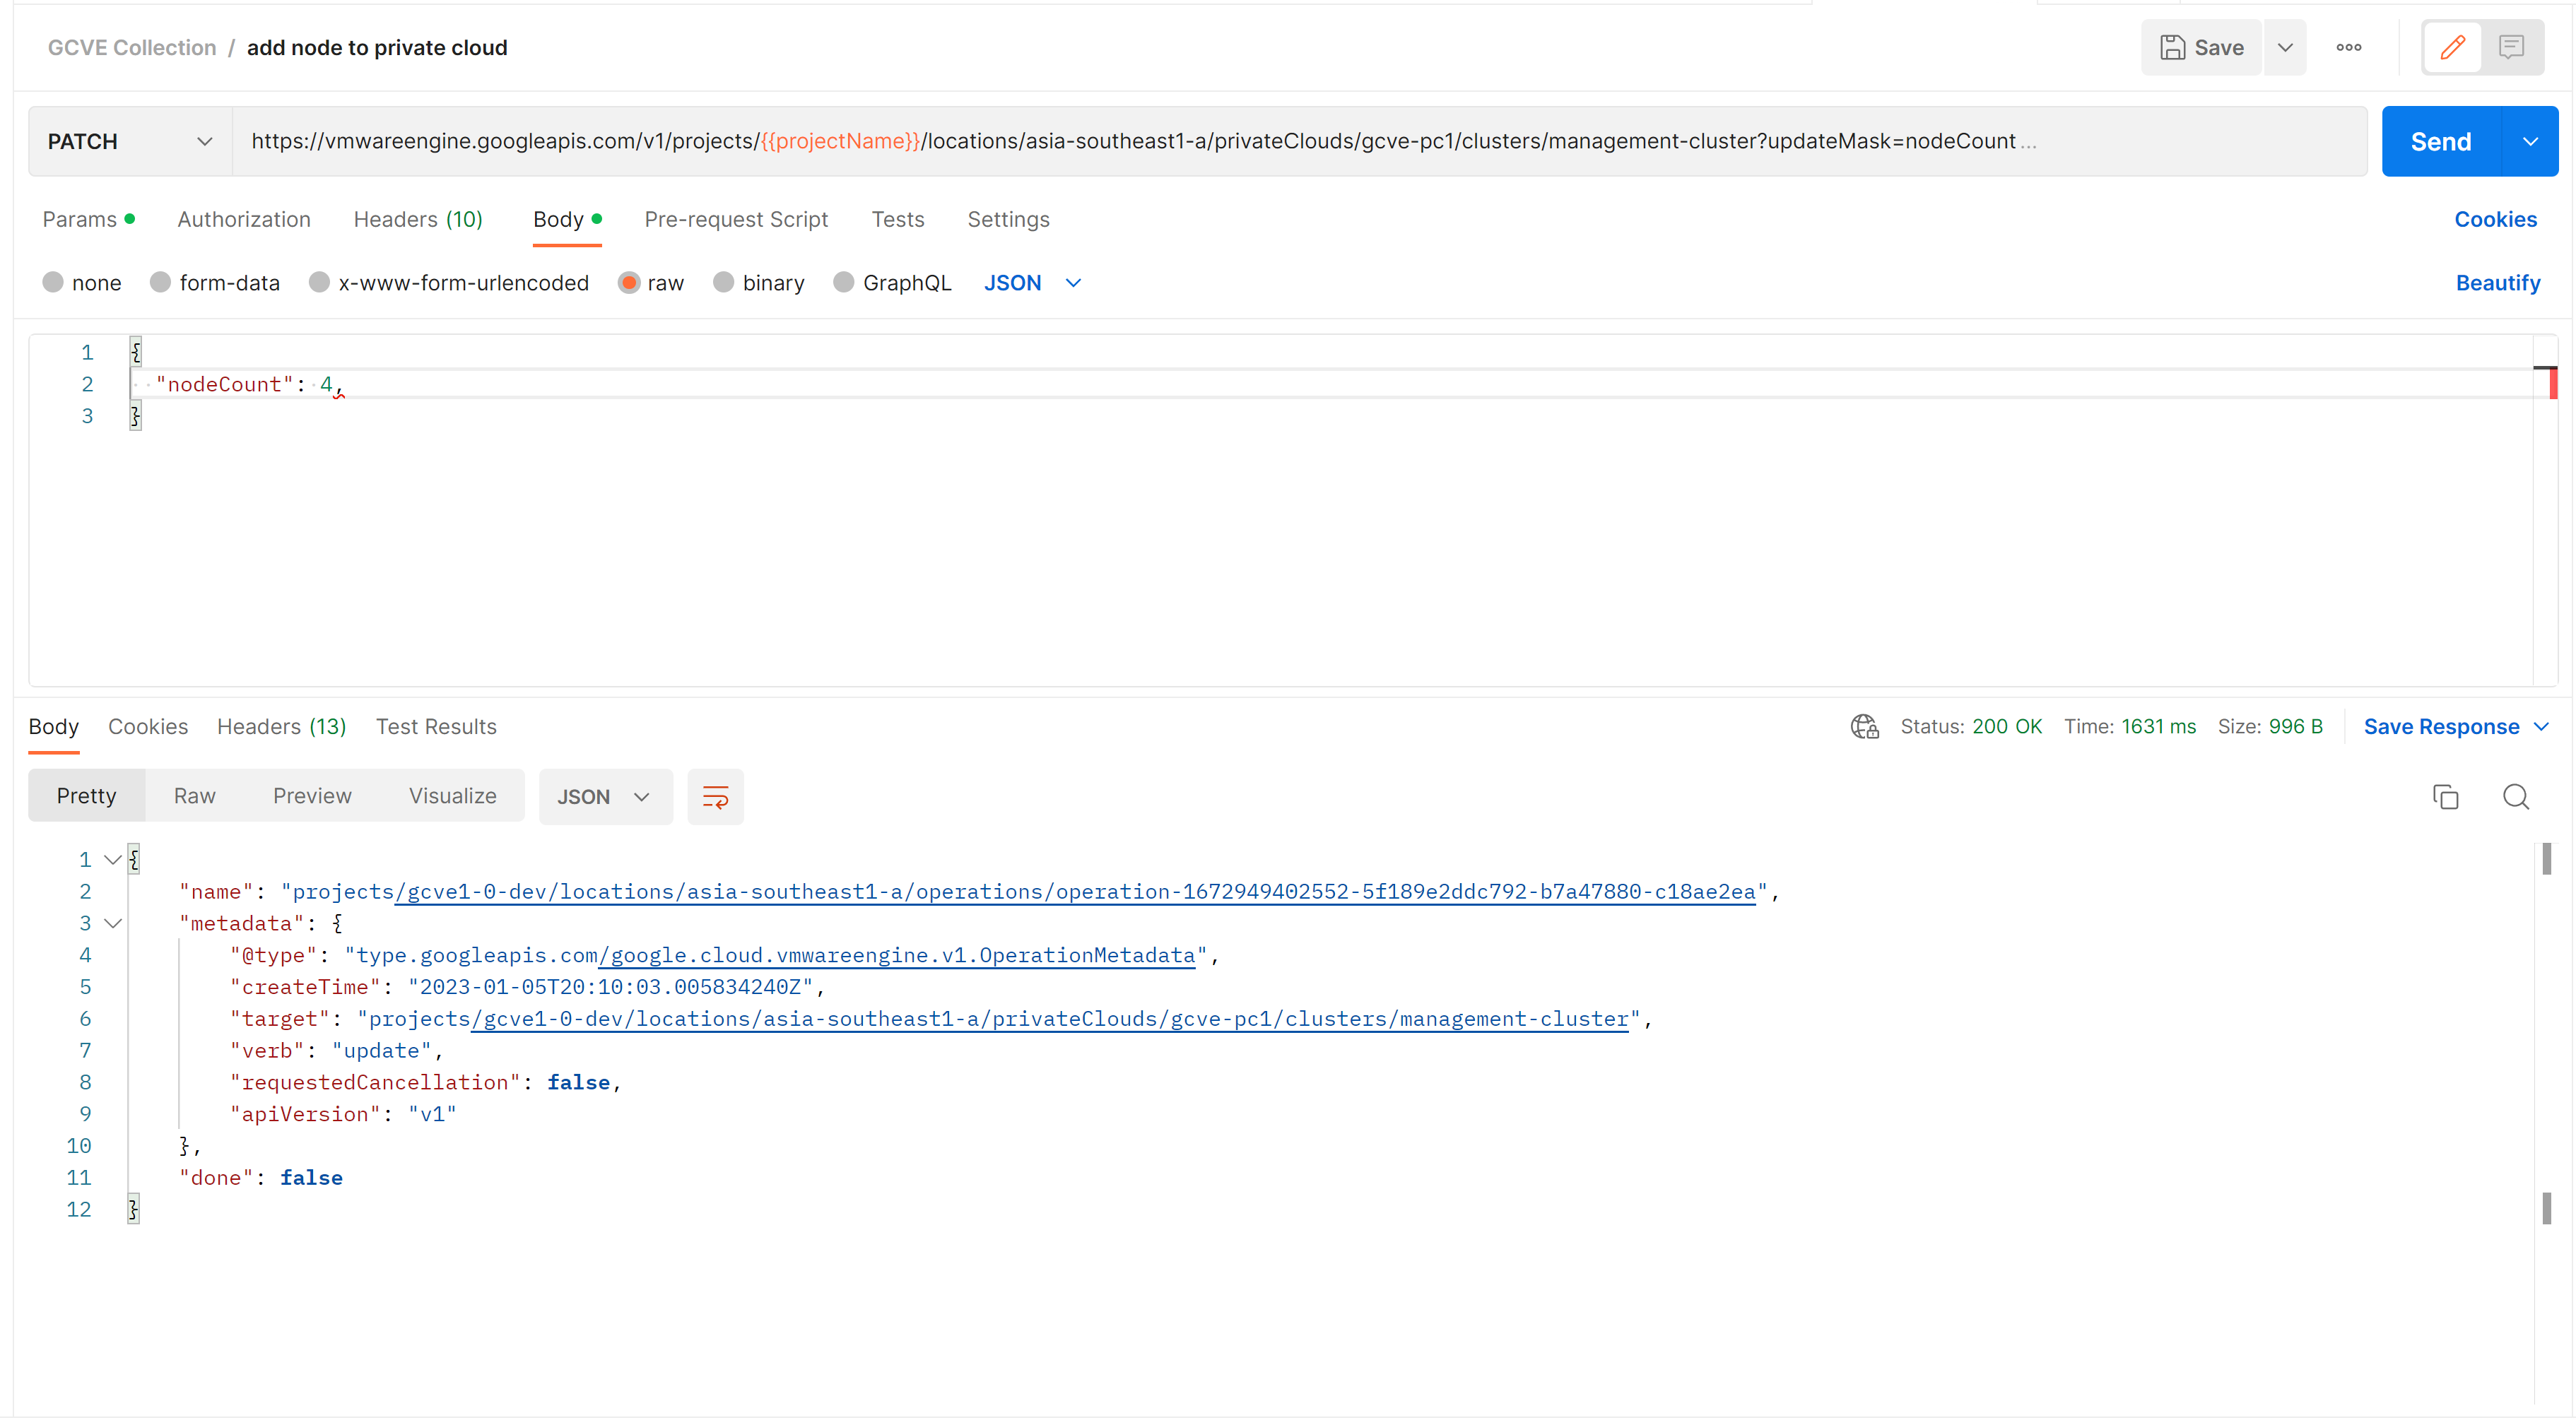
Figure 9 - Add node API call, and response from server
Deleting a Private Cloud
Now that you have looked at some of the deployment tasks, you will see how to delete a Private Cloud with the APIs
Examples used in this step:
(When building your request, please note that some of these examples may be used in the endpoint, while other may be contained in the body)
- Private Cloud Name = gcve-pc1
- Delay hours before delete = 1
- Private Cloud Zone = asia-southeast1-a
Steps to add a node to a Private Cloud with APIs
- Create a new API request – In this request, you will use the examples previously documented
- DELETE - https://vmwareengine.googleapis.com/v1/projects/{{projectName}}/locations/asia-southeast1-a/privateClouds/gcve-pc1?delayHours=1
- JSON Body – Leave blank
- Click Send. You should receive a Status 200 OK, indicating the call was accepted by the server
- The deletion process will take a few hours to complete. You can check status by referring to the Check Status of an operation section in this document.
- This API will return a response body that includes the value “done”
- “done” = false (Private Cloud deletion in progress)
- “done” = true (Private Cloud deletion complete)
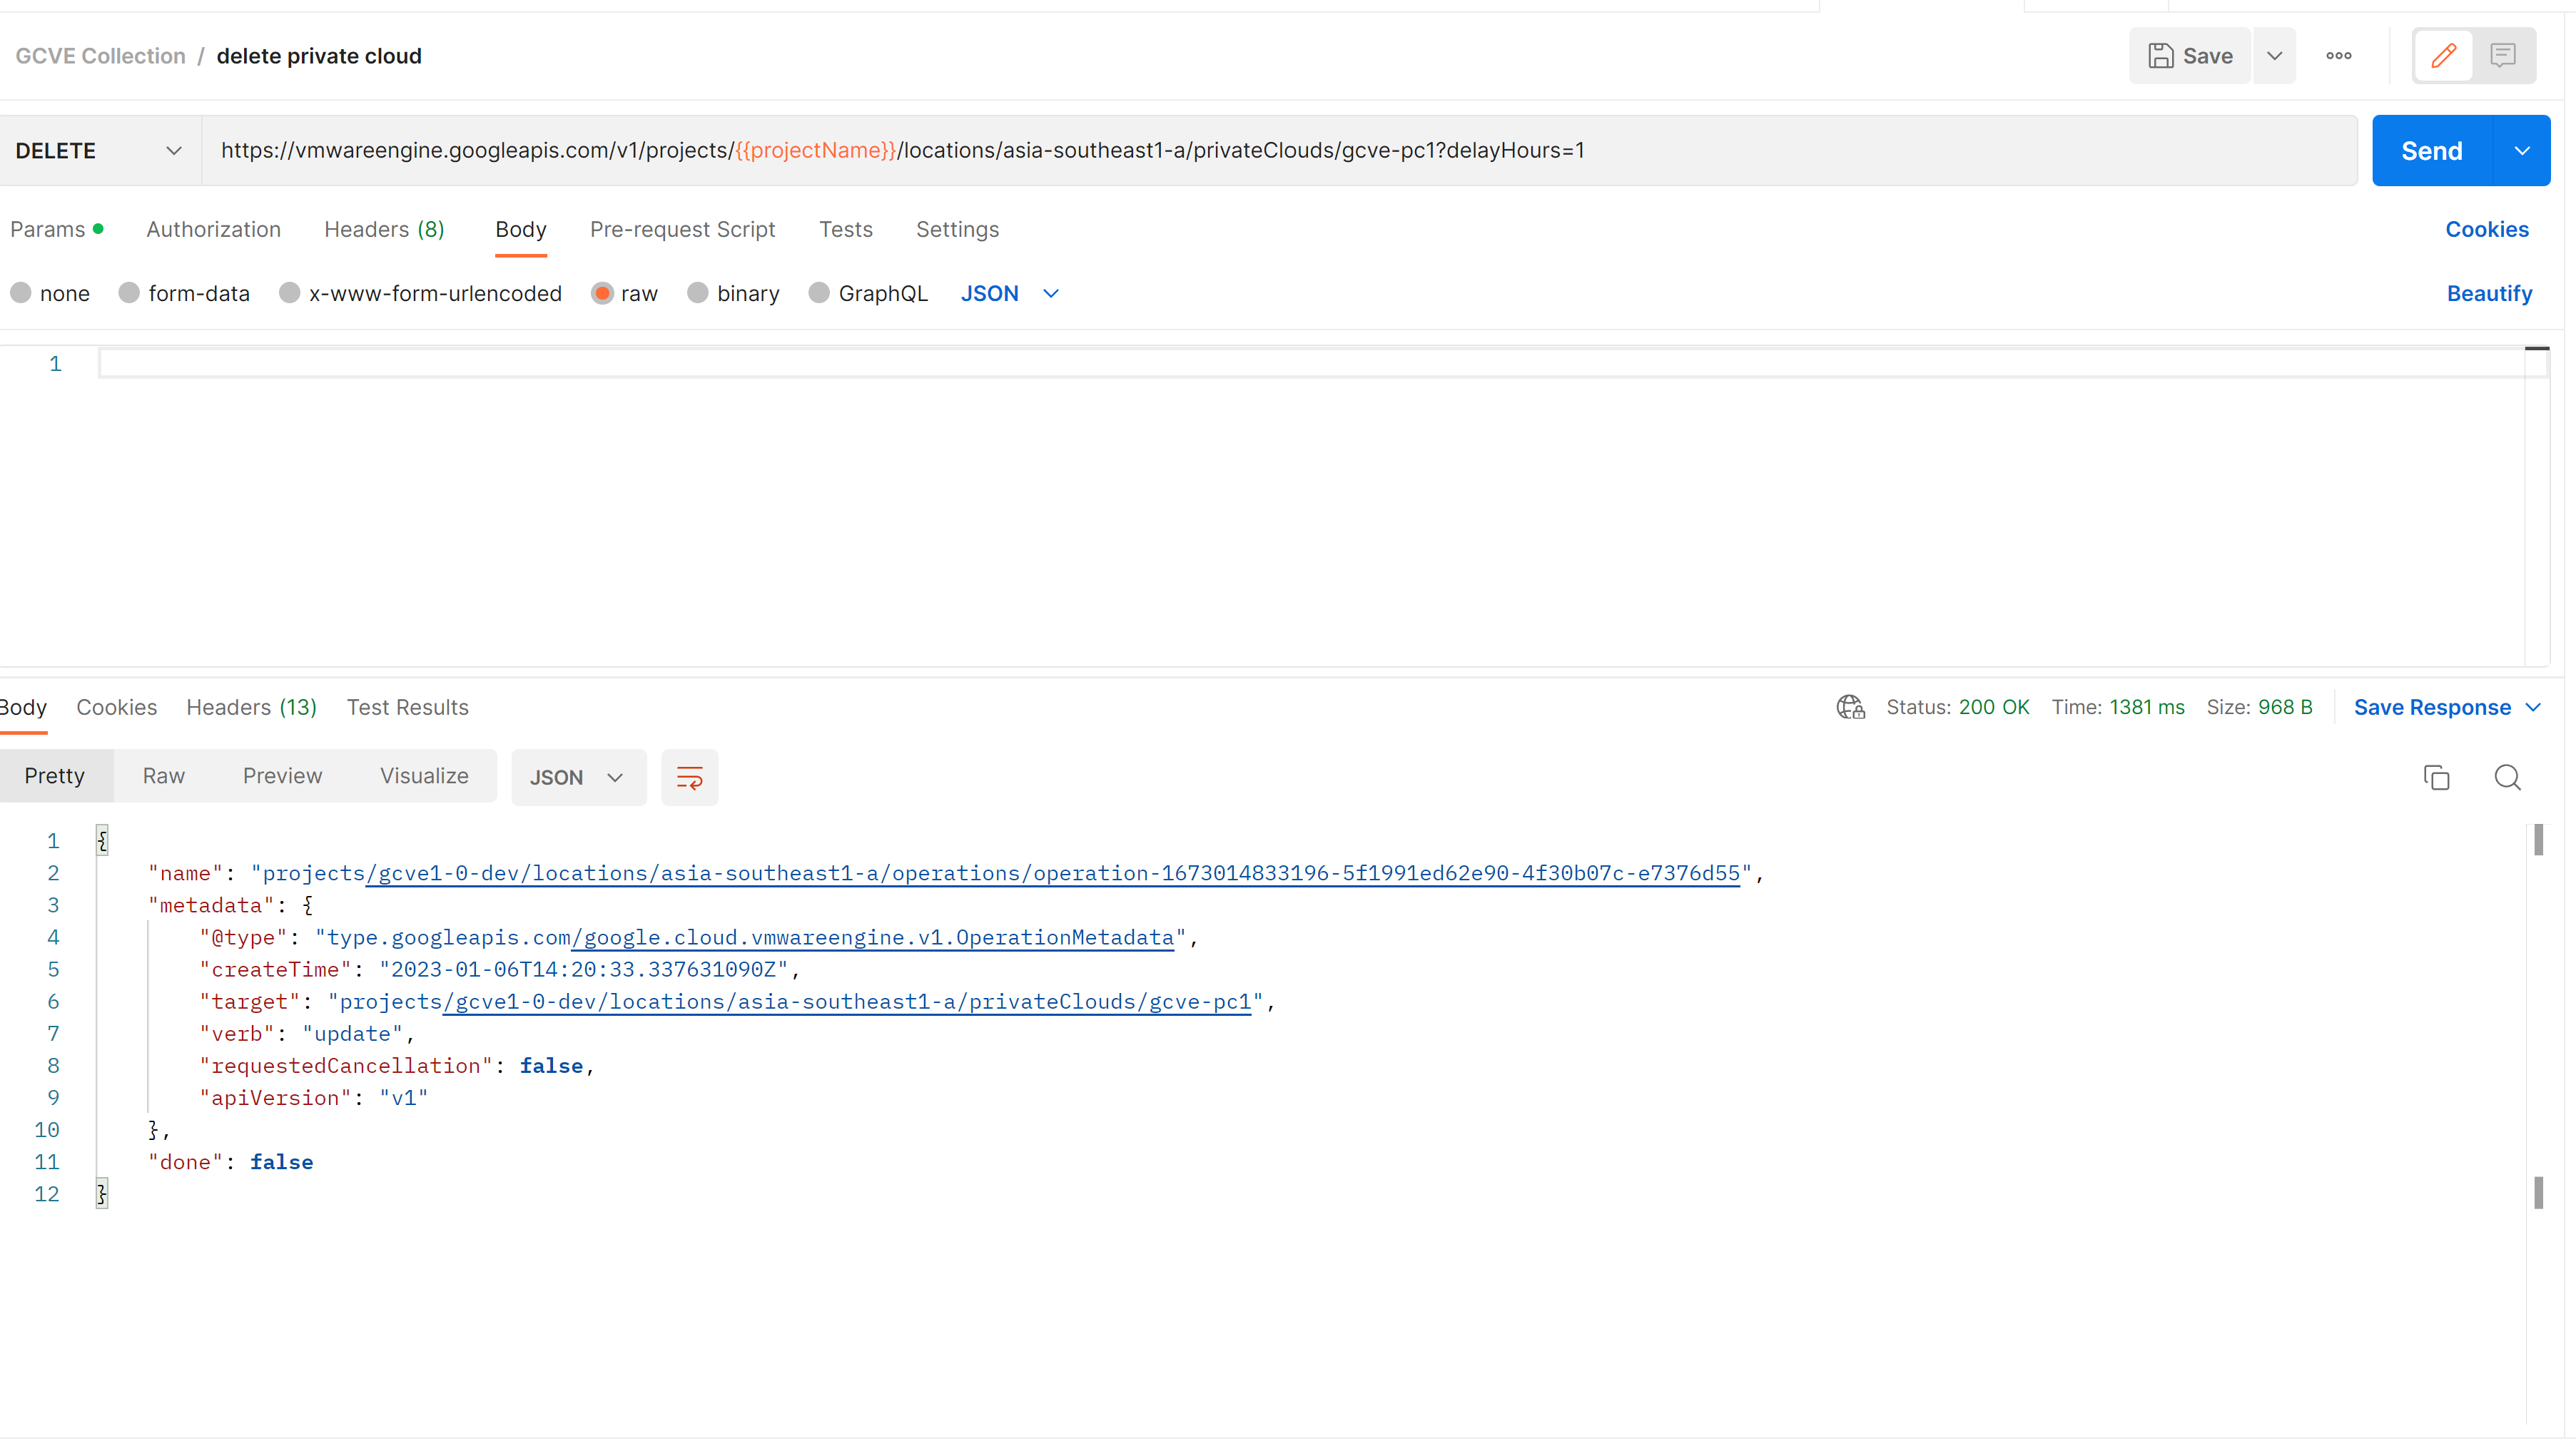
Figure 10 - Delete Private Cloud API call, and response from server
Check status of an operation
The previous examples showed how to build the API request, submit the request, and ensure you received a Status 200 OK response. That response indicates the server is processing you request and starting to deploy your Private Cloud. Some of these requests trigger lengthy processes and can take multiple hours to complete. You can check status on any of the operations through an additional API call. This status request will use an operation ID provided in the body of the response from each of the previous requests. In this example you will check status on the Private Cloud creation from a previous step.
Examples used in this step (When building your request, please note that some of these examples may be used in the endpoint, while other may be contained in the body)
- Private Cloud creation operation ID = operation-1672938131278-5f187430bcbec-82530f52-871cbea3
Steps to check status on Private Cloud creation with APIs
- Create a new API request – In this request, you will use the operation ID received from the previous request.
- Click Send. You should receive a Status 200 OK, indicating the call was accepted by the server
- This API will return a response body that includes the value “done”.
- “done” = false (Operation in progress)
- “done” = true (Operation complete)
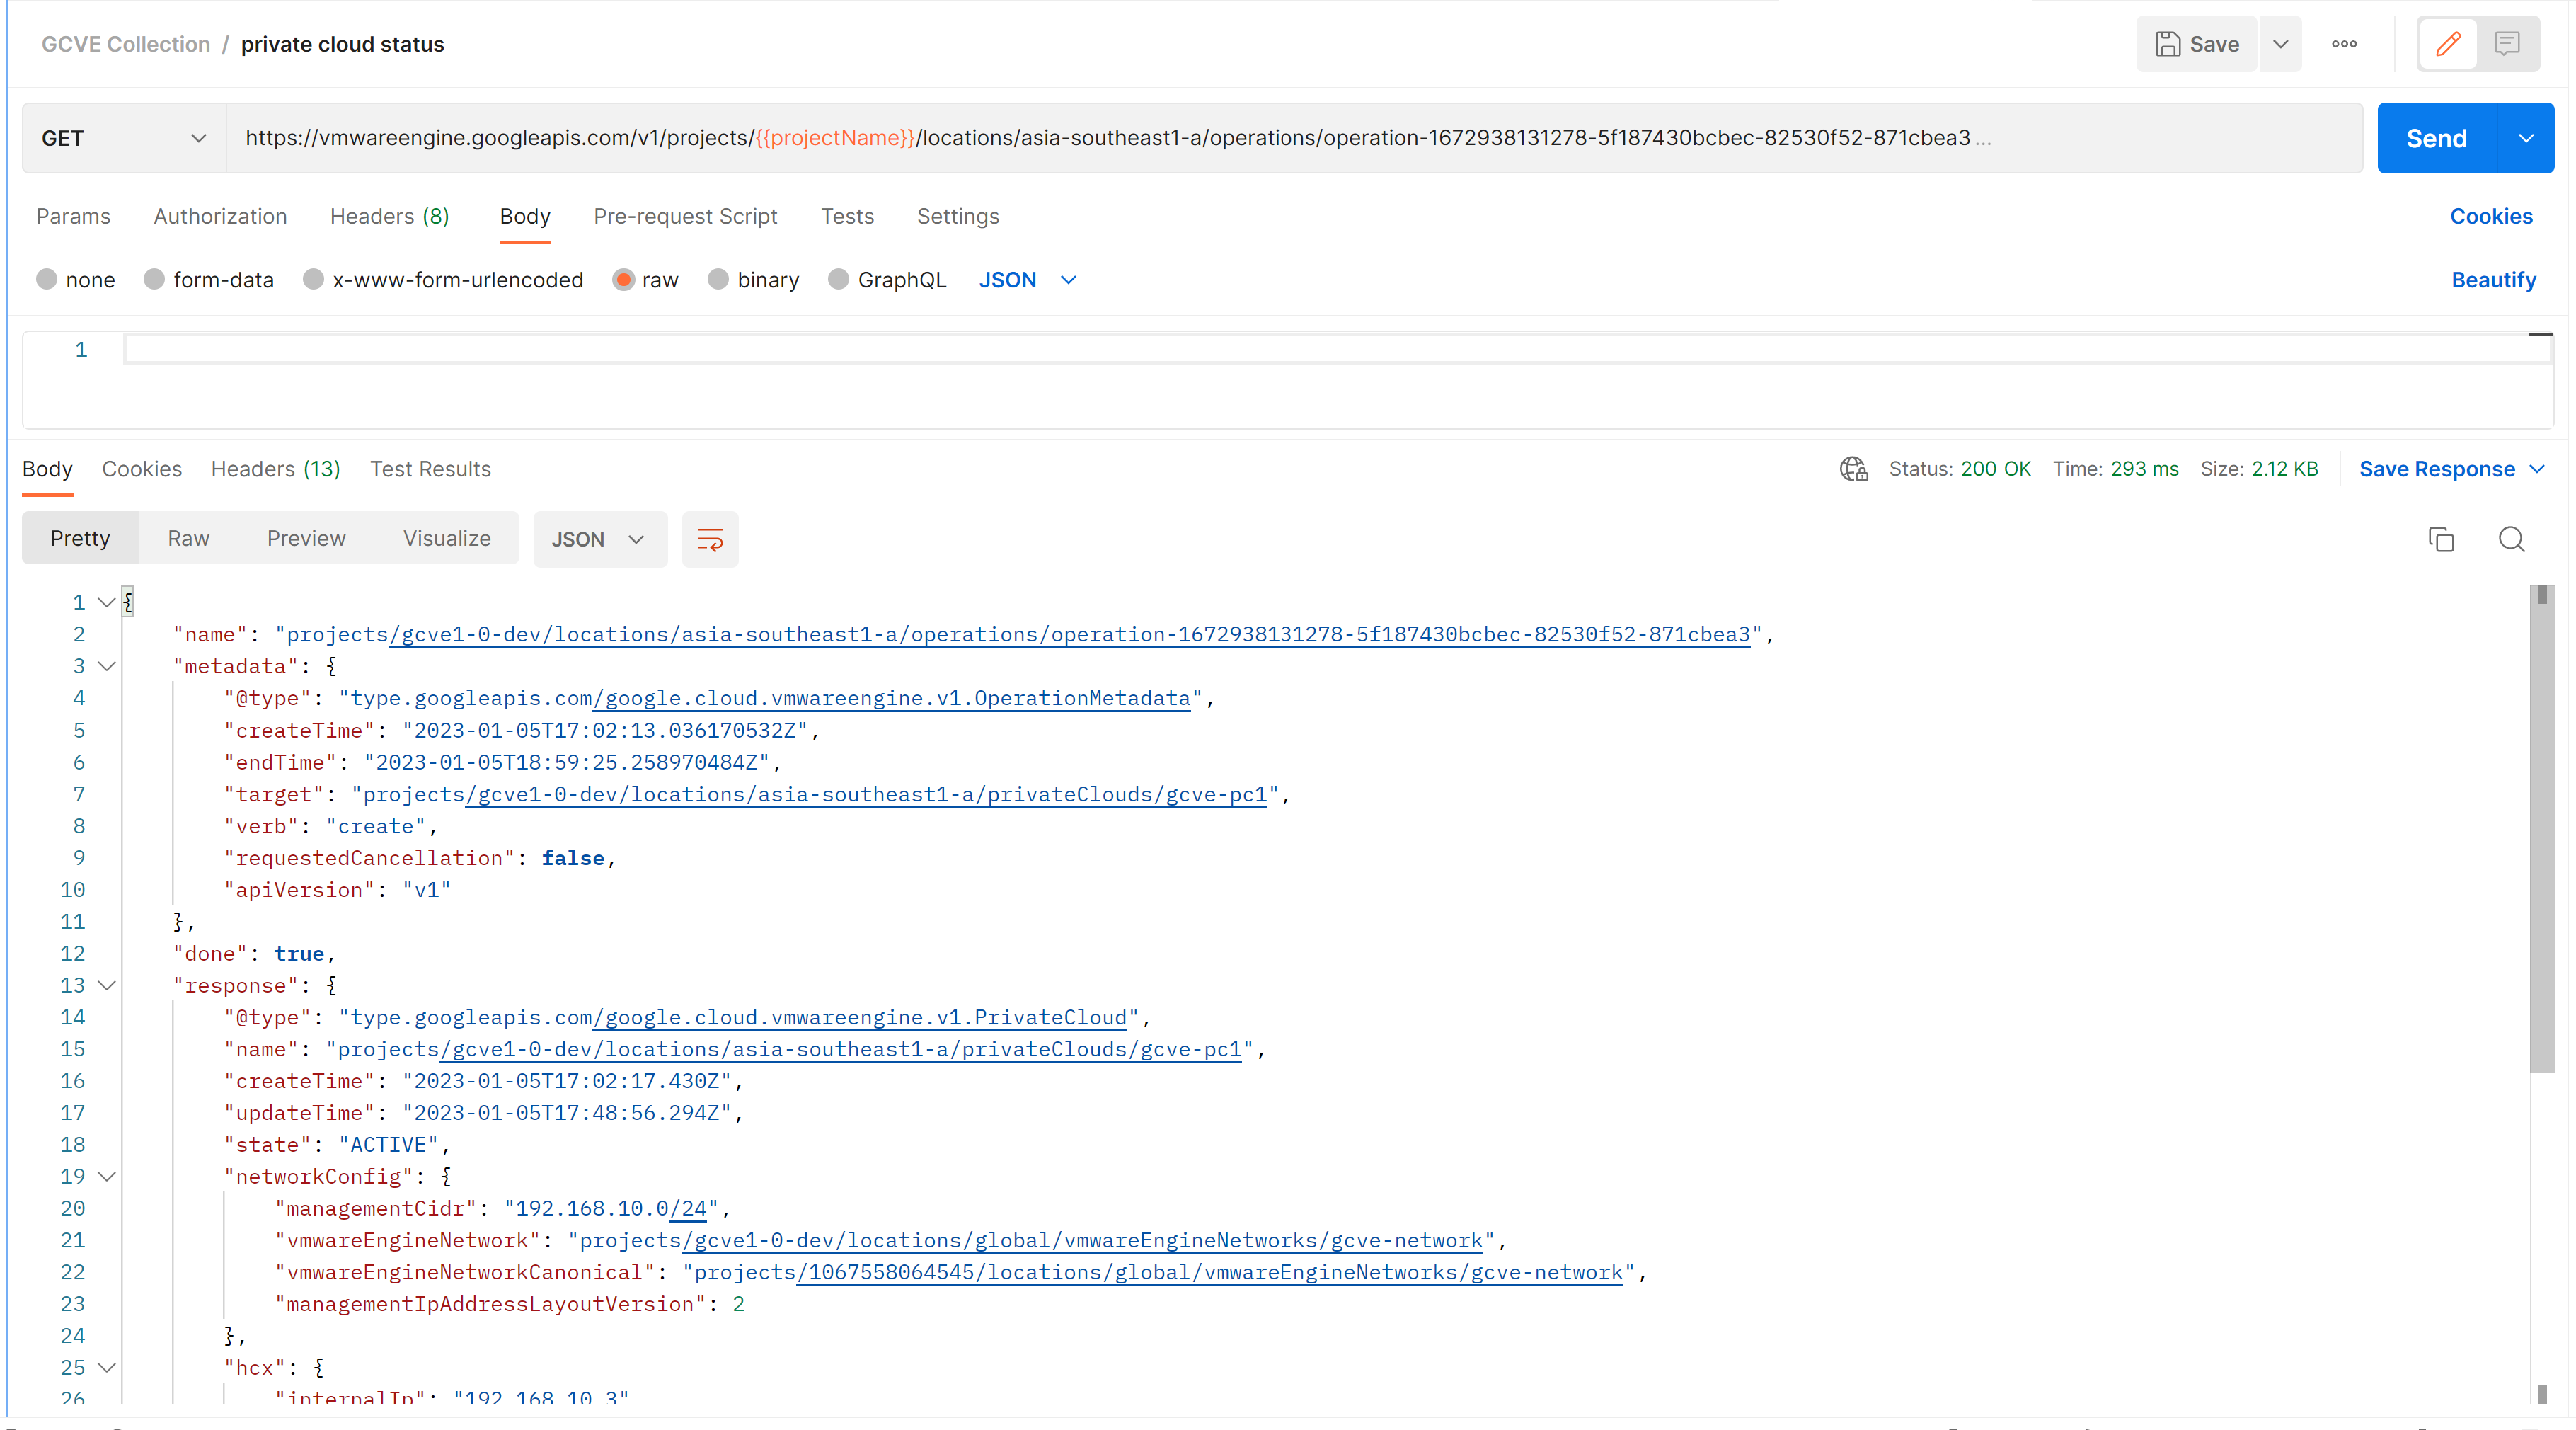
Figure 11 - Checking operation status API call, and response from server
Conclusion
Managing your GCVE environment with APIs opens new doors to automating your infrastructure. Automation can provide consistency, agility and efficiency when managing large environments. In this document we walked through the setup and execution of several lifecycle management tasks using APIs.
Additional Reading:
Getting started with Postman - https://learning.postman.com/docs/getting-started/settings/
Google Cloud VMware Engine API reference - https://cloud.google.com/vmware-engine/docs/reference/rest
Google Cloud VMware Engine Well Architected Framework - https://vmc.techzone.vmware.com/vmcwaf/gcve
Authors and Contributors
- Ian Allie, Sr. Technical Product Manager, VMware