
Designlet: A Brief Guide to Load Balancing Applications in VMware Cloud on AWS Using NSX Advanced Load Balancer
Introduction
Some of the key features of NSX ALB are:
- Autoscaling of load balancers and applications
- Web application analytics & performance insights
- Automation for IT, self-service for developers
Scope of the Document
This guide walks you through the process of configuring load balancing for web (HTTP) application servers. Refer to the NSX Advanced Load Balancer Documentation for configuring load balancing for custom applications.
Note: Web Server deployment & configuration is not in the scope of this document.
Summary and Considerations
|
Use Cases |
|
|
Pre-requisites |
|
|
General Considerations/Recommendations |
|
|
Cost Implications |
Public IPs are needed per DNS virtual service VIP. Public IPs are chargeable in VMware Cloud. To know more about the charges, see VMware Cloud on AWS Pricing Guide. |
|
Performance Considerations |
Service Engines are shared among Virtual Services, CPU/Memory reservations can be configured on the service engine VMs for guaranteed performance. |
|
Documentation reference |
NSX ALB Introduction & Architecture VMware Cloud on AWS Pricing Guide |
|
Last Updated |
July 2021 |
Configure Load Balancing
Create Persistence Profile
A persistence profile controls the settings that dictate how long a client will stay connected to one of the servers from a pool of load-balanced servers. Enabling a persistence profile ensures the client will reconnect to the same server every time, or at least for a desired duration of time. To know more about persistence profiles in NSX ALB, refer to the Avi documentation.
To create a new persistence profile, log in to the Avi Controller UI and navigate to Templates > Profiles > Persistence, and click Create.

Configure the following settings:
|
Name |
Name for the persistence profile |
|
Supported Type |
Supported types are Client IP Address, HTTP Cookie, App Cookie, HTTP Custom Header, and TLS. To learn more about persistence profile type, see the NSX ALB Documentation. |
|
HTTP Cookie Name:
|
A name that makes sense to you. |
|
Persistence Timeout |
Enter the number of minutes to preserve the client’s IP address in the Persistence Timeout field. A value of ‘0’ disables persistence and allows new connections to be load balanced to a new server immediately. Before configuring the timeout value, consult your application owner to understand the ideal timeout value for client connections. |
Note: Cookie-based persistence is the most commonly used mechanism when dealing with web applications. To learn more about this, see the Avi documentation on HTTP Cookie Persistence

Create Health Monitor
Health monitors are used by load balancers to check if the back-end servers in the server pool are healthy or not. If a back-end server has gone bad, the load balancer doesn’t forward any traffic to that server and ensures that client computers always get connected to healthy servers.
NSX ALB health monitor is explained in greater detail in the NSX ALB documentation.
To create a new health monitor profile, navigate to Templates > Profiles > Health Monitors and click Create.

Configure the following settings:
- Name: Name for the profile.
- Type: HTTP (For Web applications)
- Monitor Port: 80 (For HTTP Server)
- Response Code: 2XX
To learn more about the supported configuration parameters in a health monitor profile, see the Avi Networks documentation.


Create Server Pool
A Server Pool has a list of servers that must be load balanced.
To create a new server pool, navigate to Applications > Pools and click CREATE POOL.

Configure the following settings:
- Name: Name for the server pool.
- Persistence: Select the persistence profile that you created previously.
- Add Active Monitor and add the health monitor that created previously.

On the Servers page:
- Add the workload/servers that will be part of this pool.
- Port number if any custom port/service port is being used.

Create Virtual Service
Virtual services are the core of the NSX load balancing and proxy functionality. A virtual service advertises an IP address and ports to the external world and listens for client traffic.
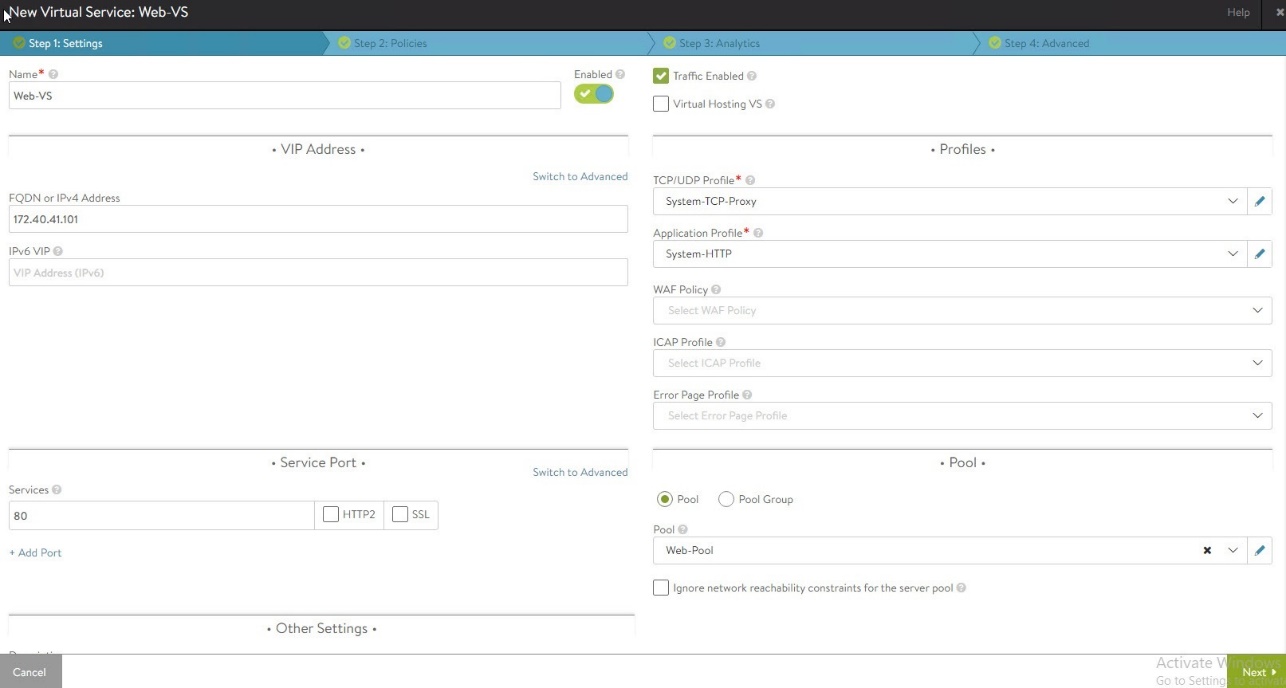
To create a new Virtual Service, navigate to Applications > Virtual Services > Create Virtual Service > Advanced Setup and configure the following settings:
- Name: Name for the Virtual Service.
- Enabled: The toggle icon enables (green) and disables (red) the virtual service.
- When enabled (green icon), the virtual service will accept and process traffic normally.
- When disabled (red icon), the virtual service will not accept any new connections. Existing concurrent connections will be terminated, and the virtual service will be unassociated from all Service Engines.
- Application Profile: Use the application profile pull-down menu to select how the virtual service will listen for client requests. This example shows the System-HTTP type for a web application.
- FQDN or IPv4 Address: IP Address of the VIP for the virtual server. Load balanced applications are accessed by accessing the VIP address.
- Service Port: 80.
- Pool: Select the server pool that you created previously.
On the Advanced page, configure the following settings:
- Auto Gateway: Return packets are sent to the source MAC address that is associated with the connection instead of returning client data via the default gateway of NSX ALB. Ensure that this option is selected.
- Use VIP as SNAT: Use the virtual IP as the SNAT IP for health monitoring and sending traffic to the back-end servers instead of the SE interface IP. That caveat of enabling this option is that the virtual service cannot be configured in an active-active HA mode
- SE Group: Choose system generated default SE Group.
Note: To learn about Policies and Analytics configuration of Virtual Services, refer to the Avi configuration guide.

The load balancer configuration is now complete.
Verify Load Balancer Health Status
To verify the status of the load balancer, ensure that Pool and Virtual Service status reports up and the health score for both is 100.
To check the status of the Pool, navigate to Applications > Pools and ensure that the pool health score is showing 100 and all backend servers are reporting as Up.
Note: It takes some time to build the health score.

Go to the Virtual Services tab to verify the score for Virtual Services.

Test Load Balancer
To ensure the load balancer is working as expected, ensure the web servers are reachable over the local IP address.
When you enter the VIP address, ensure that you get a response from every pool member.
Note: To access the application servers from the internet, assign a Public IP address to your SDDC and create a NAT rule mapping the Public IP address to the application server's private VIP address.
For instructions on how to create NAT rules, see the Create or Modify NAT Rules section in the VMware Cloud documentation.
For instructions on how to create firewall rules, see the Add or Modify Compute Gateway Firewall Rules section in the VMware Cloud documentation.