
Google Cloud DNS with Google Cloud VMware Engine
In a previous blog titled DNS Services Part of Google Cloud VMware Engine, we covered the basics of conditional forwarding to on-premises Microsoft Active Directory-integrated DNS servers. However, what if your organization wants to use a more cloud-native solution or one that doesn’t require additional server licensing? This post will show how simple it is to configure Google Cloud DNS to provide name resolution for applications and virtual machines in Google Cloud VMware Engine.
Getting Started
The first step in the process is enabling Google Cloud DNS. When opening the Cloud DNS console for the first time, you will automatically be prompted to enable the API (Figure 1). To find it click: Google Cloud Navigation Menu > More products > Networking > Network services > Cloud DNS.

Figure 1: Enabling the Cloud DNS API
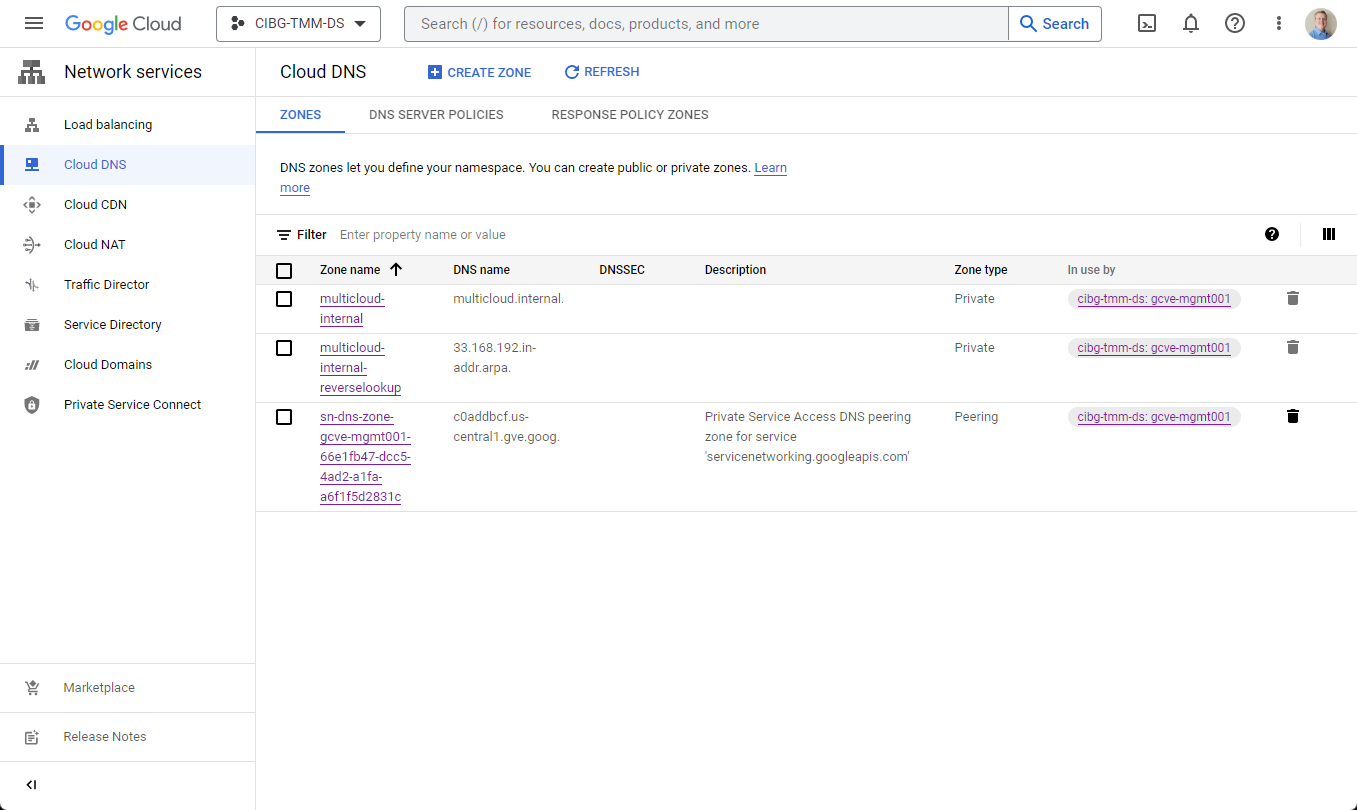
Google recommends enabling Cloud DNS before creating your first private cloud because the private cloud deployment workflow automatically creates a peering connection with your Google Cloud VMware Engine SDDC (see Figure 2). For setup assistance with configuring Cloud DNS with an existing private cloud, Google recommends contacting Cloud Customer Care.

Figure 2: Cloud DNS console displaying the automatically created peering zone for the private cloud
Finding your DNS IP addresses
The next step is to locate the Cloud DNS IP addresses assigned to your project. They can either be found in your VPC Network’s details screen under the Static Internal IP Addresses panel (see figure 3) or the VPC network IP addresses screen in the Internal IP addresses section (see figure 4).

Figure 3: Finding the DNS IP addresses - VPC Network > VPC Networks > Your VPC Network > Static Internal IP Addresses
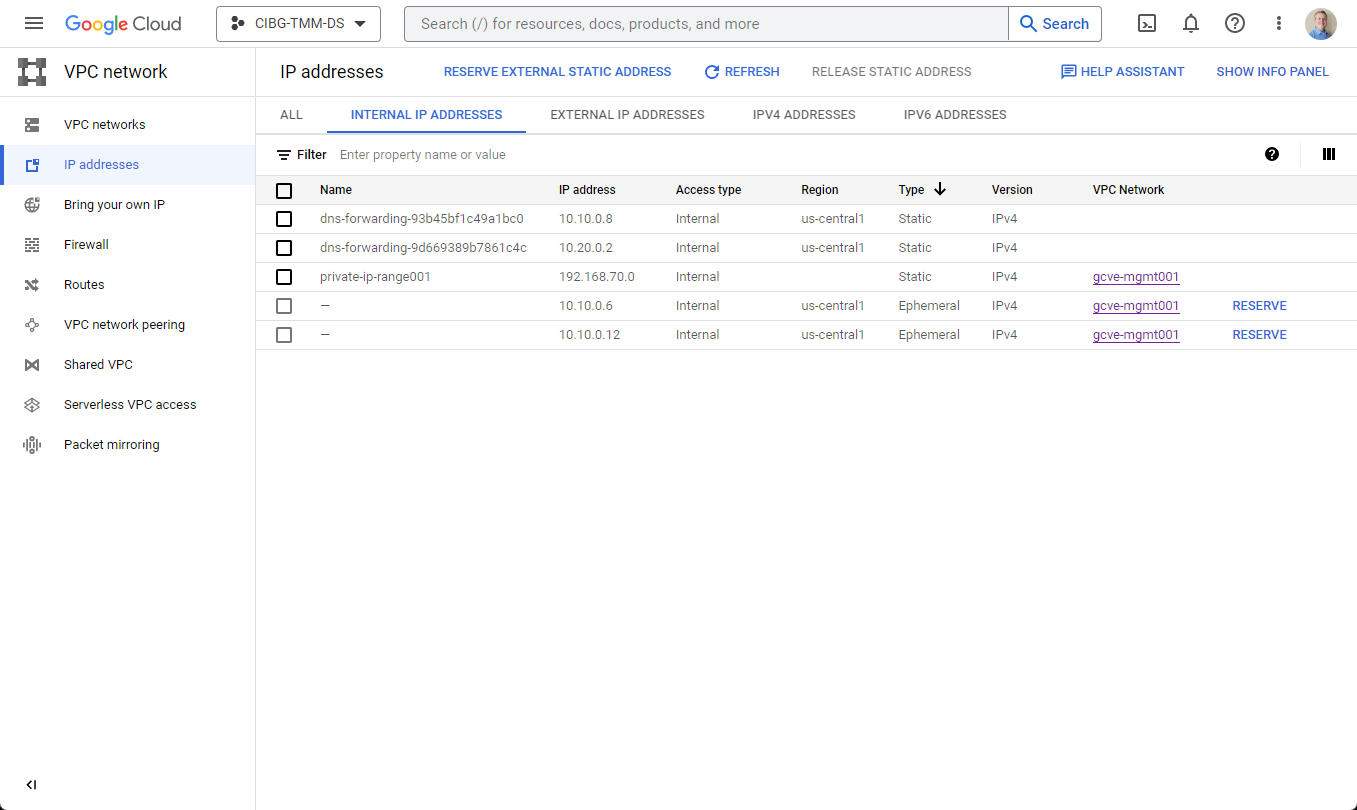
Figure 4: Finding the DNS IP addresses - VPC Network > IP Addresses > Internal IP Addresses
In this environment, the Cloud DNS servers are named “dns-forwarding-uniqueid” and are assigned IP addresses of 10.10.0.8 and 10.20.0.2. Note that these Cloud DNS IPs are created automatically for each subnet or region in your VPC network.
Creating a DNS Zone
Now that the initial prerequisites are completed, we can start by creating a new private or public zone (see Figure 5). For this example, I am creating a private zone for an internal website, so it will only be visible internally to Google Cloud networks.
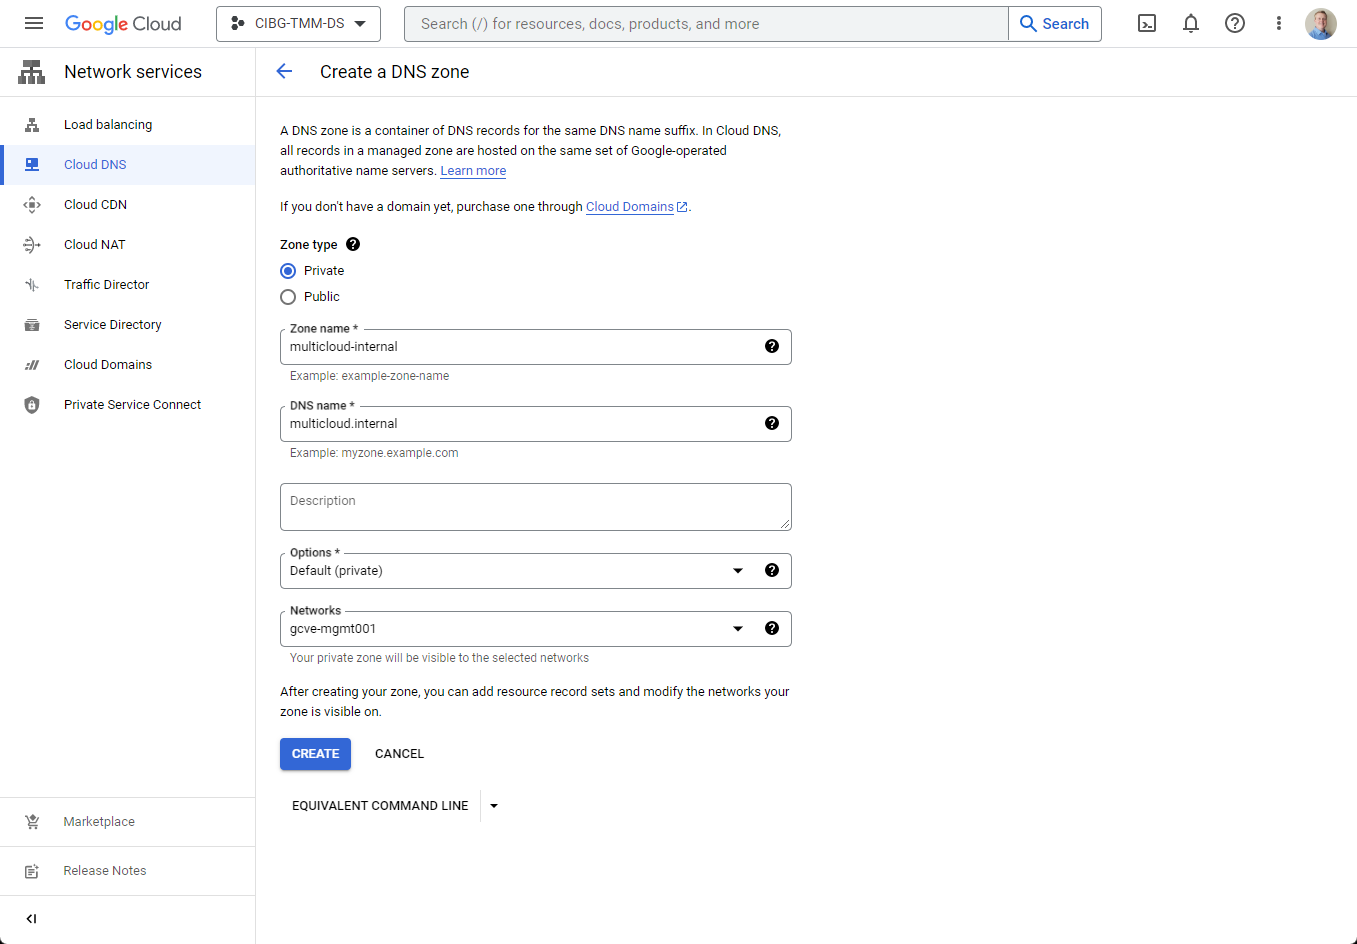
Figure 5: Creating a new private zone for my internal website
After the zone is created, I can create the A records for my hosts. I have assigned www.multicloud.internal to 192.168.33.50, serving as the virtual IP (VIP), and the web server nodes named web01-web03 are assigned 192.168.33.51-53 (see Figure 6). Since I want this website to be highly available, once the name resolution is functioning, the plan is to also configure the NSX Advanced Load Balancer (NSX ALB) to distribute the load between web servers.

Figure 6: The new zone with all the new DNS A records created
Bidirectional name resolution testing
Now that the new zone is created, we can perform some DNS queries to test the bidirectional resolution between the Google Cloud VMware Engine DNS servers and the Google Cloud DNS servers. To show the current state of the relationship, we can use nslookup (Windows – Figure 7) or dig (Linux – Figure 8) to test lookups from both sides.

Figure 7: Using Windows nslookup to query names from both Google Cloud VMware Engine and GCP
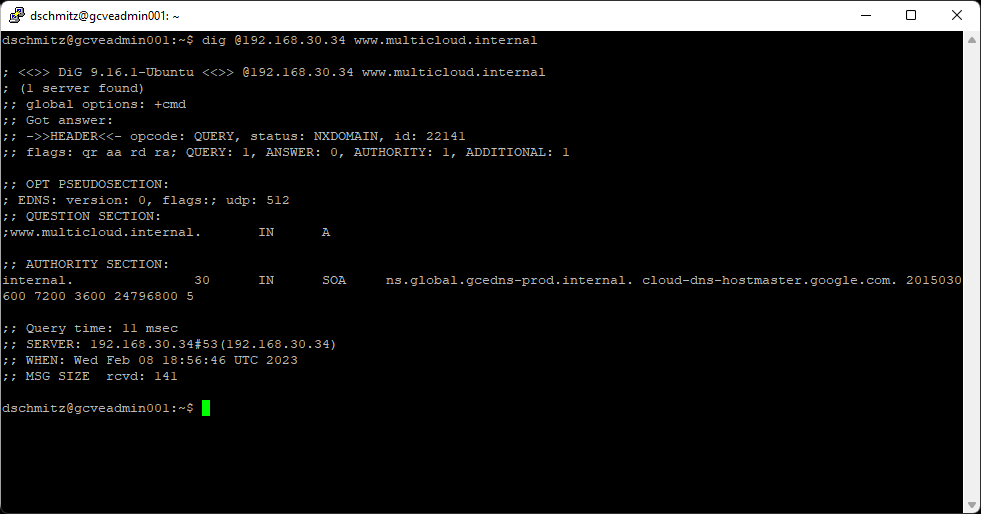
Figure 8: Using Linux dig command to query names from a Google Cloud VMware Engine DNS server
Take a moment to examine figures 7 & 8, some queries work, and some do not. What you may have noticed is the following:
- Cloud DNS Server (10.10.0.8) can resolve the private cloud’s gve.goog entries for vCenter, ESXi, NSX, etc.
- Cloud DNS Server (10.10.0.8) can resolve the newly created multicloud.internal records
- Google Cloud VMware Engine DNS Server (192.168.30.34) cannot resolve multicloud.internal records
For the Google Cloud VMware Engine DNS Servers to resolve the new multicloud.internal records, I need to create a DNS peering connection and modify the Google Cloud VMware Engine DNS profile assigned to my private cloud.
Creating the DNS Peering connection
For the Google Cloud VMware Engine DNS servers to resolve Cloud DNS zones, I must first create the private services DNS peering connection for multicloud.internal. For each Cloud DNS zone that needs name resolution, I need to use the “gcloud services peered-dns-domains create” command from the Cloud Shell console (see figure 9).

Figure 9: Using the Cloud Shell to create a peered DNS domain for a private service connection
Creating/modifying the DNS profile
Once creating the peering connection has finished successfully, the second step is to create (or modify) the Google Cloud VMware Engine DNS profile. From the VMware Engine networking screen, select DNS Configuration, then add the domain names and their respective Cloud DNS server IPs to the profile. Once finished, assign the profile to the private cloud (see figure 10).

Figure 10: Assigning the DNS profile to the private cloud
Note: The DNS profile requires two DNS server IPs be added for each domain. If you don’t have two Cloud DNS IP addresses, you can add a second subnet to your VPC network, and a second IP will be automatically generated.
Testing the bidirectional name resolution
With all the pieces in place, both sets of DNS servers should be able to resolve addresses for both Google Cloud VMware Engine infrastructure and Google Cloud DNS (see figure 11).

Figure 11: Testing name resolution of the multicloud.internal zone from both sets of DNS servers
Reverse lookup zones
If you need reverse lookups, the zone creation process is very similar. Simply identify the subnet that you want reverse lookups from, and create an “xxx.xxx.xxx.in-addr.arpa” zone (see figure 12).

Figure 12: Creating the reverse lookup zone
In this example, since the web server’s subnet is 192.168.33.xx, the DNS name needs to be “33.168.192.in-addr.arpa.”.
Now, with the reverse lookup zone submitted, all that remains is to create the PTR records matching the IP addresses for each of the hosts (see figure 13).
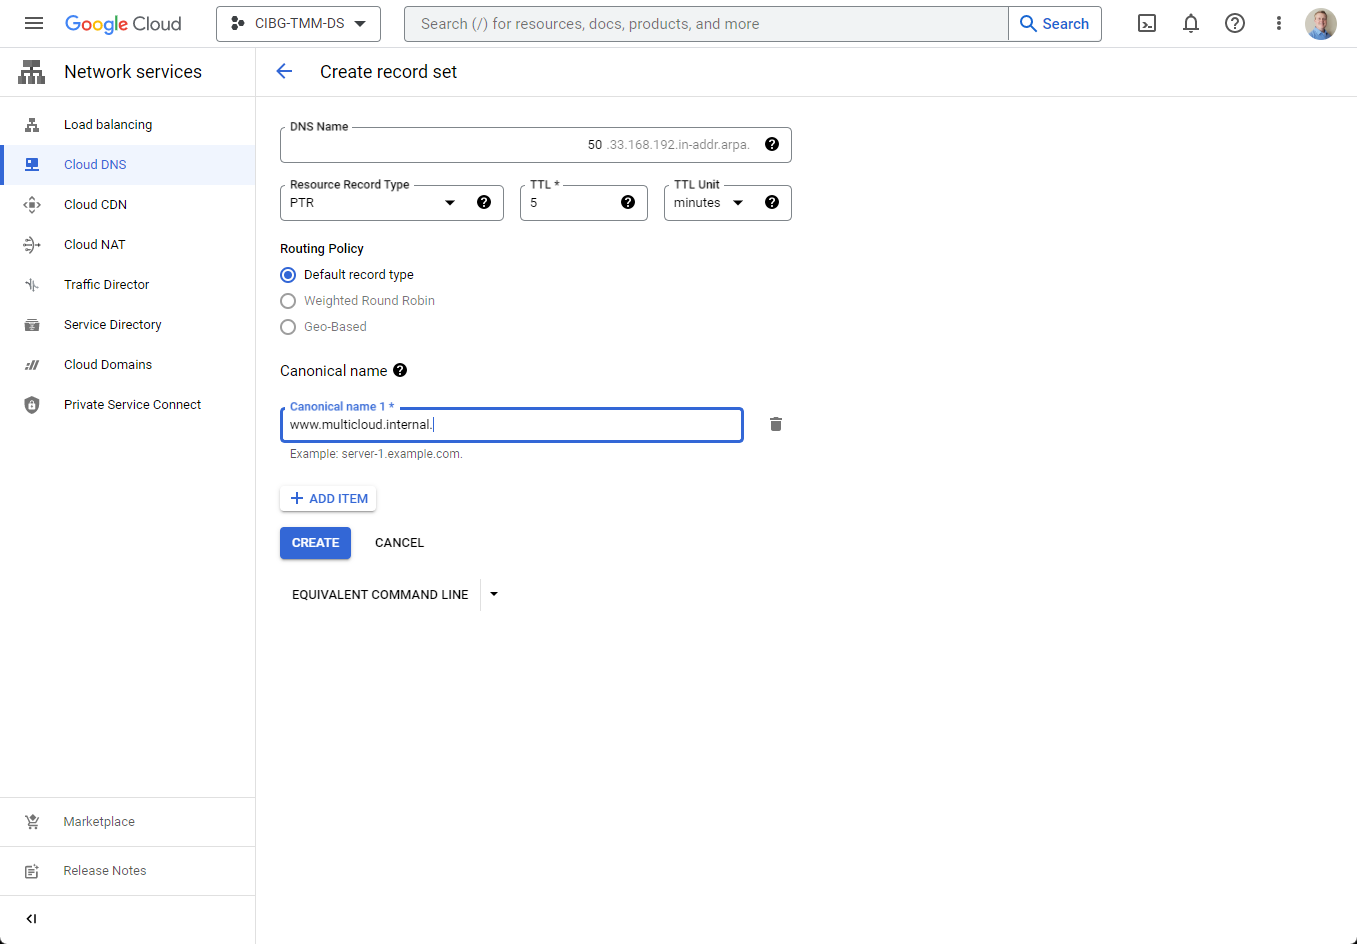
Figure 13: Creating the PTR records for each host
For the record set, be sure to select PTR as the Resource Record Type and remember to include the trailing period at the end of the canonical name, or it will display an error and not let you proceed.
When completed, all of the web server’s reverse lookup records will look like in figure 14.

Figure 14: Reverse lookup zone details showing the PTR records for the hosts
With all the forward lookup zones, reverse lookup zones, A records, and PTR records completed, a final test shows that the reverse lookup is finally completely functional (see figure 15).

Figure 15: Reverse lookup of the Cloud DNS addresses
Wrap-up
Hopefully you can see how using Google Cloud DNS in conjunction with Google Cloud VMware Engine is a quick, easy, and cost-effective way to add name resolution to your environment. For more information, demo videos, and blogs about Google Cloud VMware Engine, check out VMware Cloud Tech Zone.