
Virtual Trusted Platform Module (vTPM 2.0) with Google Cloud VMware Engine
Last month, Google formally announced that vTPM 2.0 is now supported within Google Cloud VMware Engine. This new ability allows administrators to add a Trusted Platform Module device to virtual machines that require specific software security capabilities. Most notable is Microsoft Windows 11, in which TPM was made a system requirement for installation to help increase security against firmware attacks.
This article will help you get started with enabling vTPM 2.0 in your Google Cloud VMware Engine private cloud and give you the additional settings for creating a Windows 11 virtual machine template.
Setting the default key provider
The first step in the process is to set the default key provider to enable vTPM modules to be added to virtual machines. By default, each Google Cloud VMware Engine private cloud uses a highly available Google-managed key provider within vCenter. This is the same key provider vSAN uses for data-at-rest encryption (DARE) in the environment, so it can also be conveniently used for vTPM.
To set the Google key provider as default, the CloudOwner@gve.local privileges must first be elevated. (An hour should be enough time to make the necessary changes.)
After logging out of and back into the vSphere client with the elevated privileges, navigate to Hosts and Clusters > Select the top-level vCenter name > Configure > Key providers. You will see the Google key provider named kmip-<UUID> on this screen. Google recommends using either the Google-managed default key provider or an external KMS for production environments. If you are not using an external KMS, the existing key provider can be used by clicking SET AS DEFAULT (see figure 1).
 Figure 1: Setting the Google-managed key provider as default
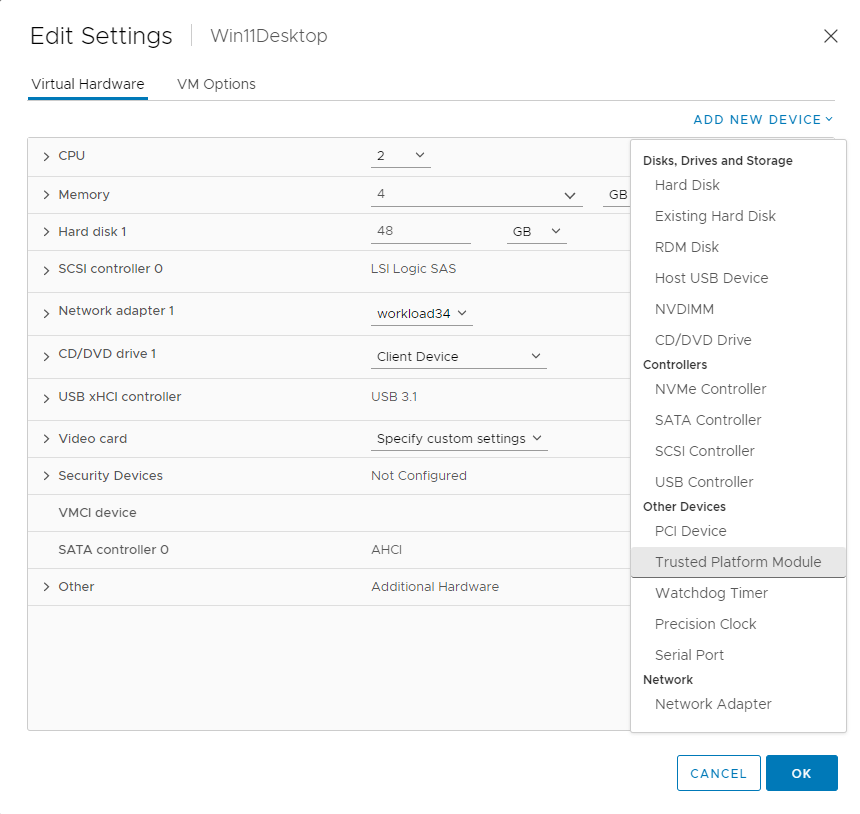
With a default key provider set, adding a Trusted Platform Module to virtual machines is now enabled (see figure 2).
 Figure 2: Adding a new Trusted Platform Module to the virtual machine
Note: When you create the new virtual machine through the wizard, provide the name, folder, resources, and storage, then select the latest hardware version 19 (ESXi 7.0 U2 and later). When prompted for the operating system, the Microsoft Windows 11 guest OS version is unavailable within vSphere 7, so you must choose Microsoft Windows 10 (64-bit) instead. Depending on the version of Windows 11 being installed, the PVSCSI and VMXNET3 device drivers may be included in the ISO image. This would allow the recommended PVSCSI and VMXNET3 devices to be installed through the Windows out-of-box experience. For important information about Windows 11 installation, vTPM, and cloning considerations, see the Windows 11 support resources.
Before continuing, select the VM Options tab, then make sure that the Encrypted vMotion and Encrypted FT are changed from Opportunistic to Required and that the EFI Secure Boot is enabled (see figure 3).
 Figure 3: Selecting the VM Encryption and Boot options for the virtual machine
Once those settings are complete, you can connect or mount a Windows 11 ISO image from a content library or datastore and begin the operating system installation. When finished, VMware tools can be installed, the in-guest device drivers can be updated, and the image can be converted or cloned to a template for future deployments.
Takeaway
Now that vTPM 2.0 enables Windows 11 virtual machines in Google Cloud VMware Engine, this will allow for more flexibility and added security to your deployments. For more information about Google Cloud VMware Engine, please visit VMware Cloud Tech Zone.