
VMware Cloud App Modernization Evaluation Guide
Summary
As enterprises go through their digital transformation journey, one of the things slowing them down is their current application estate. Enterprises across verticals and size have realized that application transformation must be a part of their cloud journey. For years customers have trusted VMware’s product portfolio to run their most mission critical applications and they are now turning to VMware to help them in their digital transformation.
To help customers accelerate their application transformation initiatives, VMware Cloud on AWS customers can use Application Transformer for VMware Tanzu to discover, analyze, and transform their current application portfolio for a cloud native deployment architecture. This document will walk you through how Application Transformer for VMware Tanzu:
- Can be deployed with a VMware Cloud on AWS SDDC
- Can discover running applications on the SDDC
- Provides a view of the application topology
- Transforms selected applications to container format
Prerequisites
- New or existing VMware Cloud on AWS (VMConAWS) SDDC
- Network connectivity on port 443 from the Application Transformer for Tanzu Virtual Appliance to SDDC vCenter Server
- Network connectivity on port 443 from the Application Transformer for Tanzu Virtual Appliance to SDDC ESXi Host
- Static IP Address and DNS Hostname for Application Transformer for Tanzu Virtual
- vRealize Network Insight Cloud Proxy must be deployed:
- Credentials to vCenter Server (cloudadmin@vmc.local)
- Credentials to NSX Manager (CSP Token with Cloud and NSX Administrator roles)
Installation
You must first configure the SDDC Firewall Configuration and deploy vRealize Network Insight Cloud and Application Transformer for Tanzu.
SDDC Firewall Configuration
Step 1 –
- Log in to the VMware Cloud on AWS Console and navigate to the Networking and Security tab.
- Select Groups on the left-hand menu and create a new Compute Groups called Tanzu-App-Transformer and click on Set Members to specify the IP Address that will be used for the Application Transformer for Tanzu Virtual Appliance. In this example, the Application Transformer for Tanzu Virtual Appliance is placed in the sddc-cgw-network-1 network and will have an IP Address of 192.168.1.20.

Step 2 - Create another Compute Groups called VMC Management Network and click on Set Members to specify the SDDC Management CIDR. In this example, the SDDC Management CIDR is 10.2.0.0/16

Step 3 - Create a new Management Groups called Tanzu-App-Transformer and click on Set Members to specify the IP Address that will be used for the Application Transformer for Tanzu Virtual Appliance. In this example, the IP Address will be 192.168.1.20.
Step 4 - Navigate to the Gateway Firewall settings in the left-hand menu and create the following Compute and Management Gateway firewall rules to allow connectivity between the Application Transformer for Tanzu Virtual Appliance and the SDDC vCenter Server and ESXi hosts.
Compute Gateway Firewall Rules
|
Rule Name |
Sources |
Destination |
Services |
|
App Transformer to VMC Management |
Tanzu-App-Transformer |
VMC Management Network |
HTTPS |
|
App Transformer to vRealize Network Cloud |
Tanzu-App-Transformer |
ANY |
HTTPS |
Click Publish to create the Compute Firewall rules.
Management Gateway Firewall Rules
|
Rule Name |
Sources |
Destination |
Services |
|
App Transformer to vCenter Server |
Tanzu-App-Transformer |
vCenter |
HTTPS |
|
App Transformer to ESXi |
Tanzu-App-Transformer |
ESXi |
HTTPS |
Click Publish to create the Management Firewall rules.
Note: ESXi connectivity is required for property functionality of Application Transformer for VMware Tanzu where in-guest application collection is performed using the Guest Operations API.
vRealize Network Insight Cloud Deployment
It is highly recommended that you deploy the vRealize Network Insight Cloud Proxy Appliance that will aid in the application discovery when using Application Transformer for Tanzu. For customers that are currently not entitled to vRealize Network Insight Cloud, VMware offers a full-featured 30 days vRealize Network Insight Cloud free trial as well as an on-demand subscription for vRealize Network Insight Cloud.
Step 1 - Open the vRealize Network Insight Cloud service and select the VMware Cloud on AWS deployment option.

Step 2 - Download the OVA to your local system or import the OVA using the given URL to deploy the vRealize Network Insight Cloud Proxy OVA

During the OVA import, you must provide the unique shared secret that will allow the vRealize Network Insight Cloud Proxy to connect back to vRealize Network Insight Cloud service. Power on the VM after the import has completed and use the VM Console and the instructions provided within the terminal to configure the VM.
Step 3 - After the vRealize Network Insight Cloud Proxy has been detected, add your VMware Cloud on AWS vCenter Server and NSX Manager.


After you have successfully deployed the vRealize Network Insight Cloud Proxy, you must wait for a minimum of 4 hours for data collection by the proxy before you can configure the Application Transformer for Tanzu.”
Application Transformer for Tanzu OVA Deployment
Step 1 – Log in to the VMware Cloud console and navigate to the Tools menu to download the Application Transformer Virtual Appliance OVA.
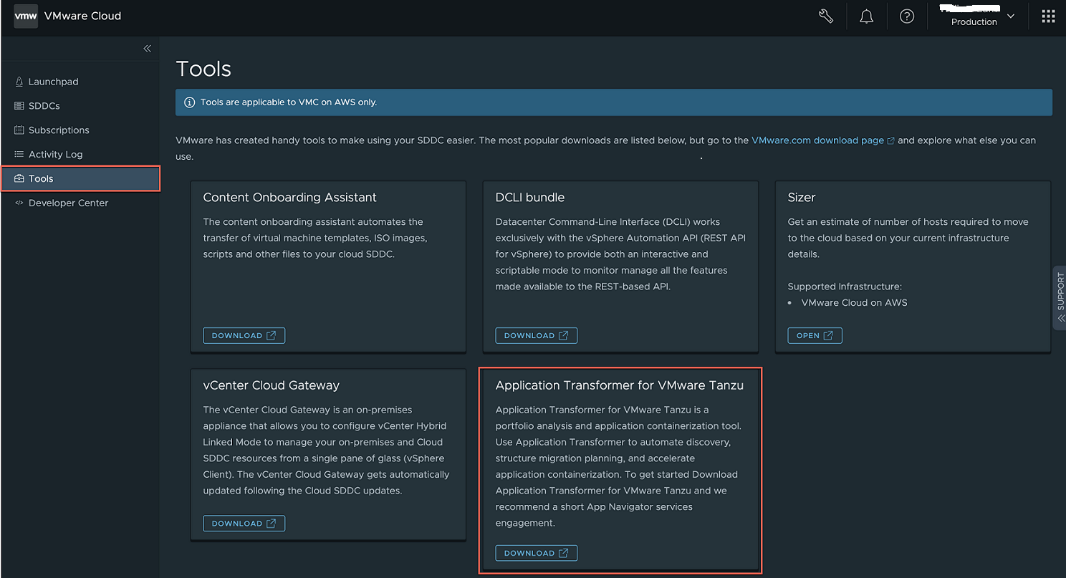
Step 2 – Log in to the SDDC vSphere UI and import the Application Transformer for Tanzu Virtual Appliance OVA into your environment using the OVF deployment guided wizard.
Application Configuration
- Root Password - Configure the password for the root user
- NTP Server - Configure NTP server
- Username - Provide a username to log in to Application Transformer for Tanzu UI.
- Password – Provide/Enter the password that will be used to log in to Application Transformer for Tanzu UI.
- Encryption Password - Configure the password that will be used to encrypt any credentials that is configured within the Application Transformer for Tanzu UI.
- Install Harbor (optional) - Enable an Embedded Harbor registry to be used for workloads being containerized

Network Configuration
Configure/Provide the following settings:
- Gateway
- Domain Name
- Domain Search
- Doman Name Server
- Application IP Address used for Application Transformer for Tanzu
- Application Netmask

Power on the VM after the import has completed.
Configuration
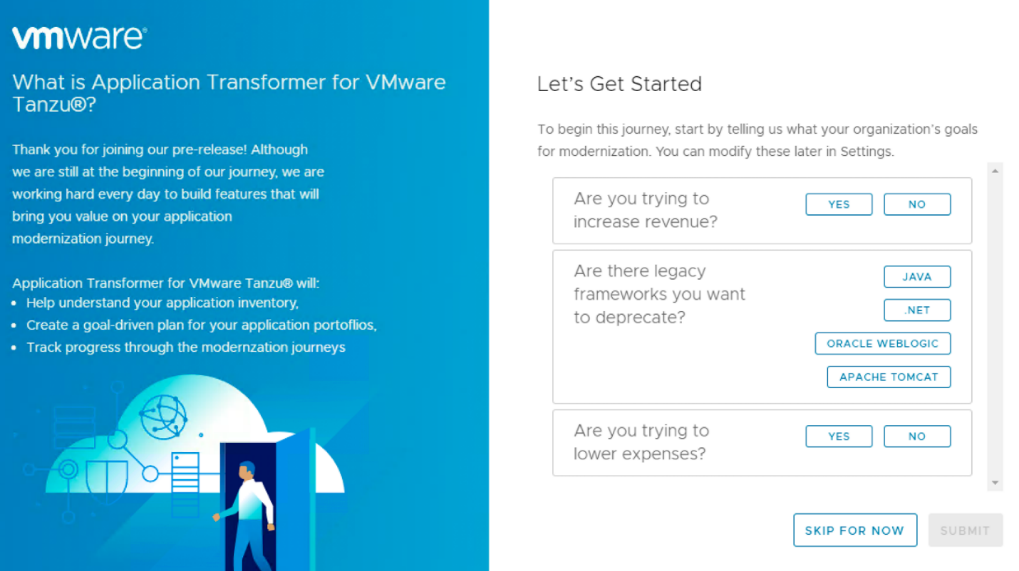
To access the Application Transformer for Tanzu UI, open a browser to the FQDN/IP Address and log in with the credentials you had configured earlier during the OVA deployment.
When you log in for the first time, you will find a short questionnaire which will help us to better understand your organization’s goals for app modernization.
This information will be used by the recommendation engine within Application Transformer for Tanzu to provide guidance to customers when analyzing the discovered applications.
Connect vCenter Server
Step 1 - Under the Discover tile, click Add vCenters to associate the SDDC vCenter Server.

Step 2 - Click Add vCenter to start the configuration.
• You will need to provide the FQDN or IP Address of the SDDC vCenter Server. In the example below, the vCenter Server private IP Address is used and per SDDC Firewall Configuration, Application Transformer for Tanzu Virtual Appliance will have proper connectivity. You must add a new credential which should contain the credentials for cloudadmin@vmc.local user. Ensure the automatically scan vCenter inventory option is selected and click Save.

After the vCenter Server is added successfully, a new entry is displayed as shown below:

Connect vRealize Network Insight
Step 1 - Navigate to the Network Insight (vRNI) tab next to vCenters and click Add to start the configuration.
Step 2 - Select the vRNI on VMC option and use the drop-down menu/down arrow key to provide the CSP API Token and the associated vCenter.

After vRealize Network Insight is added successfully, a new entry is displayed as shown below:

Guest OS Credentials
Before you can perform a guest introspection, configure the Guest OS and associate it to a specific set of VMs. Add the credentials either individually or using the bulk import process through the UI.
Follow the steps below to configure the credentials:
Step 1 - Navigate to the Credentials menu on the left hand and select either Add Credentials or Bulk Import button.

For the Bulk Import operation, you must provide a JSON file that contains the credential alias along with their username/passwords. An example of the JSON file can be found by clicking on the “informational” icon after clicking on the Bulk Import button.
Step 2 - Associate the credential(s) to the specific VMs by navigating to the Virtual Machines menu on the left hand. Select the VM(s) you wish to associate with a specific credential and then click Change Credentials .
Note that by default, no credentials will be associated with a given VM and upon completing this step, ensure the Credential column is populated with the desired guest credential.

Application Discovery
Application Introspection
The process of scanning VM(s) and using the OS credential that were associated earlier to identify all running processes within Application Transformer for Tanzu is known as introspection. Introspection uses the vSphere Guest Operations API and VMware Tool to perform this operation and the discovered processes is referred to as a Component. The introspection operation can be performed either directly on a VM within the Virtual Machines menu or it can be performed as part of the vSphere Inventory scan within the vCenters menu, which can be useful if you wish to scan a specific part of the vSphere Inventory Hierarchy such as a vSphere Cluster, Resource Pool or vSphere Folder.
In the example below, the scan will be performed for all VMs located within the Applications vSphere Folder. To initiate the process, select the vSphere Inventory Object(s) and then click Scan.

From here, you can perform a basic scan which looks at the vSphere Inventory and/or introspection which uses the OS credentials. Select Yes, Scan and Introspect to perform the introspection.

The introspection can take some time depending on your vSphere Inventory. You can monitor the progress of the introspection in the Recent Tasks for both success or failure. If the operation was partially successful or has failed, click on the task to see what issue was encountered and re-initiate the introspection.

Once the introspection operation has completed, you can navigate to the Applications menu to see the list of discovered Components and details for each VM.

Application Topology
An application topology is more than just the VMs they are hosted on; it also involves/includes complex network and service dependencies. To construct the complete view of an application, Application Transformer for Tanzu provides can leverage data from vRealize Network Insight Cloud to discover the full topology that makes up a given set of application(s).
Navigate to the vCenters menu and then select the specific vSphere Inventory and then click Discover Topology to begin the process.

The topology discovery can take some time depending on your vSphere Inventory. You can monitor the progress of the discovery in the Recent Tasks for both success or failure. If the operation was partially successful or failed, click on the task to see what issue was encountered and re-initiate the discovery.
![]()
After the topology discovery has completed, you can navigate back to the Applications menu and for components that have been identified with a dependency, a logical group called an Application will be constructed and can be visualized as shown in the screenshot below.

An Application within Application Transformer for VMware Tanzu
Application Transformation
Application Transformer for VMware Tanzu supports two modes of containerization: application specific containerization and generic containerization. The first option supports containerization of both Oracle Weblogic and Tomcat-based applications. The second option supports a generic containerization workflow that can target any process or application running within a vSphere Virtual Machine.
Container Registry
A Container registry is required by Application Transformer for VMware Tanzu which will be used to source the container images that will be required for the containerization process but also serve as a destination for the outputted container images upon a successfully containerizing an application. Although Application Transformer for VMware Tanzu can be configured with an embedded Harbor registry, it is recommended to configure an external registry which can also be used as the source registry for deploying the container image upon post-containerization.
Navigate to the Registry menu and click Add Registry to configure additional container registry(s).

Provide a registry name, the registry URL and credentials that have the permission to upload images.

Note: For VMware Harbor, the URL is simply the FQDN (e.g. https://harbor.vmware.corp) and for Dockerhub the URL would be https://dockerhub.io/v1
Application Specific Containerization
In the example below, we will demonstrate the containerization of a Tomcat application and override the version for both Tomcat and JRE.
Step 0 - Customers can optionally upload and specify a particular version of Weblogic, JDK, Tomcat or JRE as part of the containerization process. This can be helpful if you wish to update the underlying runtime as part of the containerization workflow. To do so, navigate to 3rd Party Artifacts menu and provide both a label and the supported files to be uploaded. During the containerization workflow, users will have the option to override to a specific version depending on the available artifacts that were uploaded in this step.

Step 1 - Navigate to the Virtual Machines menu and under the Virtual Machines tab, select the specific VM that contains either a Weblogic or Tomcat application and expand the discovered list of components. If the supported application is detected, a Discover button will be displayed.

Click Discover to start the application-specific discovery operation which will identify all artifacts used within the application deployment and transfer that into Application Transformer for VMware Tanzu in preparation for containerization. This process can take a few minutes depending on the size of the application and can be monitored in the Recent Tasks.
![]()
Step 2 - Once the discover operation has completed, the Containerization button will be available and users can begin the containerization process by clicking on the button to start the guided wizard.

Step 3 (optional) - Users can chose to override the current version of Tomcat and JRE. In the example below, Tomcat is already at the latest version but the current JRE version is older and we can select the version we had uploaded to the 3rd Party Artifacts earlier.

Step 4 - Users will now specify the configuration for both the source and destination resources. Application Transformer for VMware Tanzu will use the detected Guest Operating System to provide a recommended OS base image that can be used for the containerization purpose. In the example below, the VM is running CentOS and it has defaulted to centos:latest container image. Users can override this by choosing another valid image and version. If you are not using a public registry such as Dockerhub, you will need to ensure the required OS base image is available within your registry. In the example below, the registry is VMware Harbor and the default repo being used is library and this requires an update to the base image path. Users will also need to provide a repo name and version for the containerized application and again, this needs to match the repo name of your registry.

Step 5 - The final step is to confirm all settings before starting the containerization process

The containerization process can take some time depending on the size of the artifacts for the application. You can monitor the image building progress in the Recent Tasks for both success or failure.

If the operation has failed, click on the task details and expand the Image Build Logs to better understand the issue.

Upon a successful containerization, users will notice a “green” status icon on the upper right hand corner for the specified component. Users can also see the OCI image that was produced and its location based on the destination registry.

In addition, a downloadable artifact link is available which contains all application configurations along with an auto-generated Kubernetes YAML manifest file that can be used to deploy the containerized application

Generic Containerization
In the example below, we will demonstrate the containerization of a Python service called toUpper.
Step 1 - Navigate to the Virtual Machines menu and under the Virtual Machines tab, select the specific VM that you wish to go through the generic containerization workflow and click Create Image Template to begin the process.

Step 2 - Provide a friendly name for the generic containerization template, base OS image and source registry. In the example below, the VM is running CentOS and the default recommendation is centos:latest container image. Click a different valid image and version to override the default recommendation.
If you are not using a public registry such as Dockerhub, ensure the required OS base image is available within your registry. In the example below, the registry is VMware Harbor and the default repo being used is library and this requires an update to the base image path.

Step 3 (optional) - Configure any environment variables that your application may require. Users can either source the environment variables from existing running processes from within the VM or construct new environment variables.

Step 4 - Select all files that should be included as part of the containerization process. In the example below, the toUpper files is located in /root/toUpper and is the only directory that needs to be included.

Step 5 (optional) - You can also override any source files that were identified in Step 4 in one of the following ways:
- Upload a zip file that contains the exact same filesystem structure with the additional files.
- Upload a zip file that contains files you wish to override with the same filename.

Step 6 - Upload a shell script that contains the commands to start the application/process which will be used as the Docker entry point. In the example below, the following snippet is contained in the entrypoint.sh script which needs to be uploaded.
#!/bin/bash
python server.py

Step 7 - Review the auto-generated Docker file and make any necessary edits such as the OS base image or additional commands to perform within the Docker file. In the example below, the Python2 runtime must be installed and the following snippet highlighted in red has been added. If you are using your own registry, ensure the path to container image is valid by reviewing the FROM property.
At this point, you can either save the current configuration and build the image later or you can save and proceed to the container build process.

Step 8 - Before we can start the build process, you must specify the destination registry and the OCI image name and version that will be outputted from the process. Finally, click Containerize to start the process.

The containerization process can take some time depending on the size of the artifacts for the application. Progress for the image building can be monitored in the Recent Tasks. If the operation fails, users can click on the task details and expand the Image Build Logs to better understand the issue.

Upon a successful containerization, users will be taken to the Image Templates tab (located in Virtual Machines menu) and find the OCI image that was produced and its location based on the destination registry that was configured.

In addition, a downloadable artifact link is also available which contains all application configurations along with an auto-generated Kubernetes YAML manifest file that can be used to deploy the containerized application

Advanced Topics
Naming & Password Policies
The application and component names use a default pattern which are auto-generated by Application Transformer for Tanzu, however, a custom naming policy can be created to match the requirements of an organization. To do so, navigate to the Policy menu on the left hand side and select Naming Policy. As part of creating a custom naming policy, customers will be able to use pattern builder to take advantage of dynamic values such as VM Name and Folder to name a few.

Bulk Credential Import
To aid in the OS credential association to specific VM(s), customers can bulk import a JSON configuration file that contains the desired credential mapping. Click Import, then click the “informational” icon for an example of the JSON file.

User & Roles
Additional users can be created to access Application Transformer for VMware Tanzu after the initial deployment. The following four roles are available for assignment when a new user is created. Detailed privileges for each role is documented under the Roles tab.
- Root - Full viewing and editing access
- Administrator - Managed settings and discovery applications
- Operator - Discover applications, edit components and applications and perform modernizations actions
- Viewer - View only access
To manage additional users, click on the username that you had configured initially when logging into Application Transformer for VMware Tanzu and then click on Administration.

Under the Users and Roles menu, additional users can be created by clicking on the Add User button.

Automation & REST API
All functionality within Application Transformer for VMware Tanzu can be automated using a REST API. To access the API Swagger documentation, click the “question mark” icon next to the username and click API Documentation.

Changelog
|
Initial Release |
09/02/21 |
Authors
William Lam, VMware
William is a Senior Staff Solution Architect working in the VMware Cloud team within the Cloud Services Business Unit (CSBU) at VMware. He focuses on Automation, Integration and Operation for the VMware Cloud Software Defined Datacenters (SDDC). One of his primary responsibility is driving VMware Cloud’s Customer[0] initiative and helping provide early feedback on the usability, design and architecture of new VMware Cloud features and capabilities.