
Upgrading Oracle Cloud VMware Solution from 6.x to 7.x
Introduction
Oracle Cloud VMware Solution (OCVS) lets you deploy the VMware SDDC environment in the Oracle Cloud Infrastructure (OCI). The solution allows you to deploy VMware SDDC versions 6.5, 6.7 and 7.0. VMware vSphere 6.5 and 6.7 reached the end of general support on October 15th, 2022, and both software versions are in the technical guidance phase. During the technical guidance phase, VMware products and solutions have limited support scope; hence, customers must upgrade the VMware vSphere 6.5 and 6.7 environments to the VMware vSphere 7.0 Software version.
This document provides step-by-step upgrade guidance for upgrading VMware SDDC from 6. x to 7.0 deployed in OCVS.
Scope of the Document
The implementation steps to upgrade VMware SDDC are validated against OCVC VMware SDDC 6.5 and 6.7. Users of this guide are expected to be the existing customers and partners with OCVS implemented in their environment. Basic Oracle Cloud and VMware SDDC knowledge are required before implementing the steps in the VMware SDDC.
Before you begin
Before upgrading the VMware SDDC environment, please ensure the below checks are done and validated.
- Review the existing environment and address issues, and alert if there are any. Ensure that there are no network, DNS, or storage issues.
- All the VMware Appliances and ESXi hosts are healthy with no significant alerts or issues.
- Backup vCenter server, Check the VMware Documentation for more details.
- Backup NSX-T environment, Check the VMware Documentation for more details
- Backup vSphere Distributed Switch; check the VMware Documentation for more information.
- It is recommended that you have the latest backups for critical workload VMs, even though there is no change or outage required for the workload VMs.
- This upgrade process requires you to provision a new host and delete the old host. The new host provisioning requires adequate service limits for ESXi hosts and capacity for boot volume to accommodate the vSphere 7. x requirement in the Oracle Cloud. Work with your oracle cloud representative to ensure that you have the required service limit, quota, and capacity allocated.
VMware SDDC Upgrade
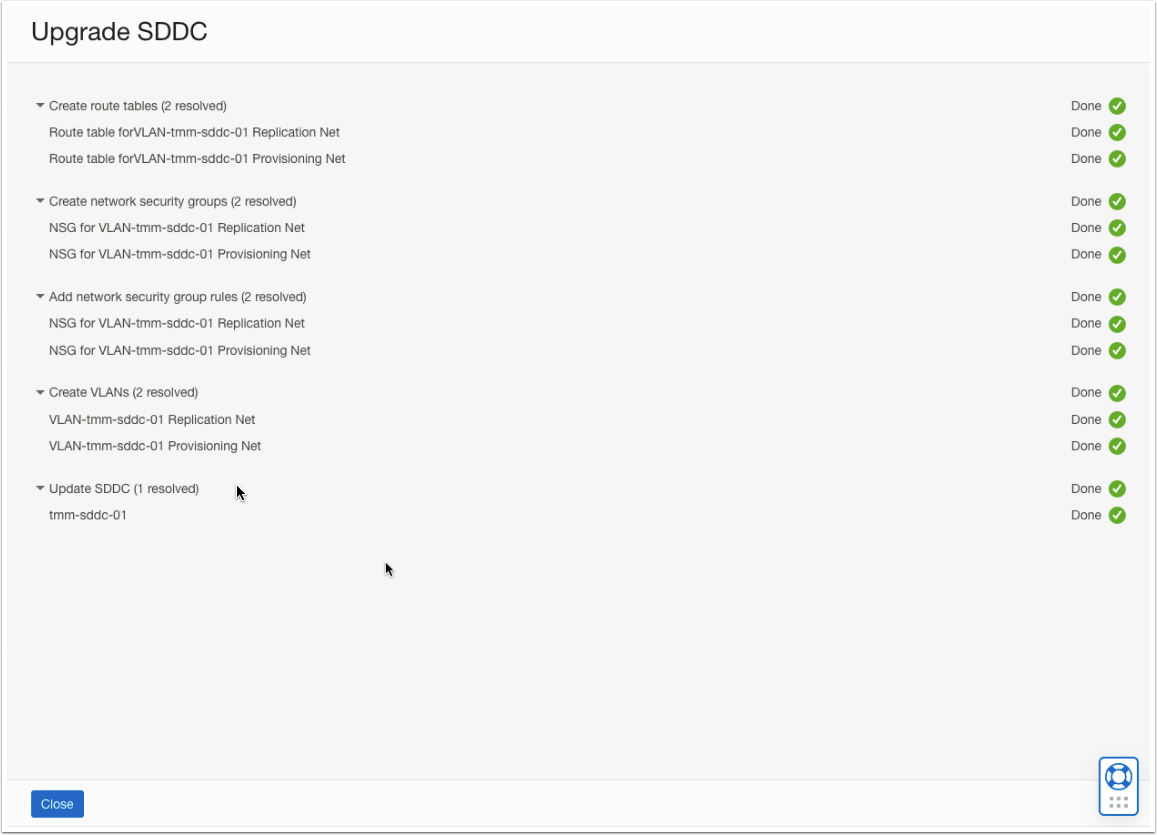
When a new VMware SDDC version is available, a notification is displayed for the same. This step upgrades the VMware SDDC version metadata in the OCI. VMware SDDC version 7 also has a new network architecture with two additional VLANs for provisioning and replication purposes. This workflow allows you to create these two additional VLANs as a part of the SDDC upgrade process. Follow the below steps to upgrade the VMware SDDC version.
- Log in to the OCI console, and from the left navigation pane, Click Hybrid and Select VMware Solution to view VMware SDDC in the OCI.
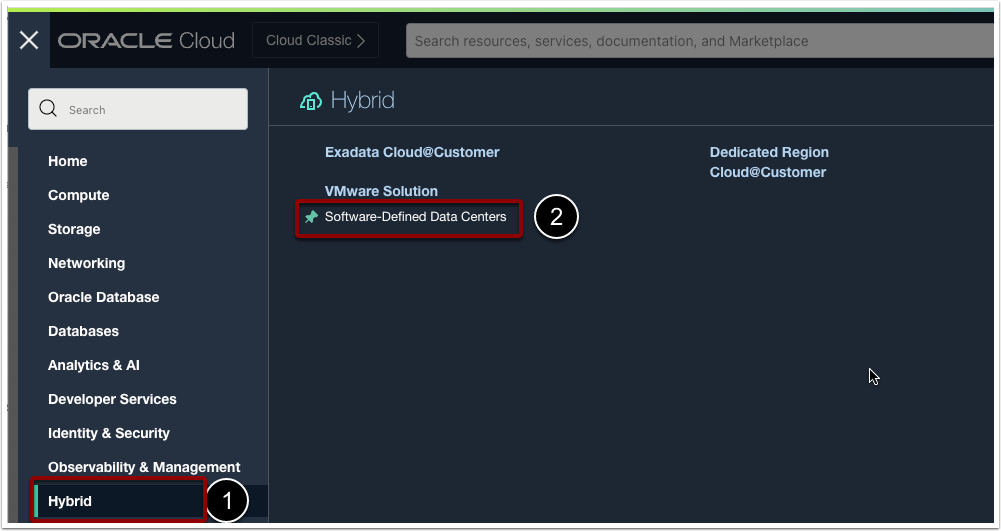
- Select the Compartment.
- Click on the appropriate VMware SDDC that you want to upgrade.
- If the VMware SDDC software version is 6.5 or 6.7, you should be able to see a notification, as shown in the below screenshot.
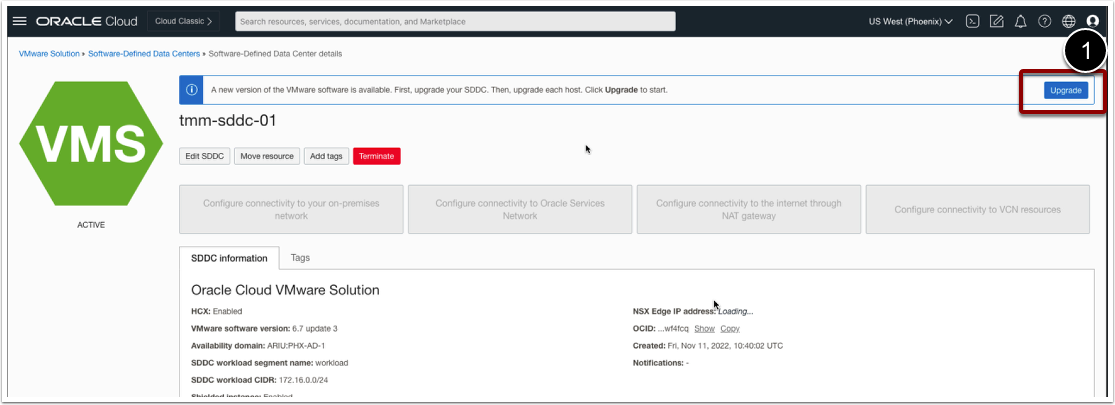
- Click on Upgrade
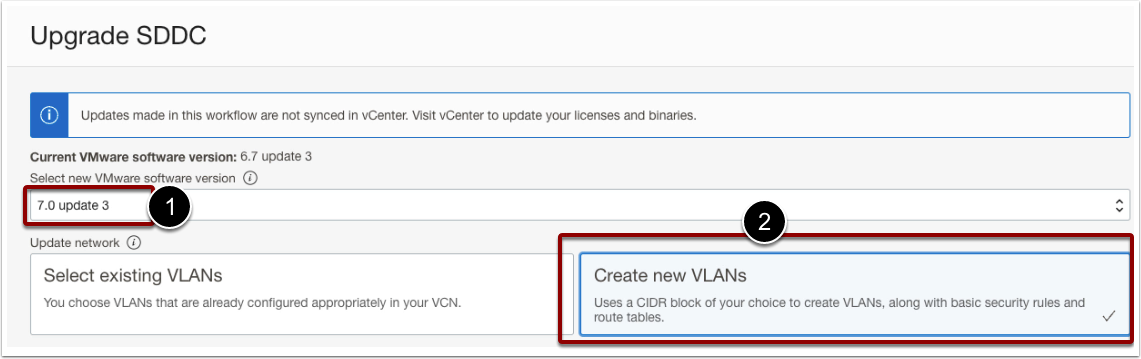
- Select a new VMware Software version. Select 7 Update 3.
- Select Create New VLANs
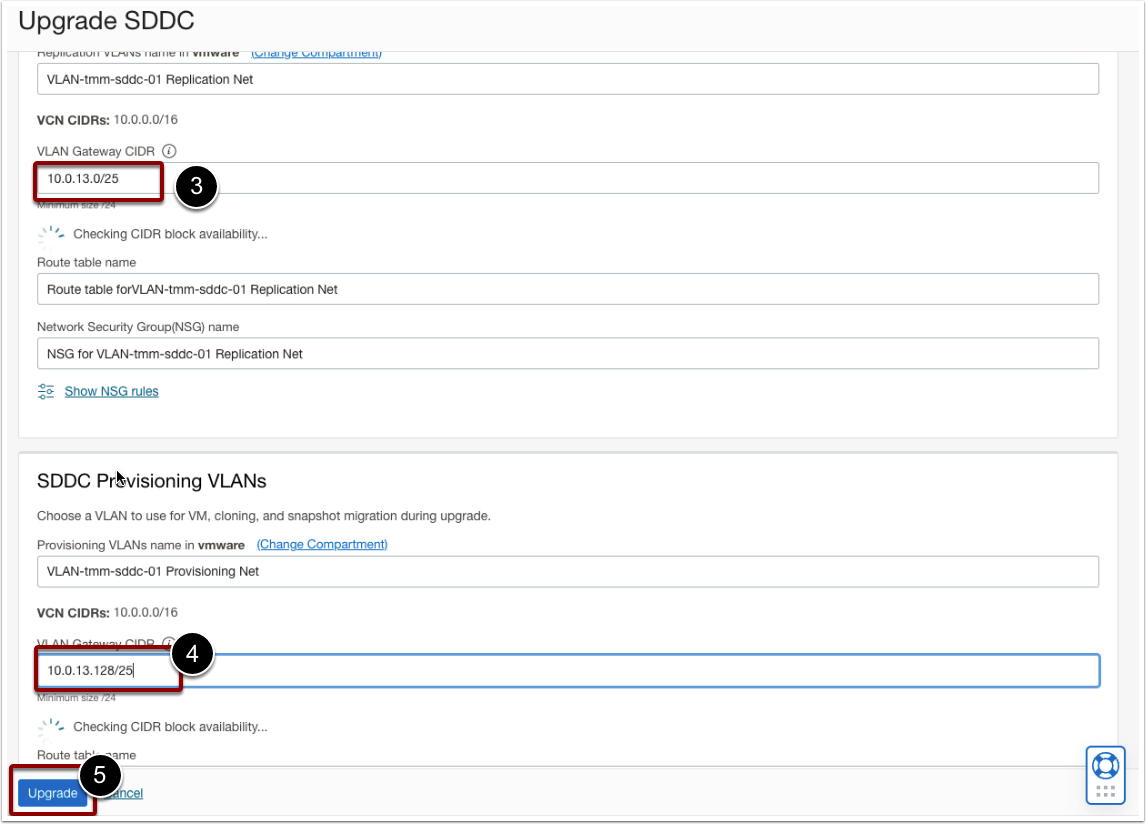
- Provide a CIDR Block for SDDC Replication VLAN. The CIDR Block should be part of the SDDC network.
- Provide a CIDR Block for SDDC Provisioning VLAN. The CIDR Block should be part of the SDDC network.
- Let the CIDR availability check complete.
- Click Upgrade only If both the CIDR blocks are available and highlighted in green.
- Wait until the upgrade process is completed successfully.
- Once all the tasks are shown as Done, Click Finish.
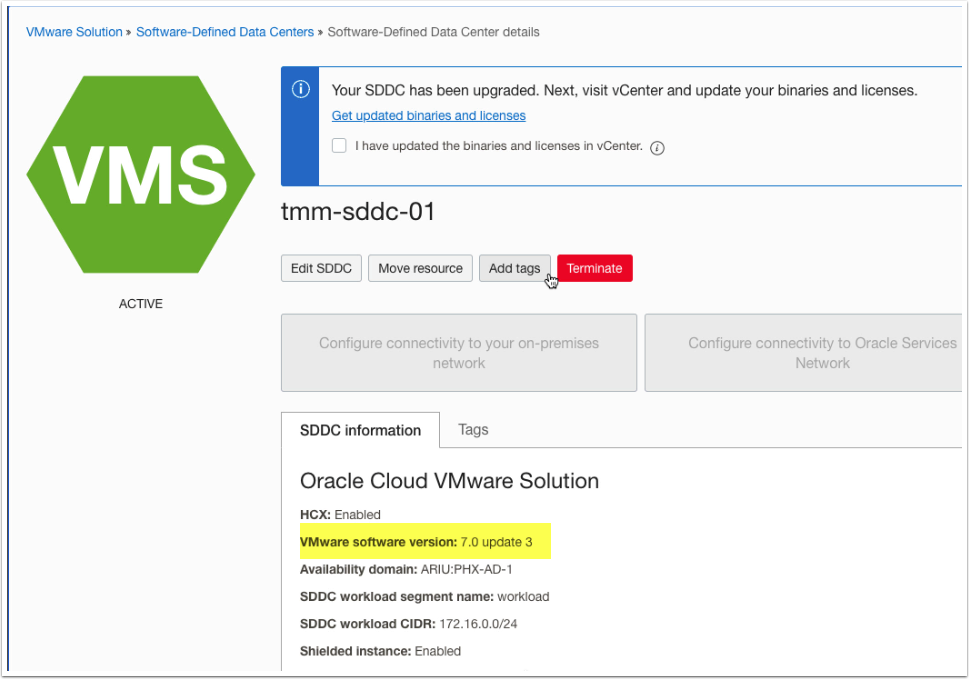
- Validate that the VMware SDDC Software version is updated to 7 Update 3.
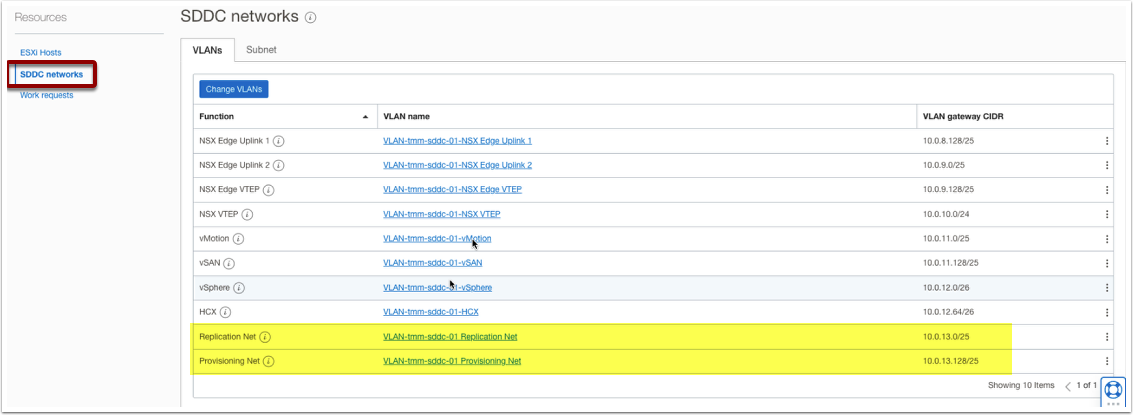
- Scroll down to the SDDC summary page, Click on SDDC Network, and validate that both Provisioning and Replication Networks are created successfully.
NSX-T Upgrade
Please verify the NSX-T version. You can skip the NSX-T upgrade if the current version is 3.2.0.1 19232396 or above. Follow the steps below if the NSX version is lower than 3.2.0.1 19232396.
- On the VMware SDDC Overview page, Check the notification.
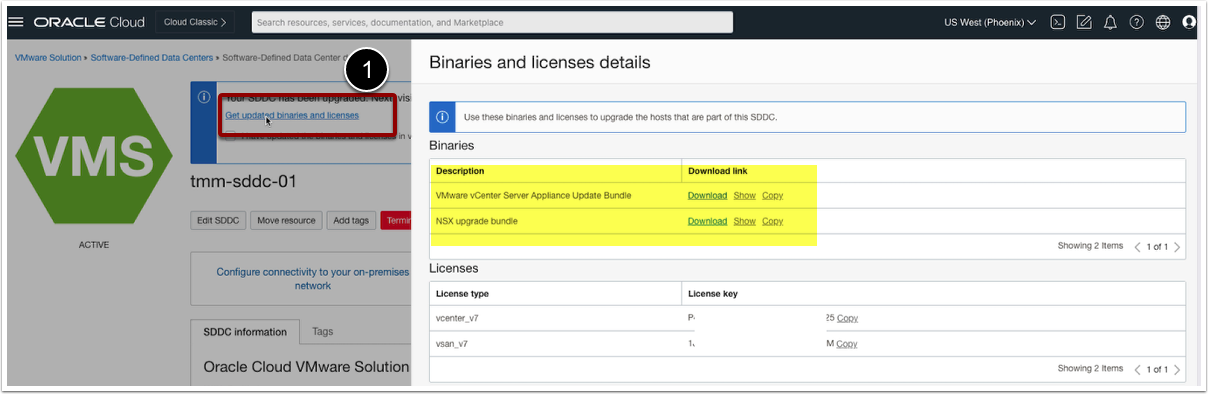
- Click on Get updated binaries and licenses.
- Log in to the NSX Manager.
- Navigate System -> Lifecycle Management -> Click Upgrade.
- Upload the MUB bundle.
- Click Prepare for Upgrade.
- Click Run Pre-Checks.
- Review the pre-check results.
- Ensure that backups are available.
- You can skip the NSX Upgrade Evaluation Tool.
- Click Ok.
- Click Start to upgrade the NSX Edge nodes.
- Click Next once the upgrade status is successful for NSX Edge Node.
- Click Start to upgrade ESXi hosts. The upgrade workflow will put the host into maintenance mode automatically.
- Monitor the progress.
- Click Next once the ESXi hosts are upgraded.
- Click Start to upgrade the NSX manager.
- Monitor the progress and validate the system post-upgrade,
vCenter Server Upgrade
- On the VMware SDDC Overview page, Check the notification.
- Click on Get updated binaries and licenses.
- Download VMware vCenter Server Appliance Bundle.
Stage 1: New VCSA Deployment
- Navigate to the downloaded VCSA installer ISO.
- Double-click on the VCSA Installer ISO.
- Navigate to VCSA UI Installer -> win32 and open Installer.
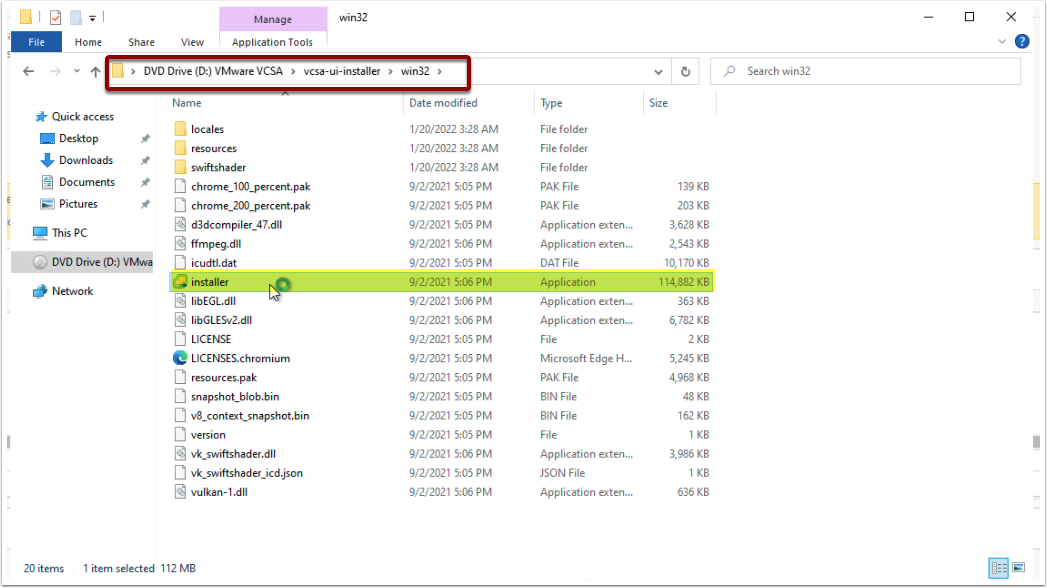
- Click Upgrade.

- Click Next to start Stage 1 (Deploy vCenter Server).
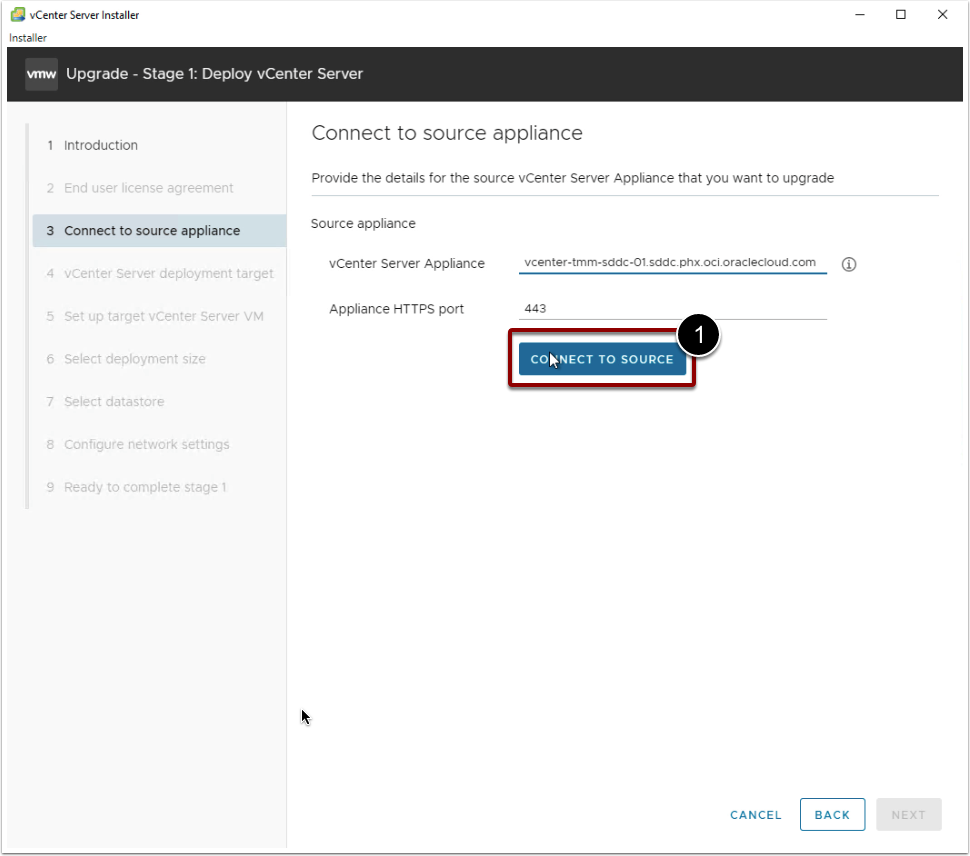
- Enter Source vCenter Server hostname/IP address.
Note: You can find the vCenter Server hostname/IP address from the OCI VMware SDDC Overview page. As shown in the below screenshot.
- Leave Appliance HTTPS Port to its default value, which is 443.
- Click on Connect to Source.
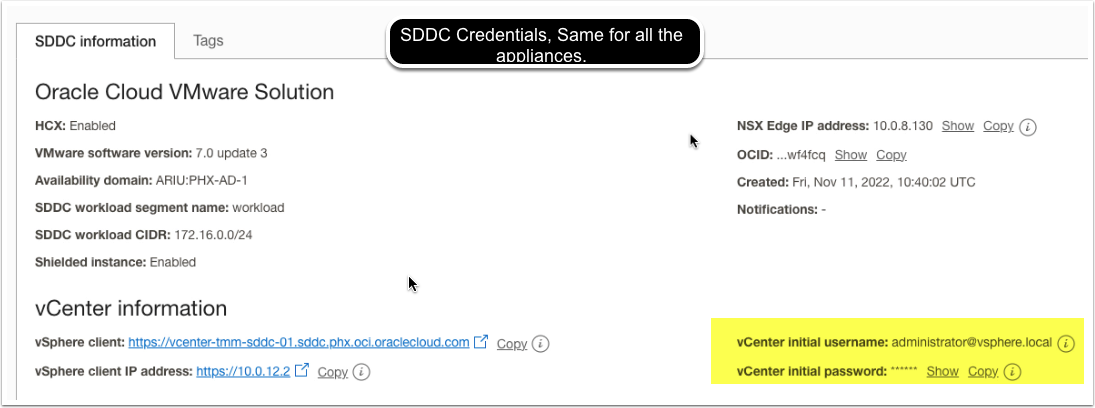
- Provide the SSO Username
- Provide SSO password
Note: You can find the vCenter Server SSO Username and Password from OCI VMware SDDC Overview Page. As shown in the below screenshot.
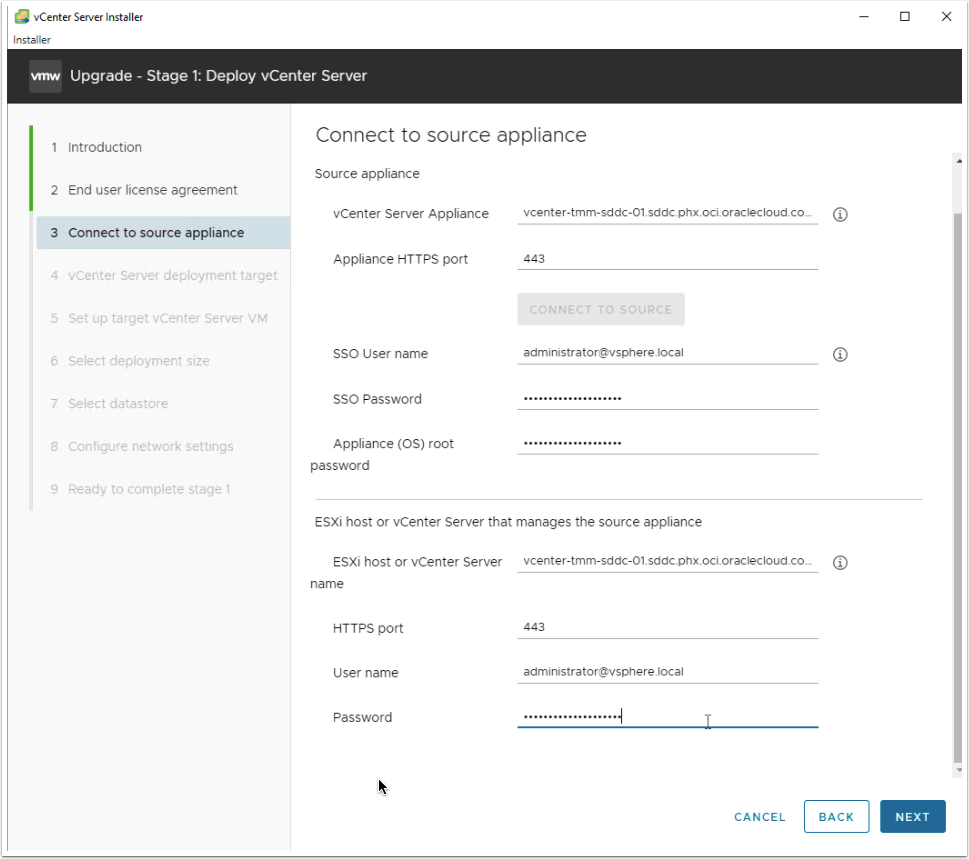
- Provide the vCenter Server or ESXi host details that manages the source vCenter. In this case, provide the vCenter Server details. Click Next.
- Click Yes, to accept the certificate thumbprint.
- Provide the target vCenter Server detail. This is the vCenter Server where you want to deploy the upgraded vCenter Server virtual machine. In this case, we are also using the same source vCenter server to deploy a new vCenter Server instance. Hence provide the same vCenter Server details.
- Click Next.
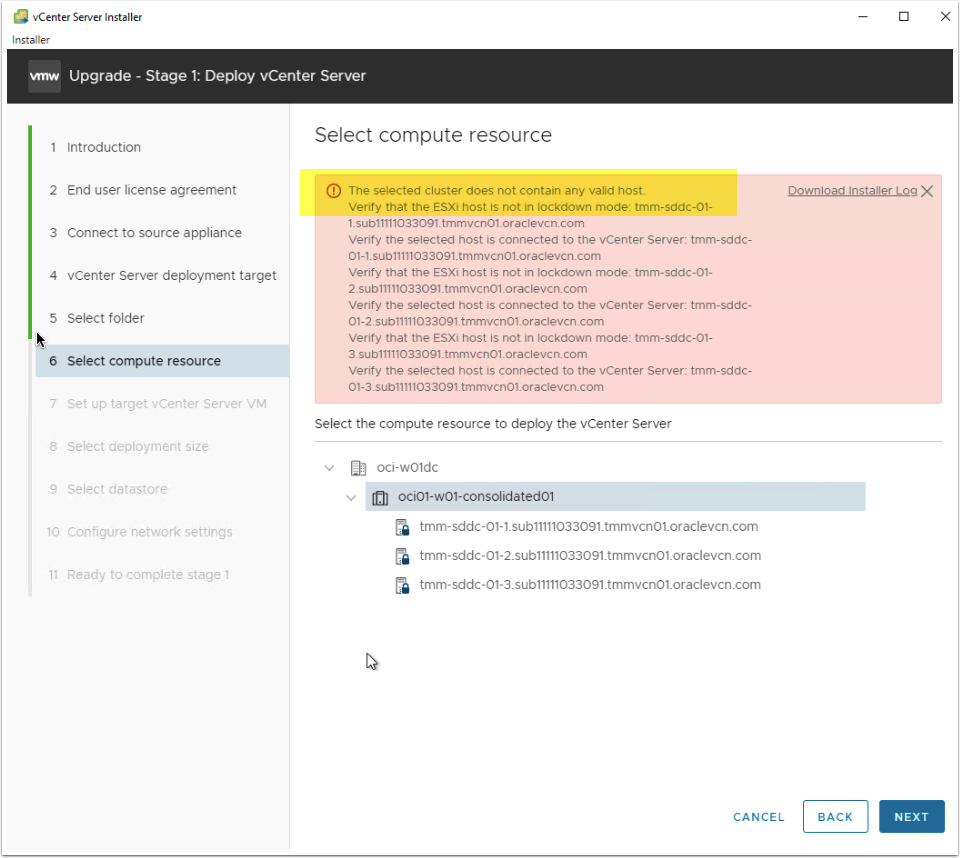
- Select the folder, and compute resources.
Note: Disable the lockdown mode on one of the ESXi hosts if you get an error similar to the below screenshot. Check out the VMware Documentation on How to disable ESXi lockdown mode.
- Set up target vCenter Server VM.
- Provide the VM Name.
- Set root password.
Note: It is advised to keep the same password as the old vCenter Server for better password management. It is important to keep the password secure yet accessible. You can copy the same password from the OCI VMware SDDC Overview page and use the same.
- Select the Deployment Size—select Medium. Click Next.
- Select vSAN datastore.
- Select the Network, keep the same network as the old vCenter Server.
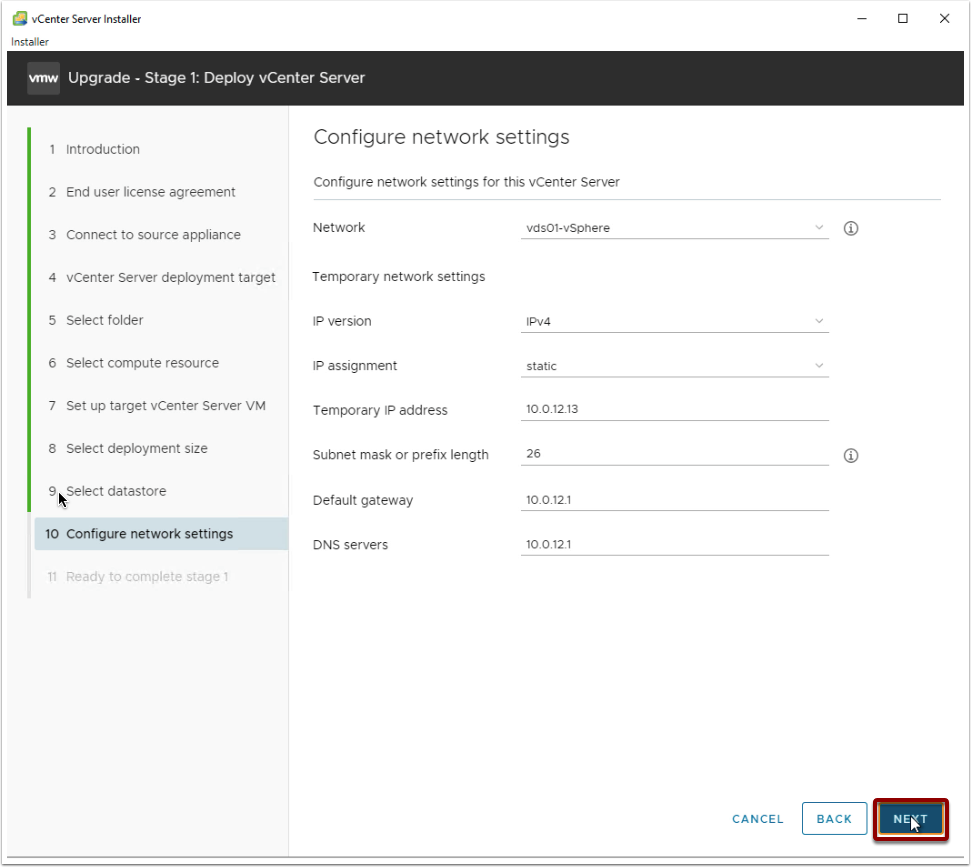
- Provide the IPv4 details for temporary network settings.
- IP Version: IPv4
- IP Assignment: Static
- Temporary IP Address: This should be an available IP address from the vSphere network.
- Subnet Mask or Prefix: Same as the source vCenter Server network.
- Default Gateway: Same as the source vCenter Server
- DNS Servers: Same as the source vCenter Server.
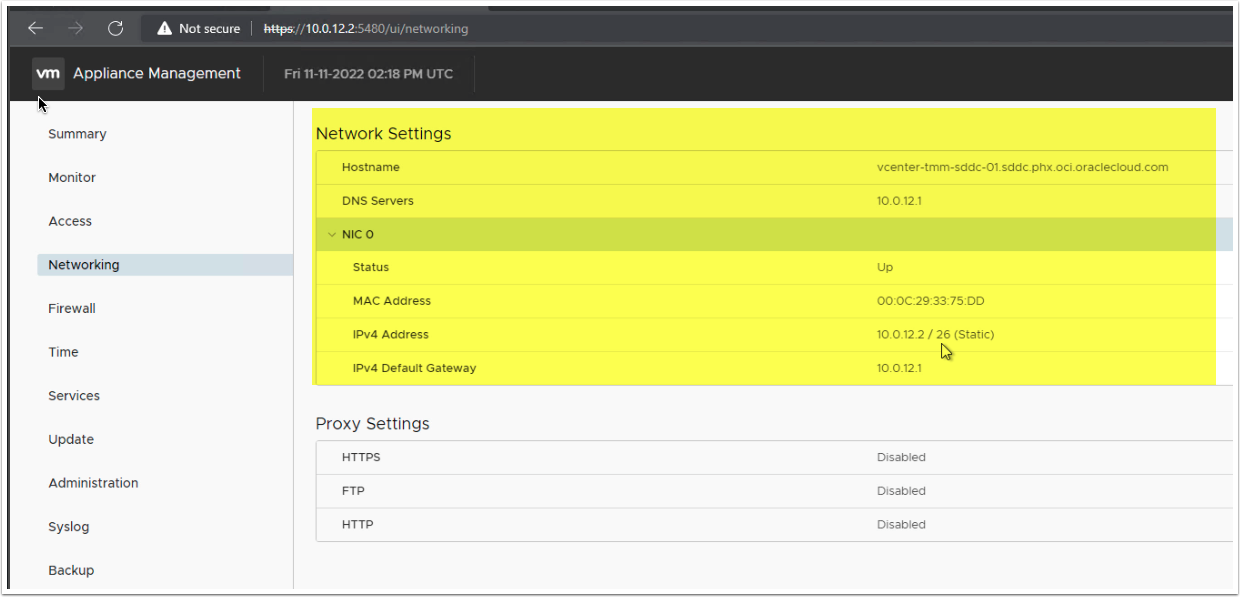
You can verify the subnet mask, default gateway, and DNS server details via login into the VAMI interface (https://vcenter-ip:5480) and go to the network section.
Ensure all the network details are correct and click Next.
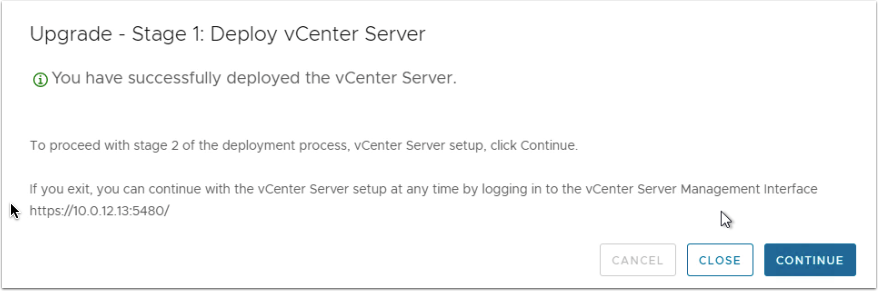
- Review all the details and click Finish.
- Wait for stage 1 to complete. And click Continue for Stage 2.
Stage 2: Switch Over Phase
Stage 2 is also known as the cutover phase. In this stage, vCenter Server data is migrated to the new vCenter Server instance, and vCenter Server services are resumed on the new vCenter Server instance. This stage requires downtime and vCenter becomes inaccessible during this phase. Also, it is important to have the vCenter Server backups before stage 2.
- Click Next to start stage 2 (Upgrade Source vCenter Server).
- Let the Pre-Check process complete. If there are no errors, you can continue with the upgrade process. However, you may see an error message related to the unsupported lacpApiVersion.
- Upgrade the lacpApiVersion to Enhanced LACP Support to fix the unsupported lacpApiVersion. Follow VMware KB Article 2051311 for the detailed steps.
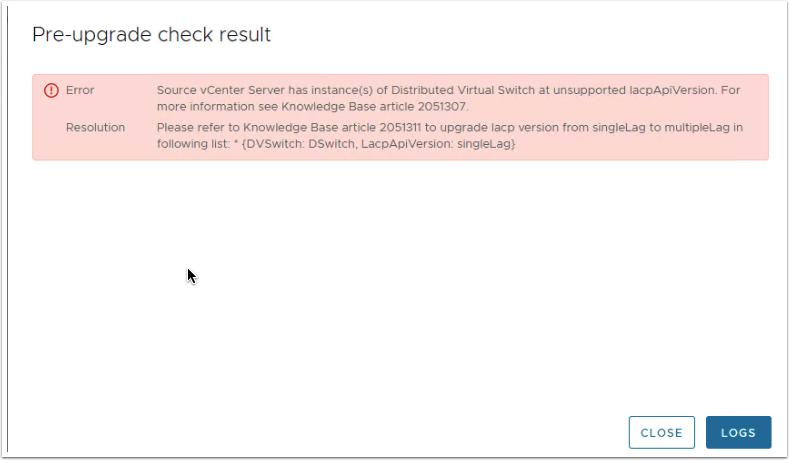
- Click on Close and continue with the pre-check process.
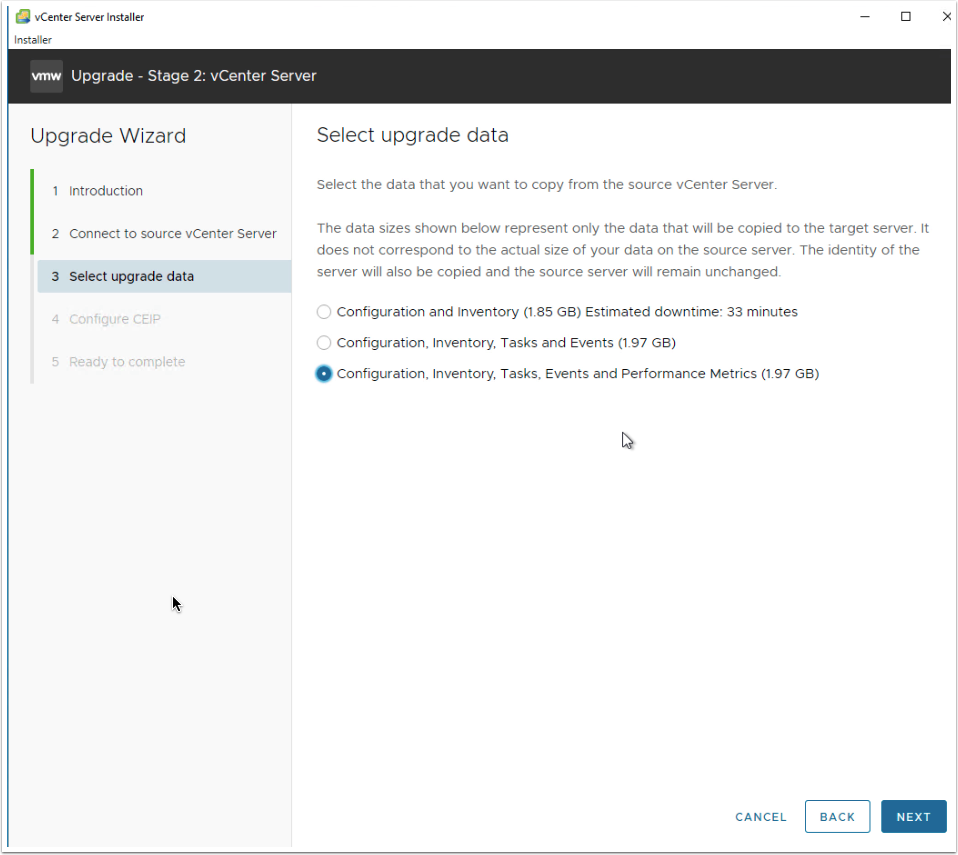
- Select the upgrade data. This will migrate the selected data to the new vCenter Server instance. Click Next.
- Review the details and click Next.
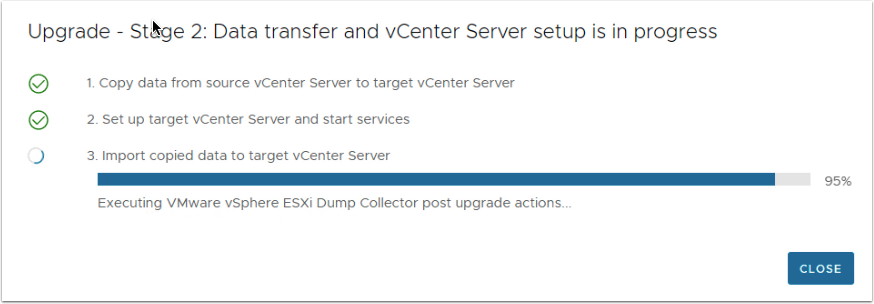
- Monitor the process until Stage 2 is finished.
Apply Licenses
- Validate the vCenter Server once stage 2 is upgraded.
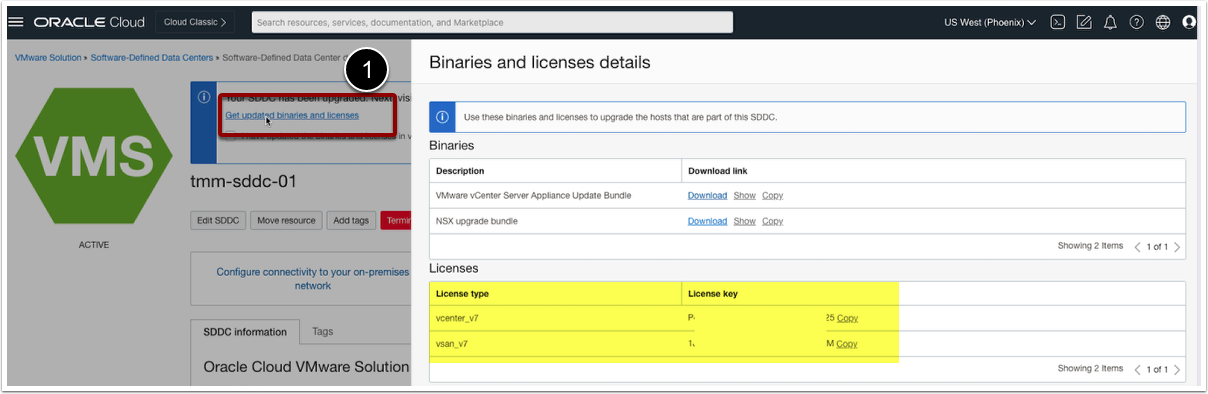
- On the VMware SDDC Overview page, Check the notification.
- Click on Get updated binaries and licenses.
- Copy the vcenter_v7 and vsan_v7 license keys.
- Log in to the vCenter server.
- Click on the navigation menu.
- Go to Administration.
- Go to Licensing and click on Licenses.
- Click on Add.
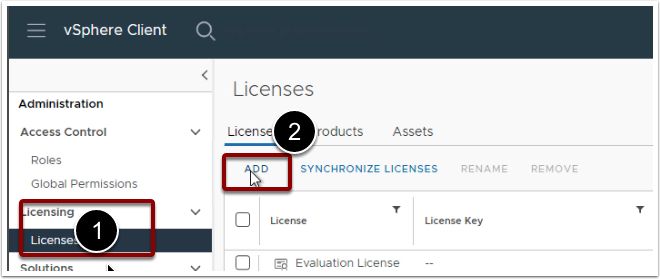
- Paste both vcenter_v7 and vsan_v7 license keys in a separate line.
- Click Next.
- Review the license details and provide license key names for both licenses.
- Click Finish.
- Click on Assets.
- Select vCenter Server Systems
- Select the vCenter Server.
- Click Assign License.
- Assign the vCenter Server 7 Standard License. Click Ok.
Note: We have added both the licenses, vCenter and vSAN but only assigned the license key to the vCenter Server. We will give the vSAN license key once the vSAN cluster is upgraded. Steps are mentioned under the vSAN Upgrade Section.
ESXi Host Upgrade
The process of upgrading ESXi hosts that are part of OCVS VMware SDDC involves building new ESXi hosts and adding the newly built ESXi hosts to the vCenter Server. This section describes the detailed steps to upgrade the ESXi hosts.
New Host Build
- On the VMware SDDC Overview page, Check the notification.
- Click on the check box ’I have updated the binaries and licenses in vCenter’ to confirm that you have upgraded the vCenter Server and assigned the licenses as described in the above steps.
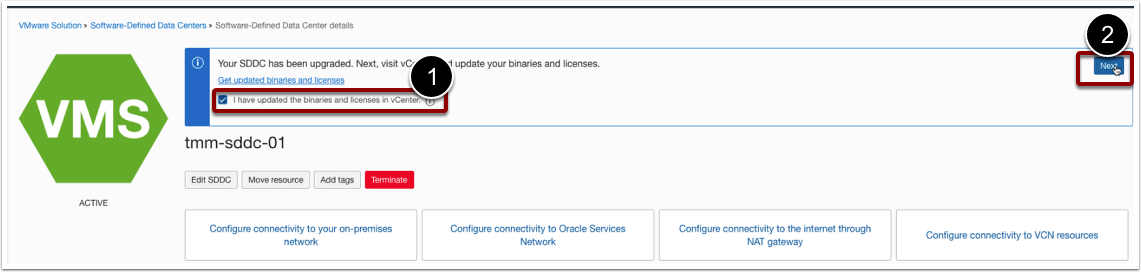
- Click on the first ESXi host instance.
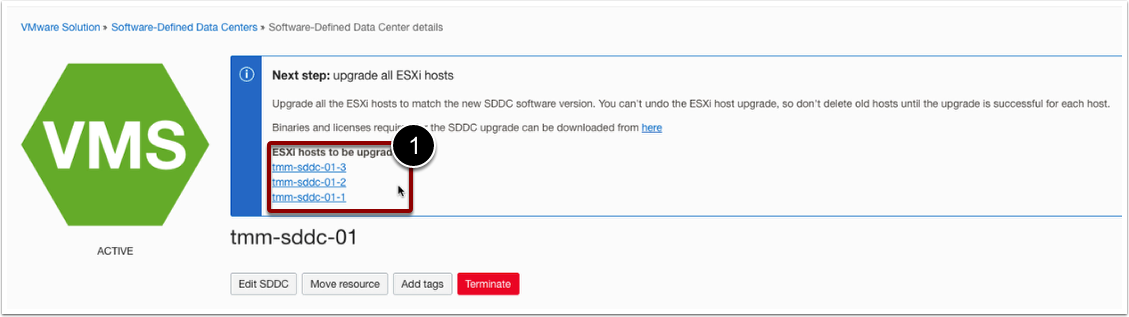
- In the ESXi host view, Click on the Upgrade.

- Leave the default capacity type and click on the checkbox.
- Click Upgrade. This will start a new job to create a new ESXi host.

- Repeat the same process for all the ESXi hosts that are part of the VMware SDDC.
- Go to the SDDC overview page and scroll down to click on Work Request.

- Monitor the progress of all the ESXi build jobs and wait until all the requests are 100% complete.
-

Note: This process builds new ESXi hosts. Please ensure you have the required quota, reservation, and capacity available in OCI to spin up new ESXi host instances.
Adding Hosts to vCenter Server
Add the ESXi hosts to the vCenter Server but do not add the hosts to the cluster object. It should be added directly to the data center object. Follow the below steps on all the ESXi hosts one by one.
- Log in to the vCenter Server.
- Right-click on the data center.
- Click on Add Host.
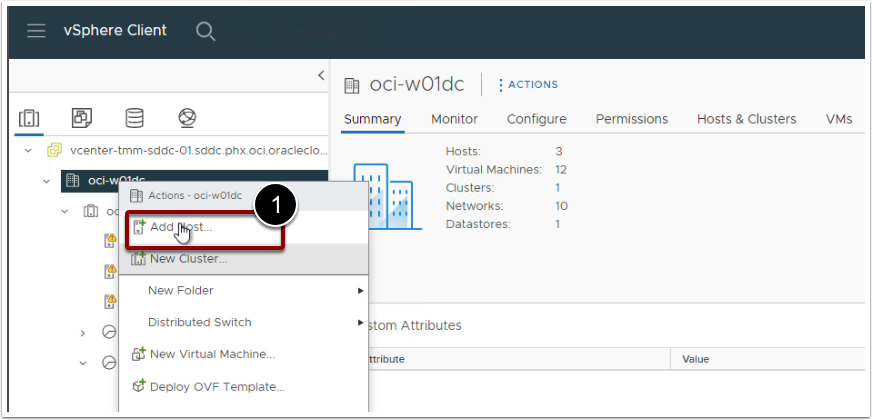
- Provide the Hostname or IP address.
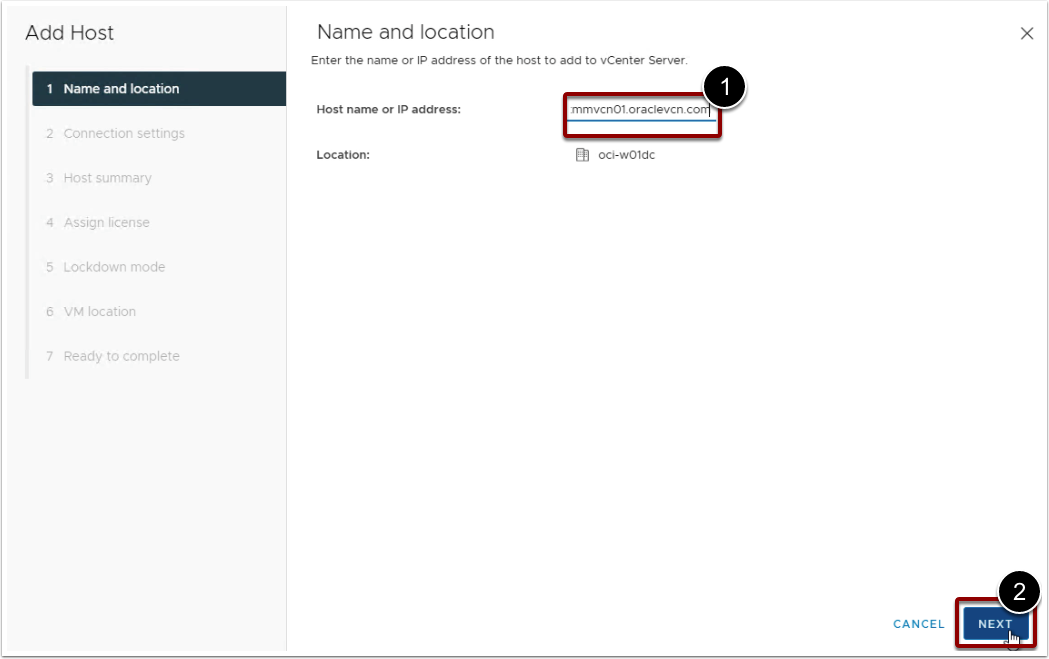
Note: You can get the hostname or IP address through the ESXi Instance page in the OCI. As shown in the below screenshot.

- Enter Username, root
- Enter Password, you can copy the same password as the vCenter Server from the VMware SDDC overview page.
- Click Next and Finish.
- Ensure that host is put into maintenance mode.
- Repeat the same process to add other ESXi hosts as well.
Adding Hosts to Distributed Switch
OCVS VMware SDDC 7.0 uses vSphere Distributed Switch for networking. The newly built ESXi host uses a standard switch for the vmkernel ports. We need to add all the hosts to the distributed switch and migrate its vmkernel ports to the respective VDS port group. After completing this task, new and old ESXi hosts will be able to communicate with each other and become part of the same network port groups.
Add replication and provisioning port groups before adding new ESXi hosts to the dvSwitch.
Note: Keep all the hosts in maintenance mode only.
Add New Replication and Provisioning port groups
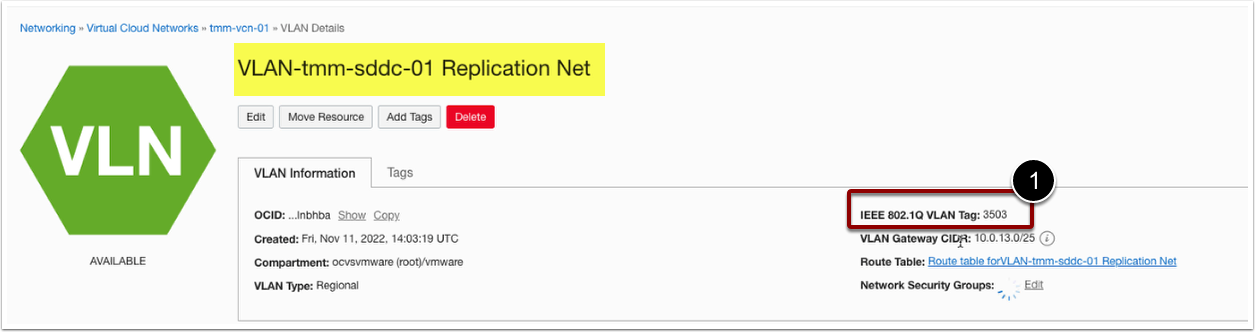
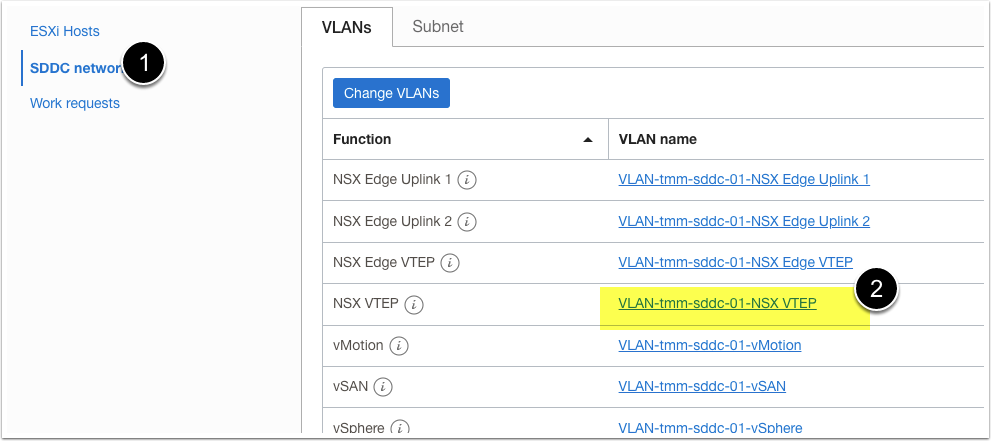
Get the VLAN IDs for provisioning and replication networks.
- Log in to the OCI console.
- Go to the VMware SDDC overview page.
- Scroll down and Click on SDDC network.
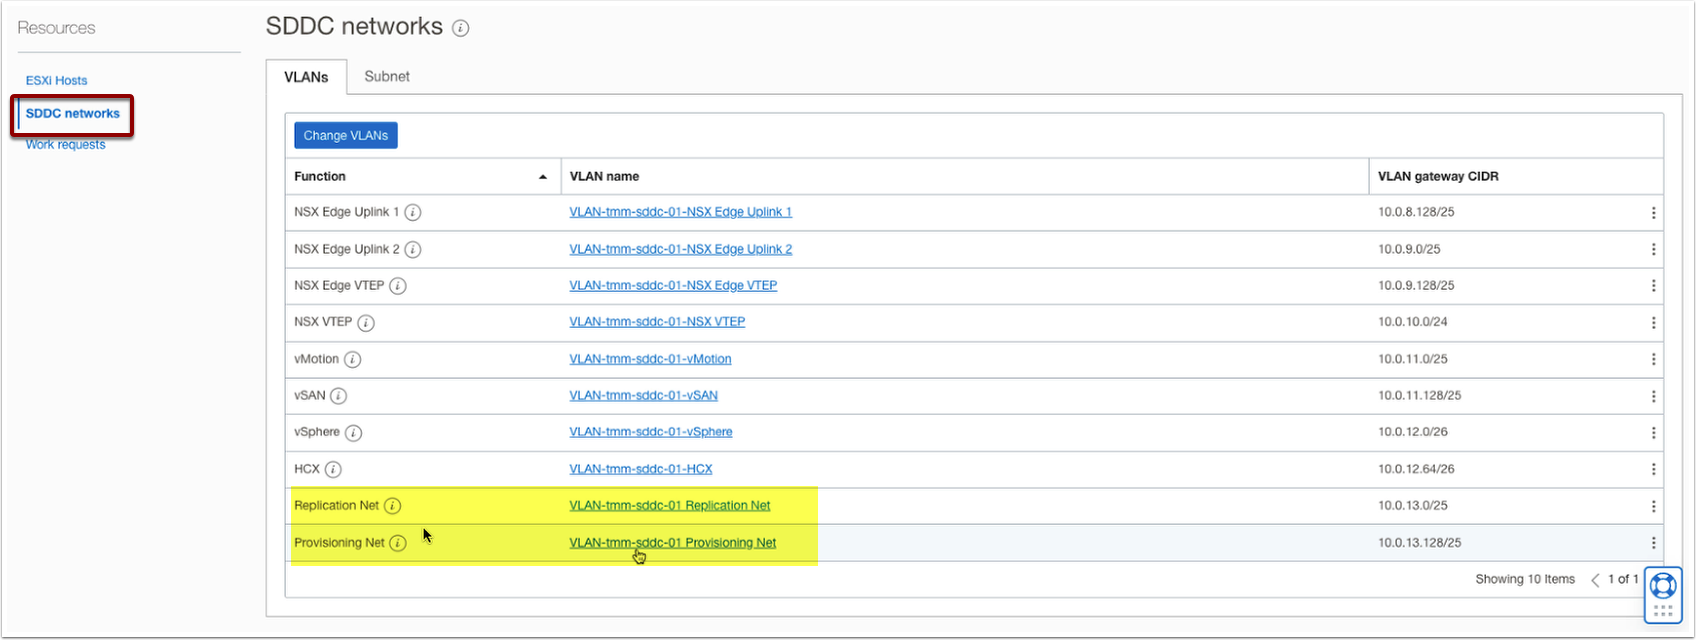
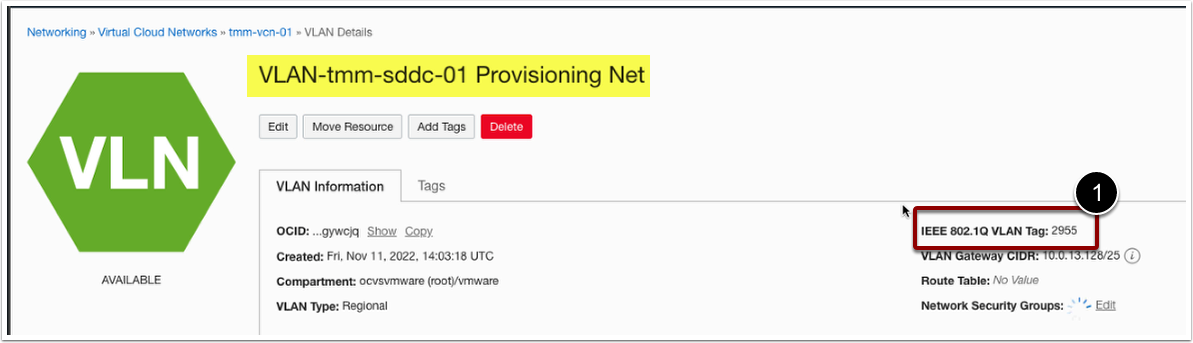
- Select the provisioning VLAN.
- Note down the VLAN ID for the provisioning network.
- Go back and select the replication VLAN.
- Note down the VLAN ID for the replication network.
Create provisioning and replication port groups.
- Log in to the vCenter Server.
- Go to the networking tab under the inventory.
- Go to DSwitch (Distributed Switch that is in use currently).
- Right-click on DSwitch and select Distributed Port Group. Click New Distributed Port Group.
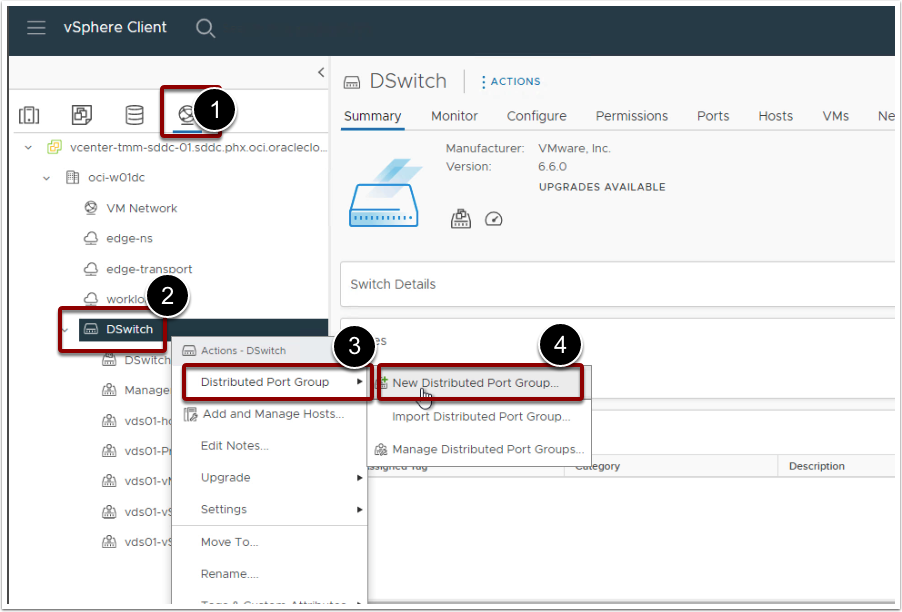
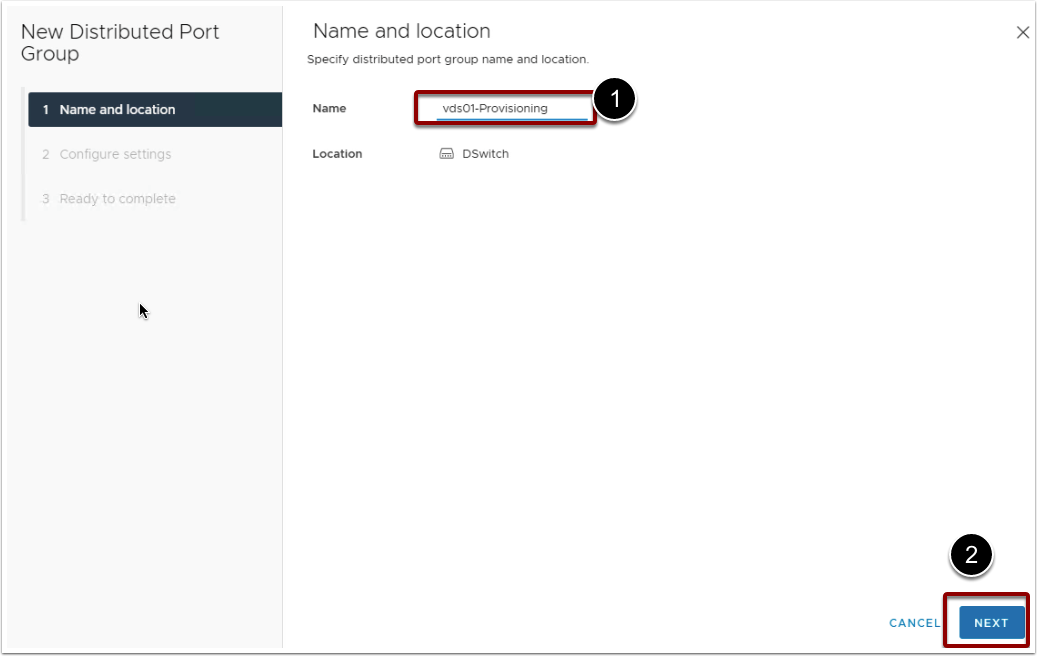
- Provide the port group name, vds01-Provisioning
- Configure Setting. Select the VLAN Type as VLAN.
- Provide the Provisioning network VLAN ID that you have noted down prior to this step.
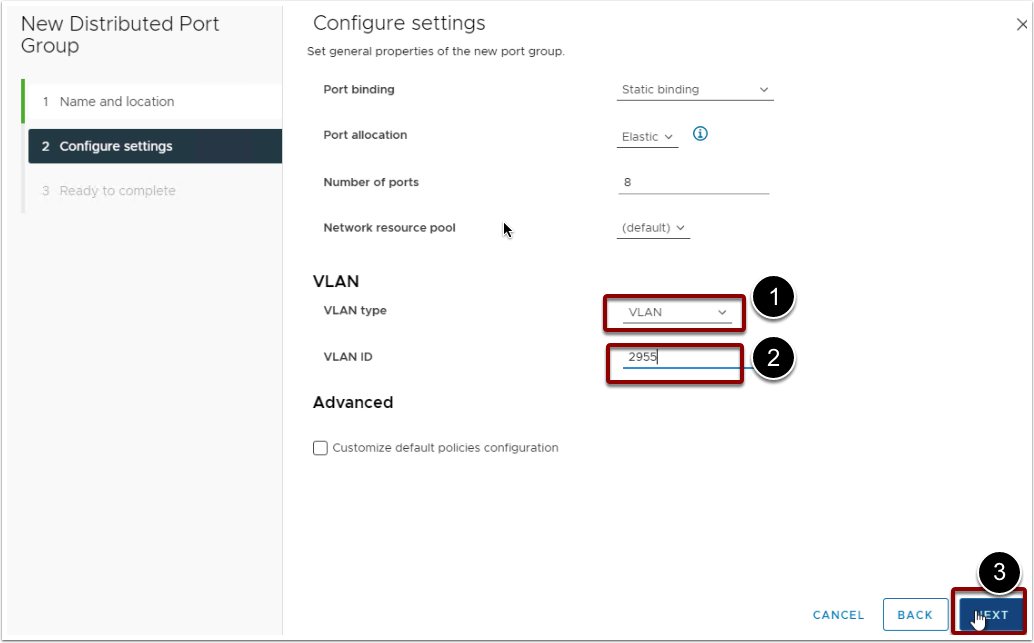
- Review the details and click Finish.
- Repeat the same process to create another port group, vds01-Replication, with the replication VLAN ID.
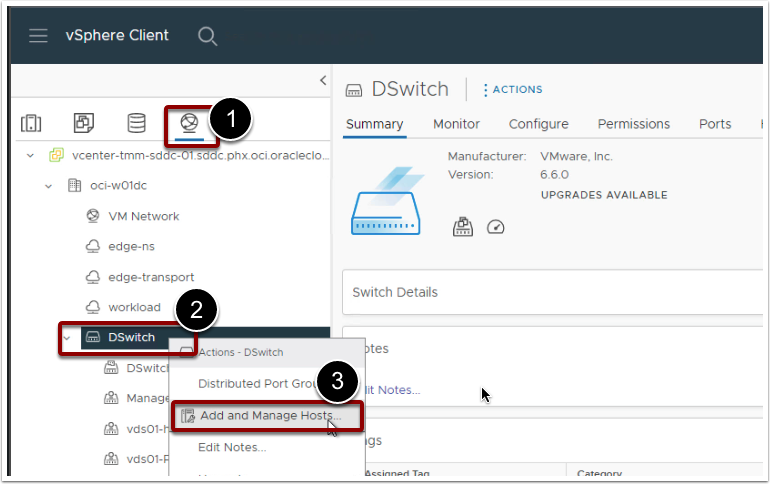
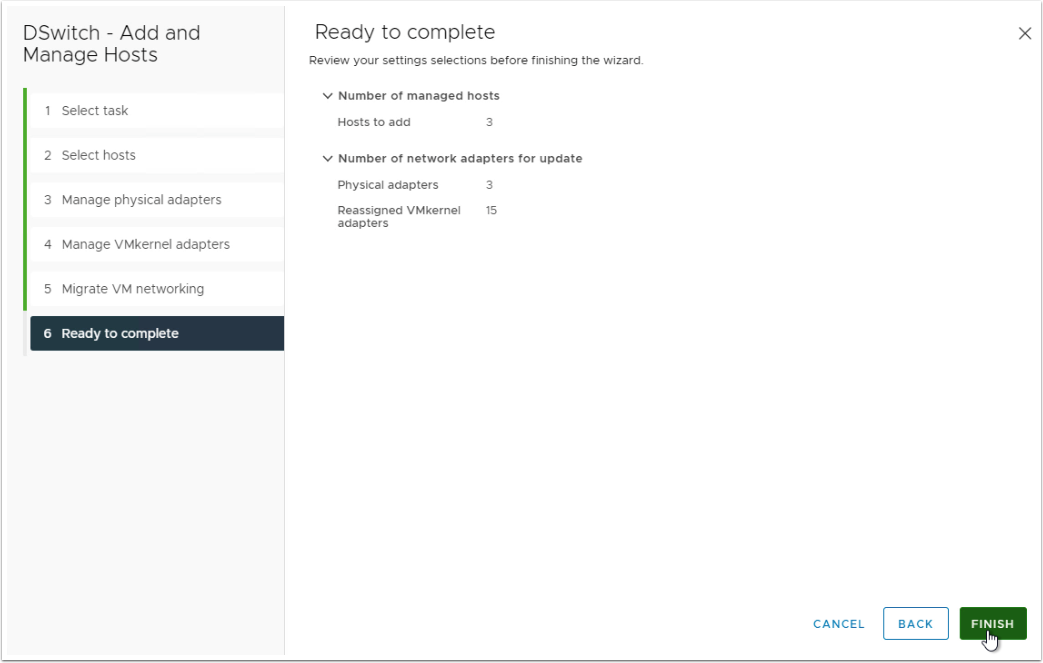
Add Hosts to dvSwitch
- Log in to the vCenter Server.
- Go to the networking tab under the inventory.
- Right click on DSwitch (Distributed Switch that is in use currently).
- Select Add and Manage Hosts.
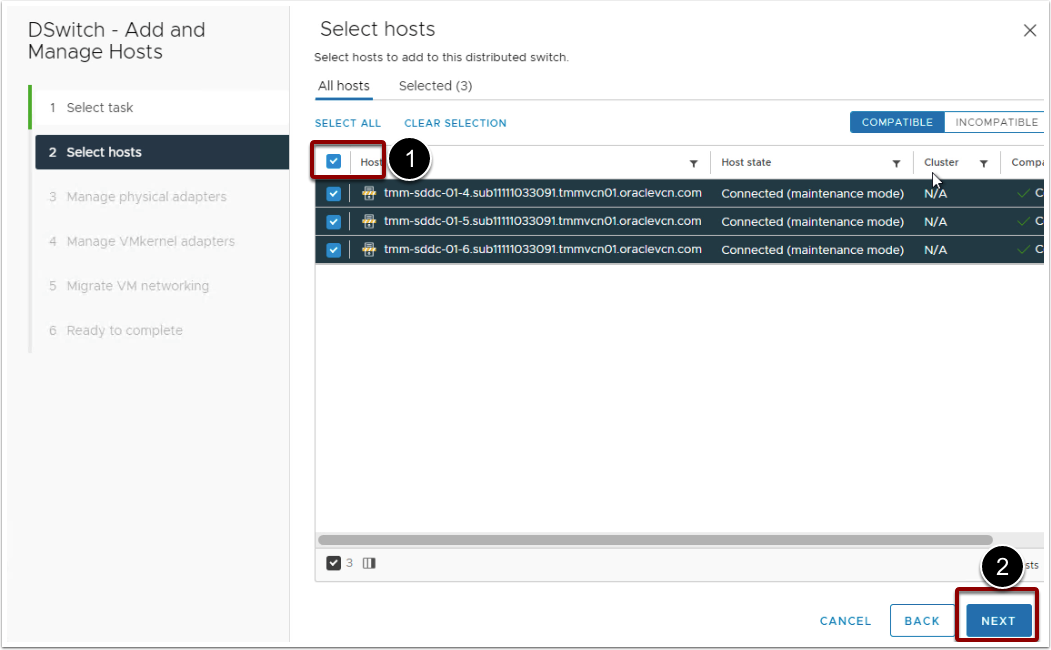
- Select all the compatible ESXi hosts from the list.
- Click Next.
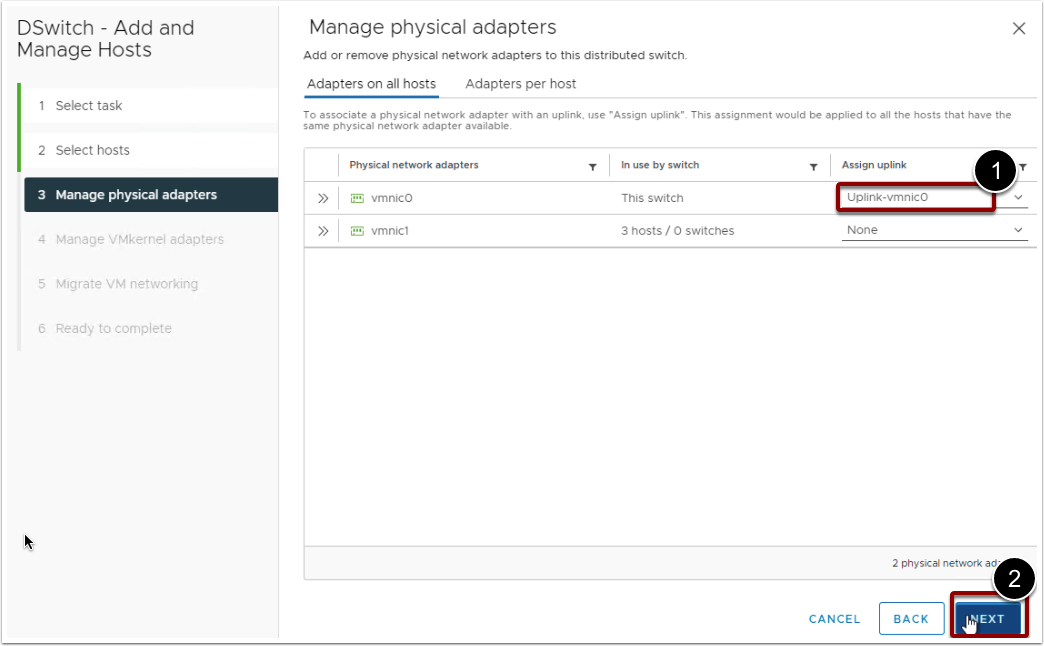
- Assign uplink-vmnic0 to vmnic0.
- Do not set uplink to vmnic1. Keep it None for now. Click Next.
- Manage vmkernel adapters.
- Click on vmk0 and click on the related hosts to review its existing port group assignment.
- Click on assign port group, Assign Management Network on vmk0.
- Similarly, click on each vmk port one by one and assign respective port groups as described below.
| vmk port interface | Port group to be assigned |
| vmk0 | Management Network |
| vmk1 | vds01-vMotion |
| vmk2 | vds01-vSAN |
| vmk3 | vds01-replication |
| vmk4 | vds01-provisioning |
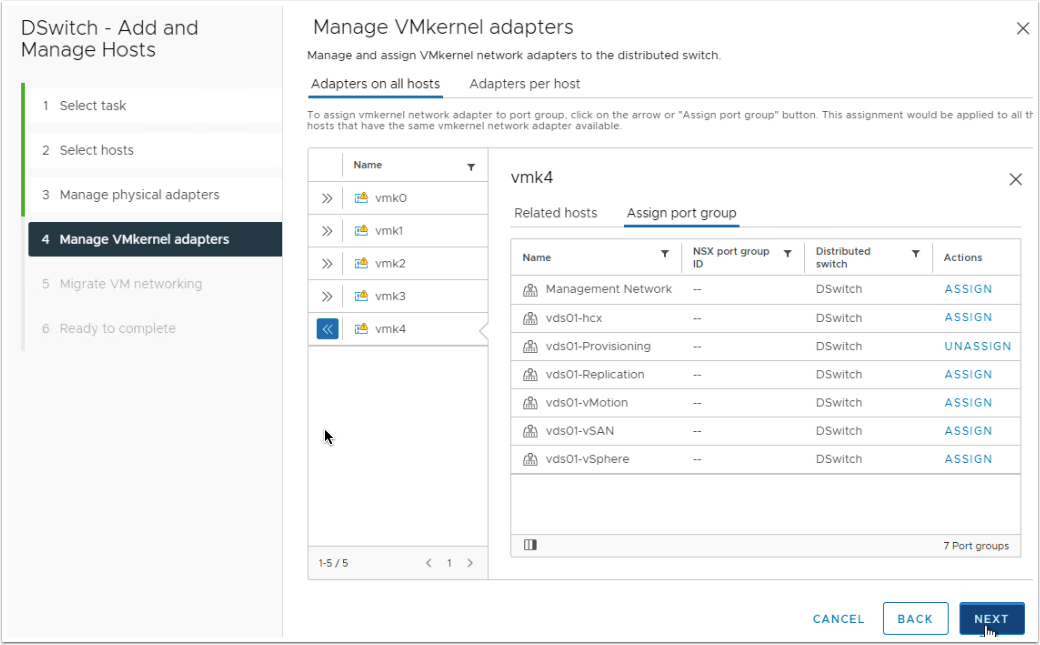
- Click Next.
- Leave the default settings for Migrate VM networking screen.
- Click Next and finish the process.
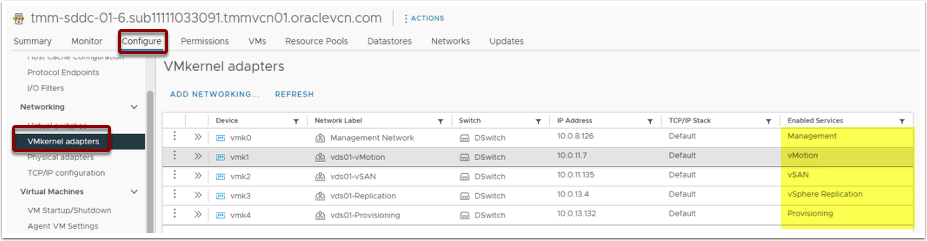
Review ESXi host networking
It is important to review ESXi host networking so that we can continue with the next steps. Review the host connection state in the vCenter Server and ensure all the hosts are showing as connected and not showing a Disconnected or Not Responding state. The below screenshot shows the ideal state after completing the VDSconfigurations.

Also, it is important to review the vmkernel ports and their associated port groups and dvSwitch. Go to the ESXi host -> Configure -> Networking -> vmkernel adapter. Review all the ports and ensure that the required services are enabled on the respective vmk port. The below screenshot shows what the vmk ports should look like.
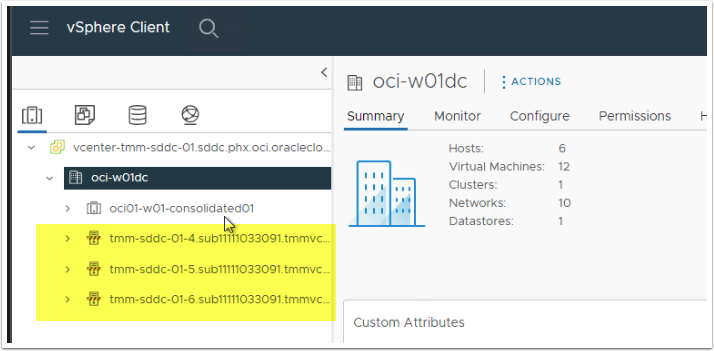
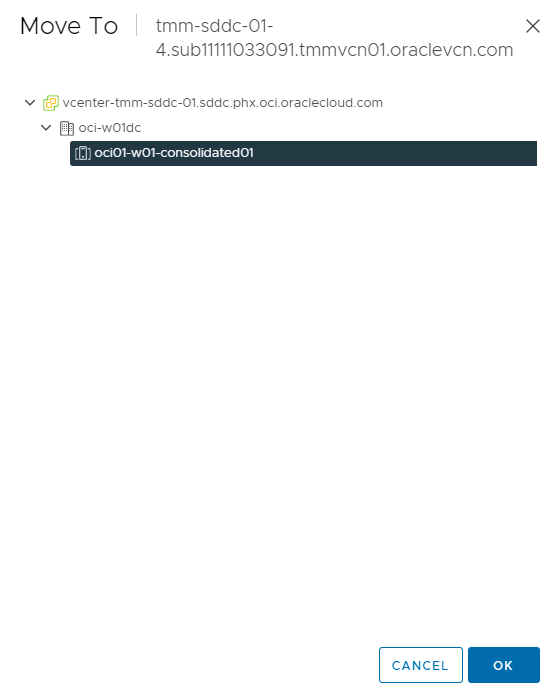
Add Hosts to the vSAN cluster
Once you have verified the networking configurations, you can move next to add ESXi hosts to the vSAN cluster. Please keep the ESXi hosts in maintenance mode only.
- Log in to the vCenter Server.
- Right-click on the ESXi host and click on Move To.
- Expand datacenter oci-w01dc, Select cluster object oci-w01-consolidated01
- Click Ok.
- Repeat the same process to move all the ESXi hosts into the vSAN cluster.
Configure the vSAN disk group
The new hosts are added to the vSAN cluster, but we need to claim the unused disks in the existing vSAN disk group.
- Log in to the vCenter Server.
- Go to the cluster object oci-w01-consolidated01
- Click on Configure.
- Go to vSAN and click Disk Management.
- Click on Claim Unused Disks.
- Claim the first disk as a cache tier and the remaining 7 disks to be claimed as a capacity tier. Configure the same claims on all the ESXi hosts.
- Click on Create.
- Wait for the operation to complete.
- Review vSAN datastore and you should be able to see an increased capacity in the vSAN datastore.
Review NSX-T Fabric Configurations
All the hosts that are part of the cluster object will receive the NSX-T configurations through NSX-T transport node profile. The current cluster object is already configured with the transport node profile so as soon as we add an ESXi host to the cluster object, NSX-T configurations are applied automatically to the newly added hosts.
Review the new host's status in the NSX-T fabric and ensure that the NSX configuration status is shown as Success and Node Status is showing as up.
- Login to the NSX-T Manager.
- Go to System.
- Expand Fabric.
- Select Managed by vCenter.
- Check the new ESXi hosts in the oci-w01-consolidated01 cluster object
- NSX Configuration should be a Success
- Node Status should be Up.

Prepare the Hosts for migration
Since all the hosts are added to the vSAN cluster and NSX-T fabric. If everything looks green from vSAN and NSX-T fabric, we can prepare the host for hosting the management and application workloads.
- Select the ESXi host.
- Right-click, Maintenance mode and select Exit Maintenance mode.
- Go to the monitor.
- Click on Task to monitor the progress.
- Wait for the task to complete.
- Click on Summary and validate HA status.
- Migrate the test virtual machine to the new host.
- Validate the virtual machine and ensure it is accessible on the network. Proceed to the next only after you are satisfied with the network and storage validation on the test virtual machine.
- Repeat the same process on all the ESXi hosts.
Please make sure you validate vSphere HA status once all the hosts are moved out of maintenance mode.
Terminating Old Hosts
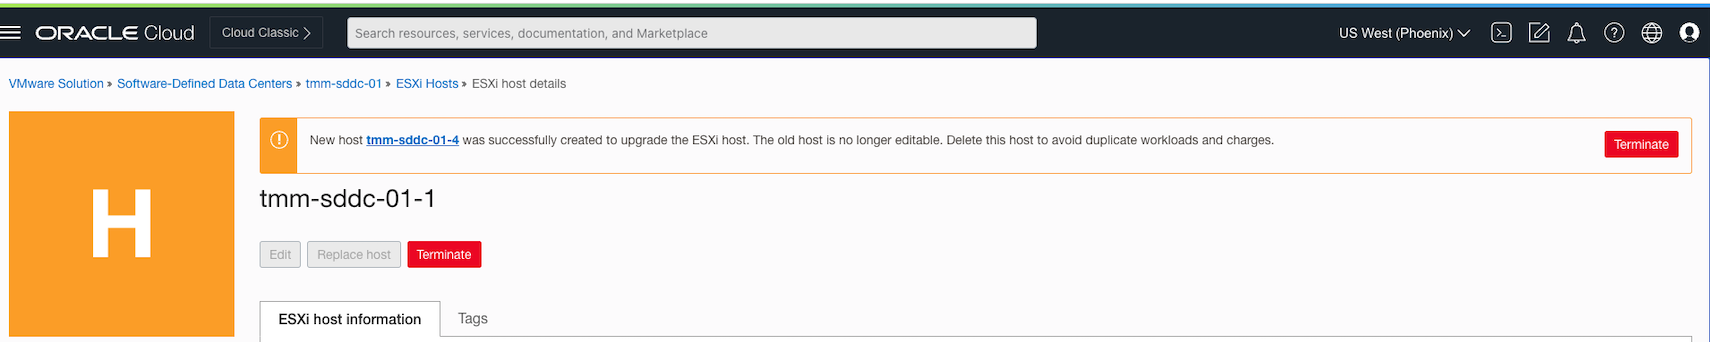
Once all the new hosts are moved out of maintenance mode, we can start terminating the old ESXi hosts one by one. It is important to note that the billing is applicable on new ESXi hosts as soon as the new ESXi instances are available and active in the OCI. It is important to terminate the old hosts so that we can avoid the additional charges for the host that are not in use.
This step is very critical so please ensure that you follow the below steps to terminate the old ESXi hosts.
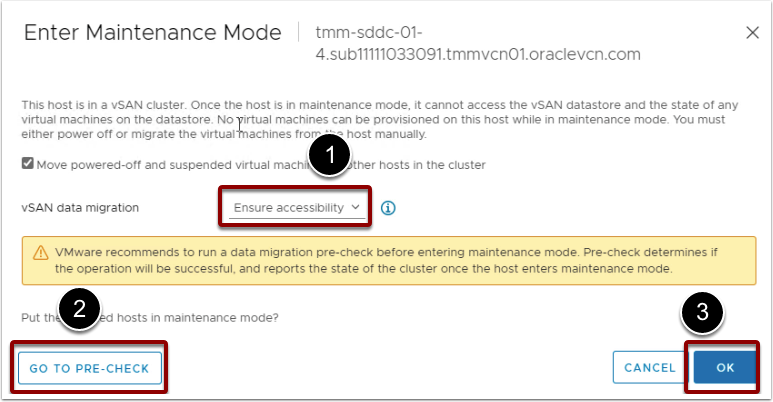
- Click on the old ESXi host.
- Right-click, Maintenance mode, and Enter Maintenance mode.
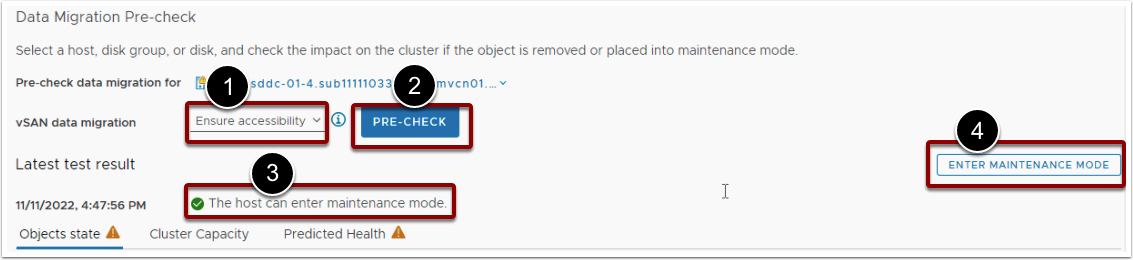
- In the Maintenance wizard, Select Full data migration. This is a must so that all the data virtual machine and its associated vSAN objects can be migrated to the other hosts.
- Click on Go to pre-check.
- Click Ok.
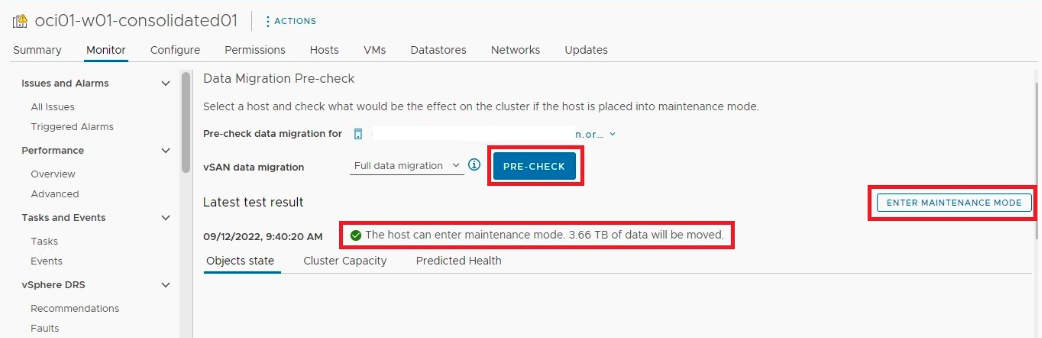
- Click Pre-Check. Wait for the pre-check process to complete.
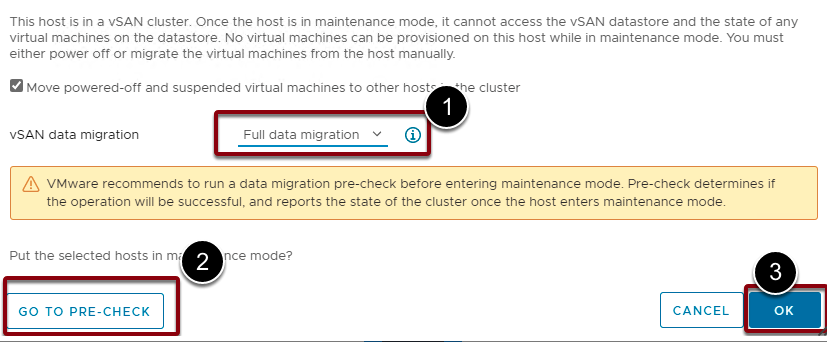
- Click Enter Maintenance Mode If the pre-check result is green.
- Wait for the host to go into maintenance mode.
- Once the host is in maintenance mode, right-click and click on Disconnect.
- Remove the host from the inventory.
- Repeat the same process on all the remaining old ESXi hosts.
Terminate ESXi instances in the OCI
- Login to the OCI Console.
- Go to the VMware Solution page.
- Select the appropriate compartment and VMware SDDC.
- Go to the ESXi hosts that are marked as Need attention.
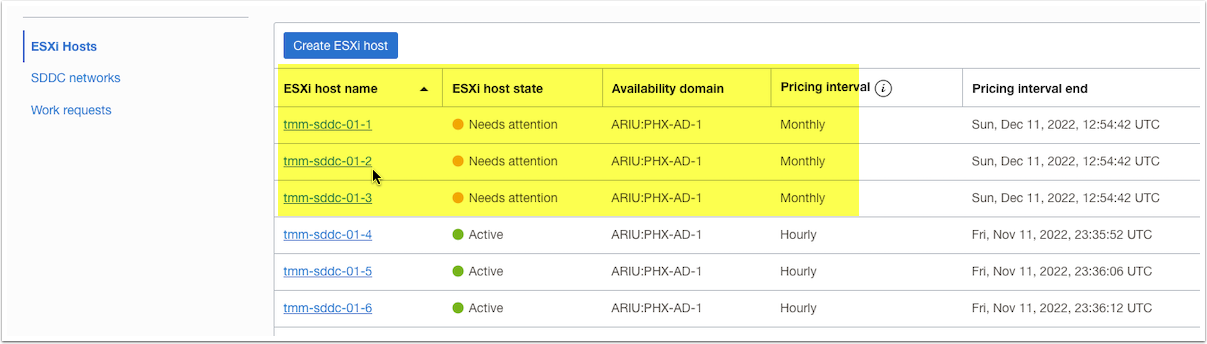
- Click on Terminate.
- Repeat the same process on all the old ESXi hosts.
Upgrade vSAN
So now we have VMware SDDC, vCenter Server, and ESXi hosts upgraded to VMware vSphere 7 Update 3. However, the current vSAN disk group is still running with the old vSAN version. Follow the below steps to upgrade the vSAN disk group version.
- Log in to the vCenter Server.
- Click on the cluster object and Select Configure.
- Go to vSAN and click on Services.
- Click on Pre-Check Upgrade.
- Click on Upgrade if the pre-check results are showing as Ready to upgrade.
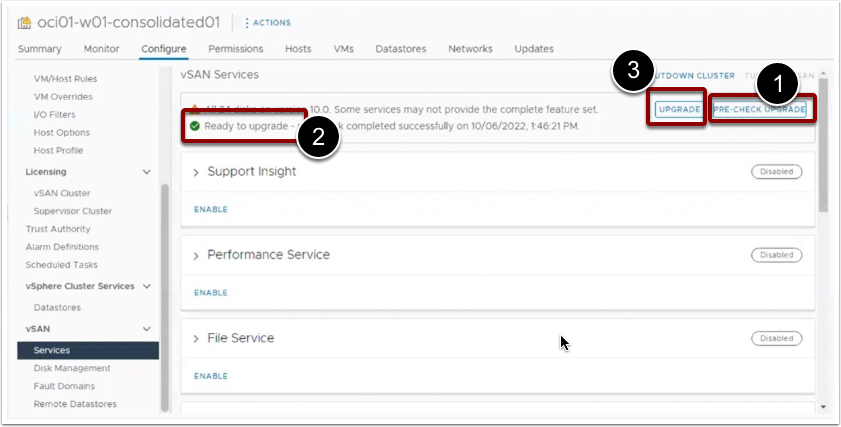
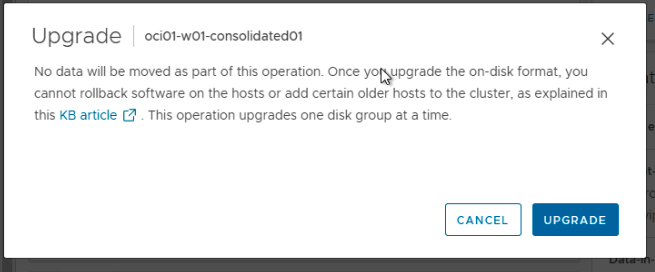
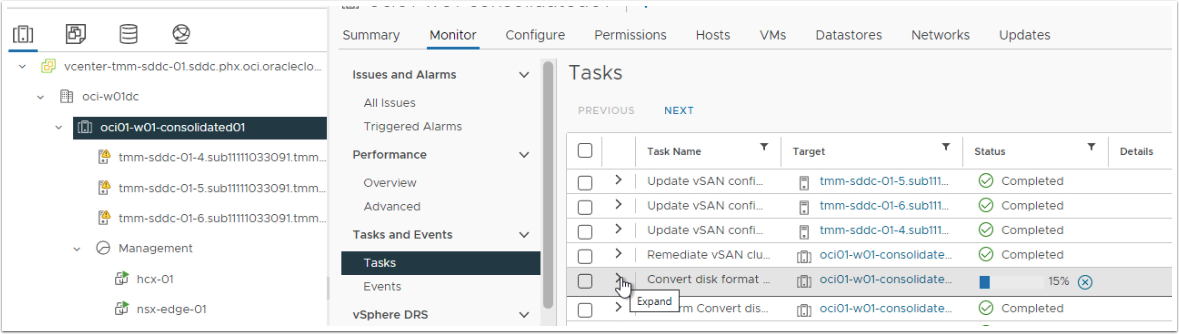
- Monitor the upgrade process and check the vSAN cluster health.
Upgrade vSphere Distributed Switch
The new OCVS VMware SDDC 7.0 architecture has slight changes to the network architecture. In the new SDDC, we will move away from the traditional NVDS-backed port group to VDS backed port group. The VDS-backed port group requires version 7 for the distributed switch. Below are the steps to upgrade the distributed switch and prepare the VDSfor the NSX-T configuration.
- Log in to the vCenter Server.
- Go to the networking tab.
- Select DSwitch.
- Right-click and Select Upgrade.

- Select the latest version and click Finish.
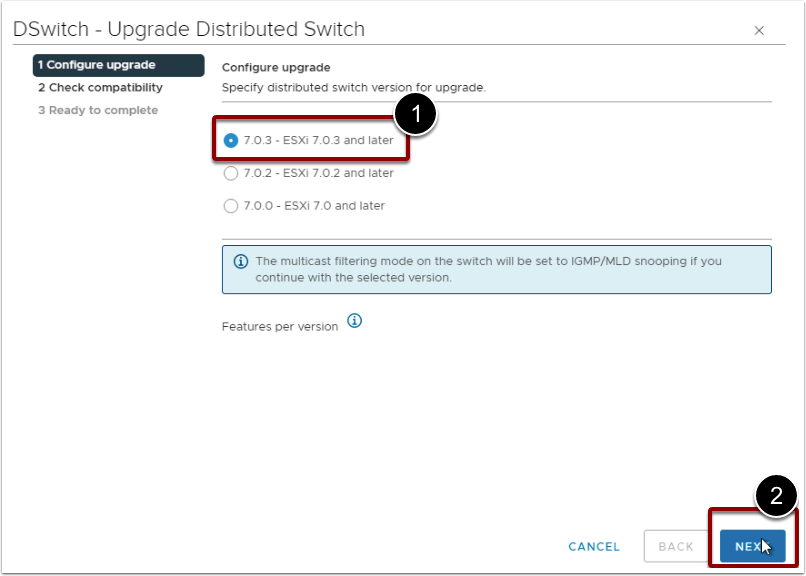
- Verify the VDSVersion and it should be upgraded to 7 Update 3 as shown in the below screenshot.

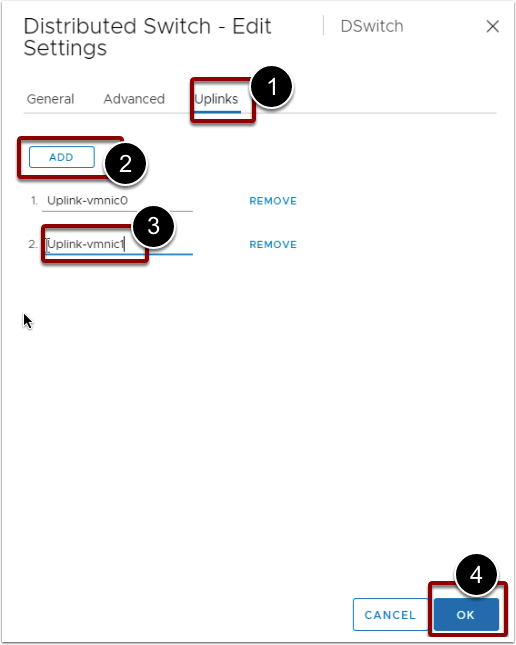
Add additional uplink to VDS
The old network architecture had only 1 uplink port for the distributed switch. The new network architecture requires 2 uplink ports for the dvSwitch. In the below step, we will just add an additional uplink to the VDSbut will not assign any vmnic at this point.
- Right-click on the DSwitch.
- Select Settings -> Edit Settings.
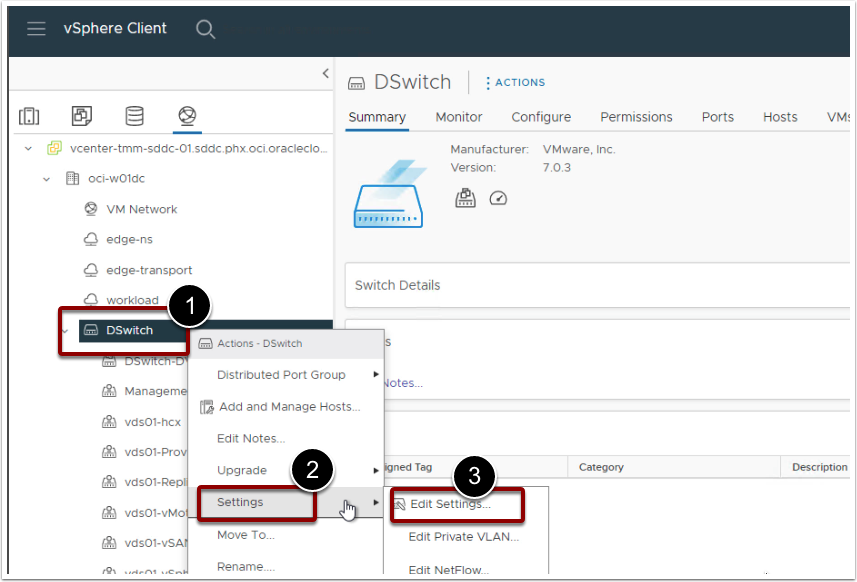
- Click on the Uplink tab.
- Click on Add.
- Provide name as Uplink-vmnic1.
- Click Ok.
Migrate N-VDS to the VDS port group
The following steps will assist you in migrating host networking from NVDS Backed port groups to VDS-backed port groups.
A. Create a new Uplink Profile
- Log in to the NSX Manager.
- Go to System -> Fabric-> Profiles -> Uplink Profiles.
- Click Add Profile.
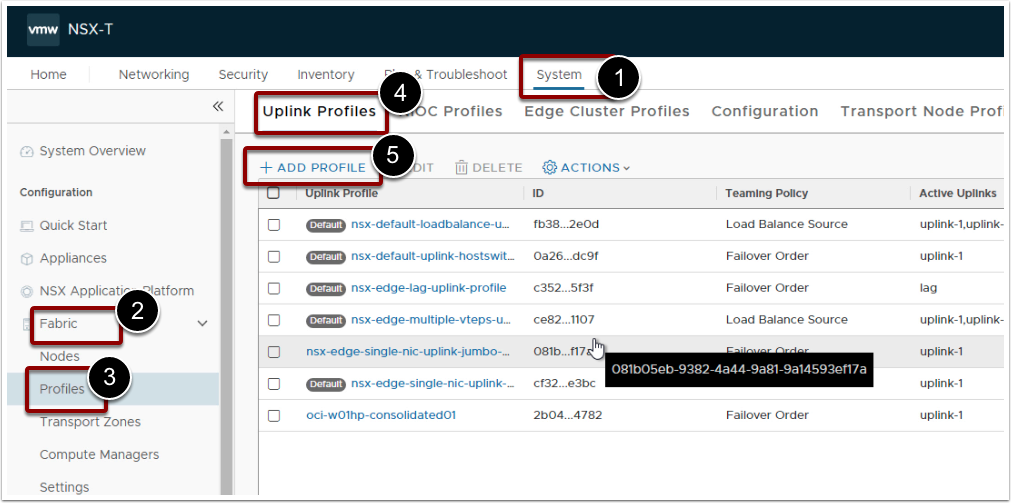
- Name
- LAGs – Leave it default (blank)
- Teaming – Add
- Teaming Policy – Load balance Source MAC address
- Active Uplink – uplink-1, uplink-2
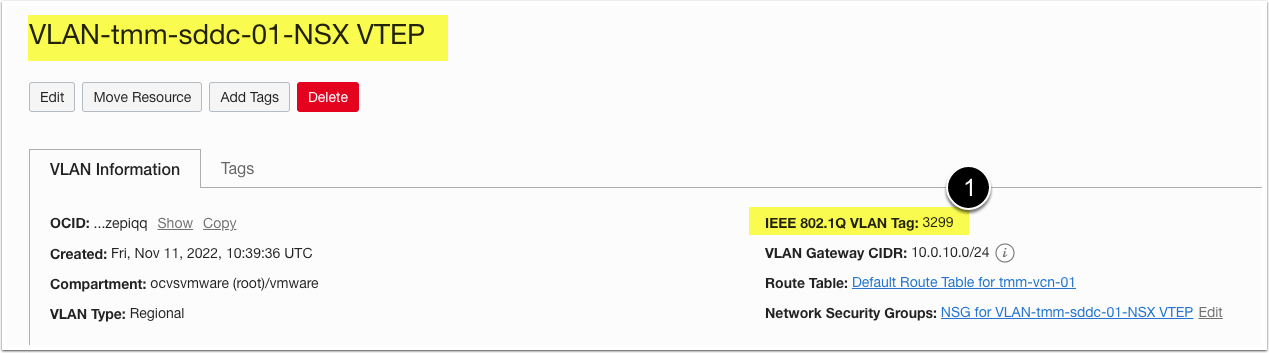
- Transport VLAN – Provide the NSX VTEP VLAN ID. Obtain the NSX VTEP VLAN ID from OCI Console.
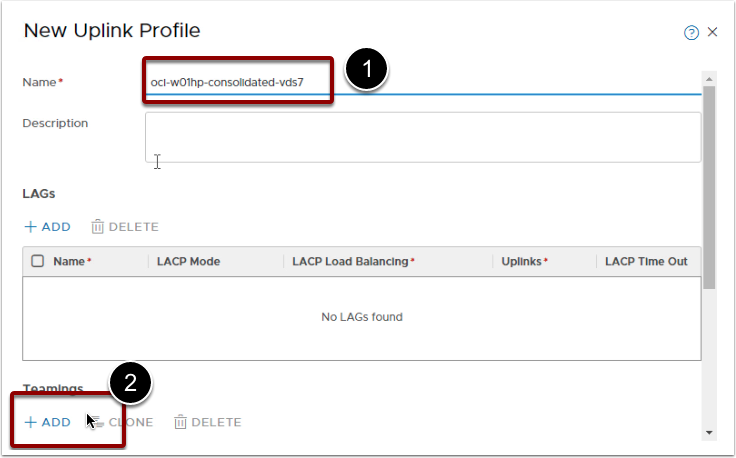
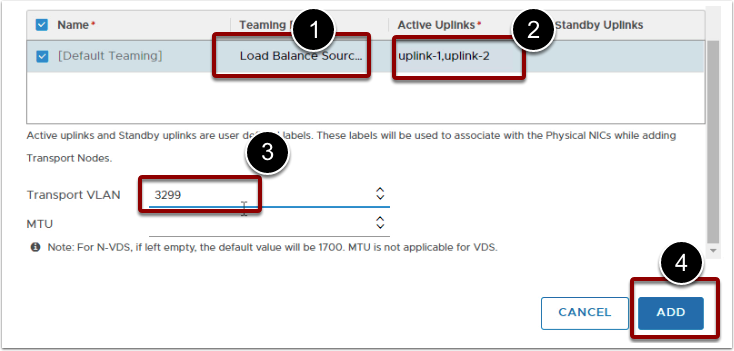
- MTU – Keep it blank.
- Click Add.
Important: Follow steps B, C and D on all the ESXi hosts one by one.
B. Remove NSX from the ESXi hosts
- Log in to the vCenter Server.
- Select the ESXi Host.
- Right-click and select Maintenance mode.
- Enter Maintenance Mode.
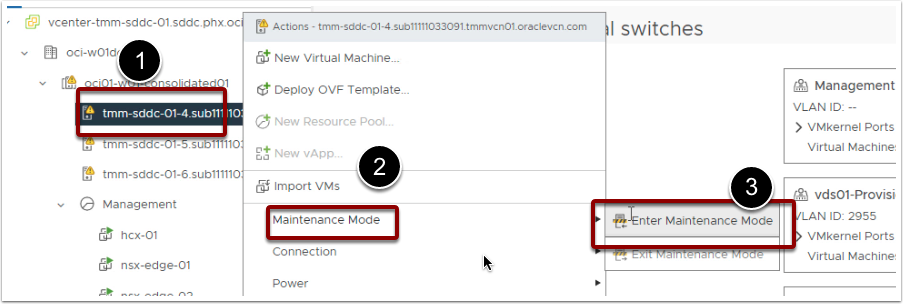
- Select Ensure accessibility and click on Go to Pre-Check.
- Run the Pre-check.
- Click on Enter Maintenance mode.
Remove NSX Configurations
- Log in to the NSX Manager.
- Go to System -> Fabric -> Nodes and select vCenter Server.
- Select the cluster object.
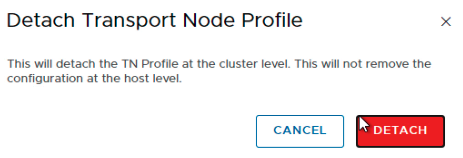
- Click on Action and then click Detach Transport Node Profile.
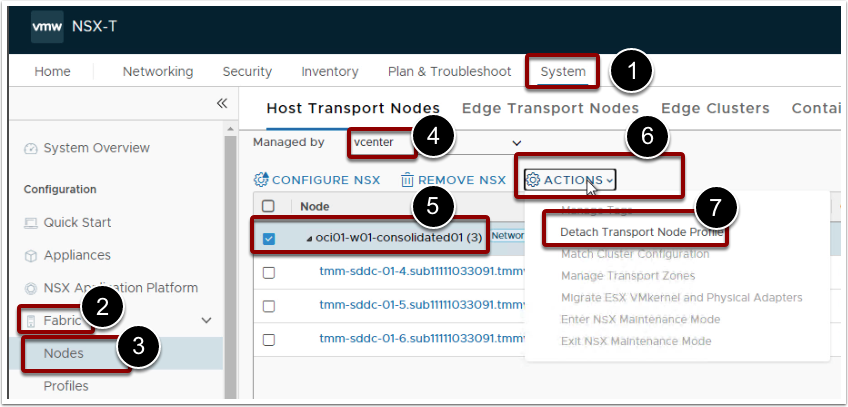
- Select the ESXi host that was put into maintenance mode.
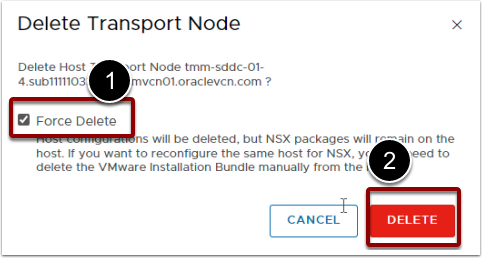
- Click on Remove NSX.
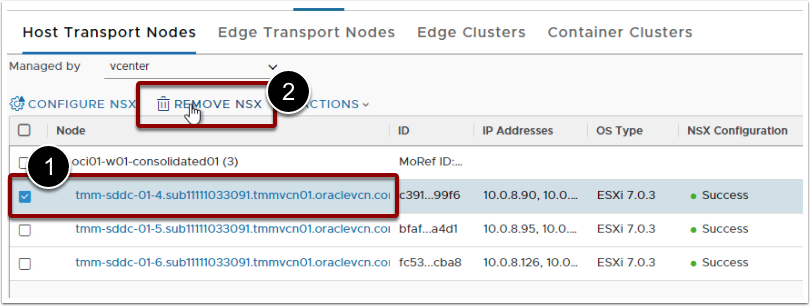
- Select Force Delete.
C. Configure NSX from the VDS-backed configurations
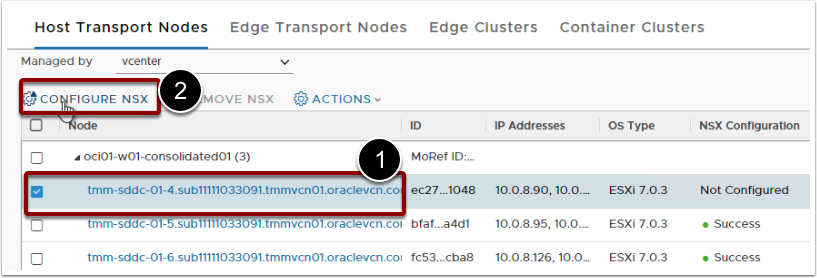
- Log in to the NSX Manager.
- Go to System -> Fabric -> Nodes and select vCenter Server.
- Select the same host that was unprepared in the previous step.
- Click Configure NSX.
- Host details – Leave it default.
- Configure NSX
- Type – VDS
- Name – Select DSwitch. It should auto-populate from the drop-down.
- Transport Zone – Select Overlay-TZ and VLAN-TZ From the drop-down list.
- Uplink Profile - Associate the new Uplink Profile that was created in Step A.
- IP Assignment (TEP) – Use IP Pool.
- IP Pool – VTEP-IP-Pool
- Teaming Policy – Map the VDS uplink ports to each uplink.
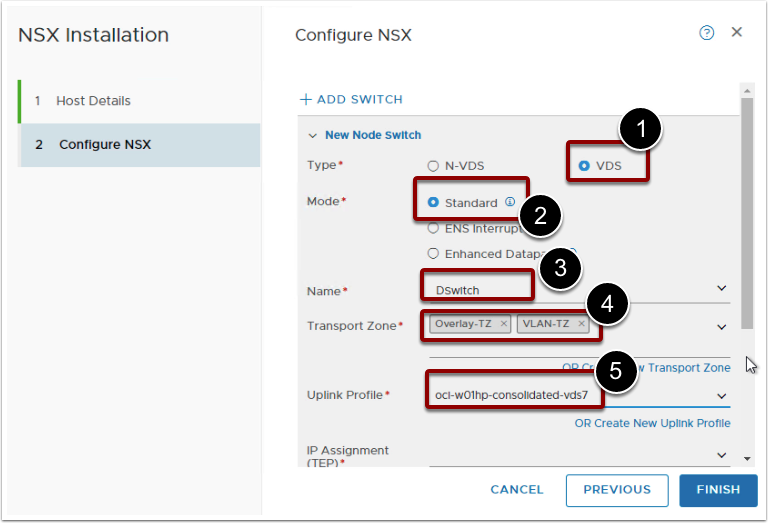
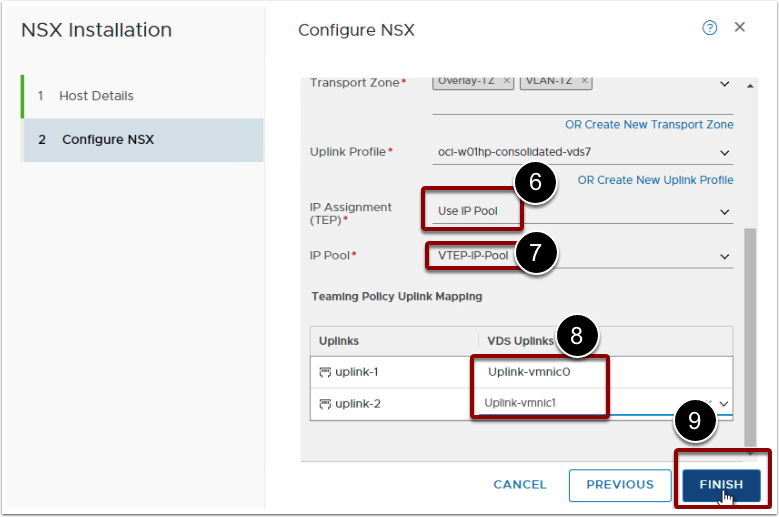
- Click Finish.
- Monitor the NSX Configuration progress until it is configured successfully.
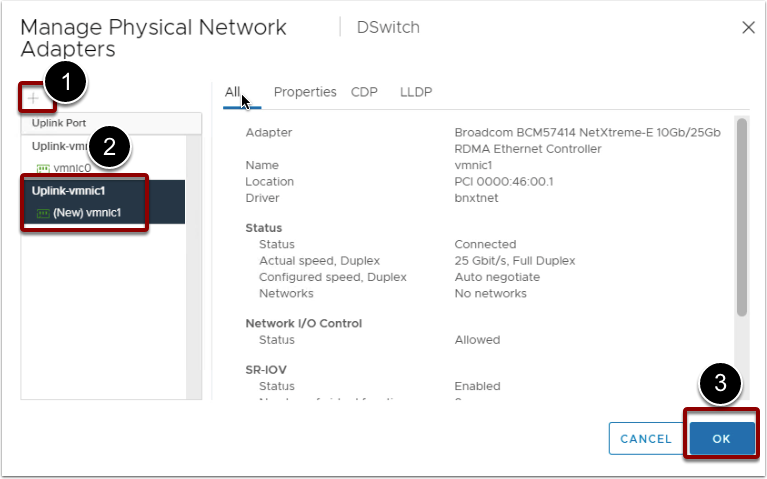
D. Add vmnic1 to the VDS Uplink port.
- Log in to the vCenter Server.
- Click on the same host that was configured with the new NSX configurations.
- Click on Configure.
- Go to Virtual Switch.
- Go to VDS DSwitch.
- Click Manage Physical Adapter.
- Select Uplink-vmnic1 and click on +
- Add the vmnic1 adapter.
- Click Ok.
- Right, Click on ESXi host.
- Maintenance Mode -> Exit Maintenance Mode.
Repeat Steps B, C and D for all other ESXi hosts one by one.
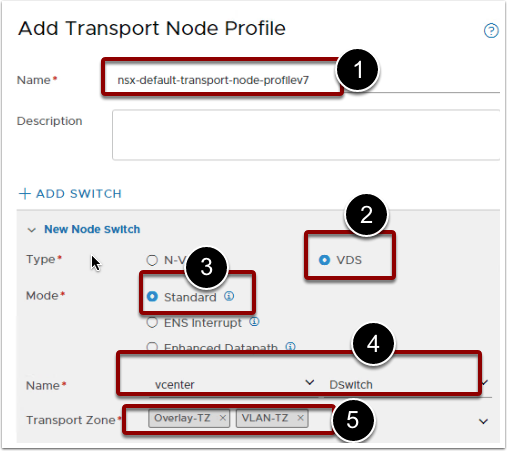
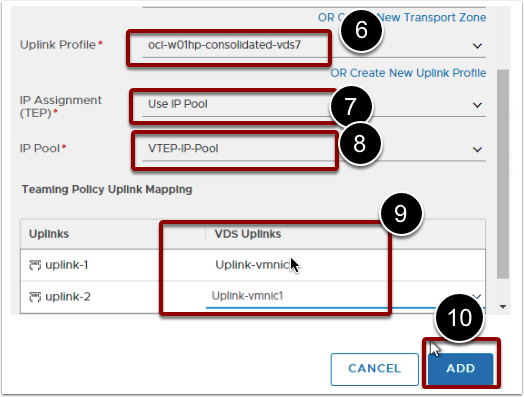
Create and assign a new transport node profile
So now we have all the ESXi hosts migrated from NVDS-backed port groups to the VDS-backed port groups. We should also create a new transport node profile with the same configurations and apply it to the cluster object. This step will ensure that all the hosts that are part of the cluster remain compliant with the same NSX configurations.
- Log in to the NSX Manager.
- Go to System -> Fabric -> Profiles -> Transport Node Profiles.
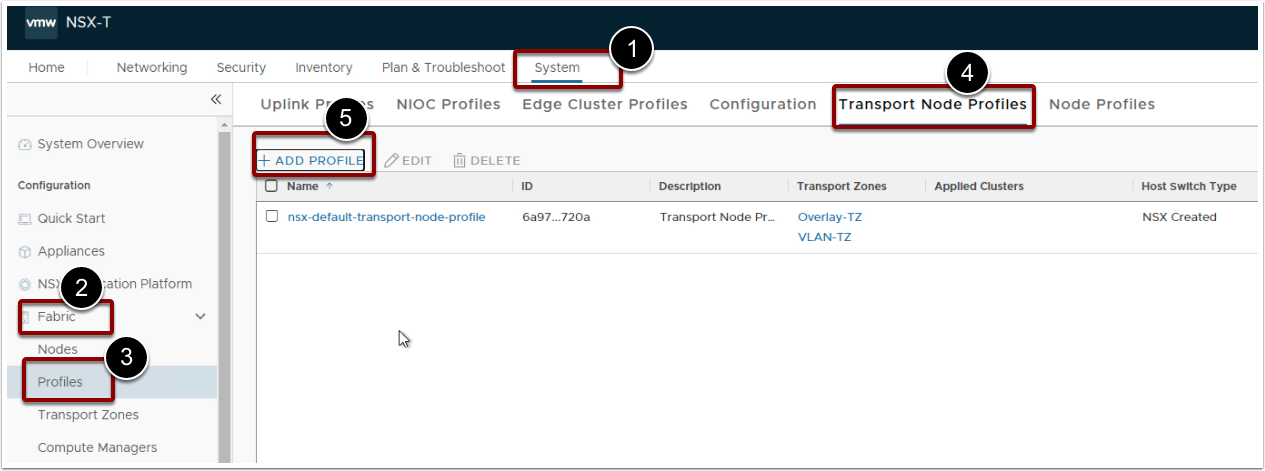
- Click Add Profile
- Name
- New Node Switch – Select vDS.
- Name – Select DSwitch. It should auto-populate from the drop-down.
- Transport Zone – Select Overlay-TZ and VLAN-TZ From the drop-down list.
- Uplink Profile - Associate the new Uplink Profile that was created in Step A.
- IP Assignment (TEP) – Use IP Pool.
- IP Pool – VTEP-IP-Pool
- Teaming Policy – Map the VDS uplink ports to each uplink.
- Click Add.
- Go to System -> Fabric -> Nodes -> Select vCenter.
- Select Cluster Object.
- Click Configure NSX.
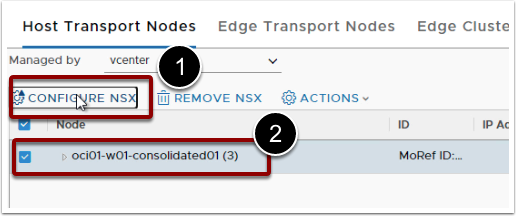
- Select the newly created Transport Node Profile and Click Apply.
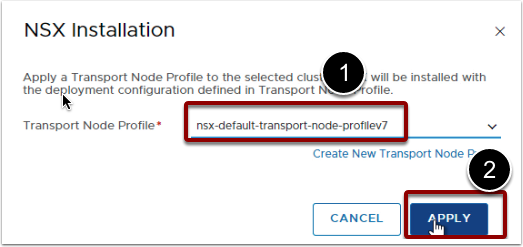
- Verify the status of all ESXi hosts in the Host transport nodes.

Post Upgrade Tasks
The VMware SDDC upgrade is considered completed once vCenter, ESXi hosts, vSAN, VDS, and NSX-T fabric is upgraded as per the above process. Virtual machine hardware and VMtools upgrade are recommended, but it is optional. However, below are the recommended tasks you should consider post-completing all the upgrade activities.
- Validate the environment for any alerts or warnings.
- Review vSAN Health.
- Review NSX-T health. Review this for all the NSX appliances.
- Validating critical application workloads and ensuring that all the services are running as expected.
- Backing up the vCenter Server, NSX appliances and VDS switch configurations.