
Getting Started with Site Recovery Manager on Google Cloud VMware Engine
When people think about VMware Site Recovery Manager (SRM), the first thing that comes to mind is Disaster Recovery (DR). With the click of a button, an entire application, set of applications, or entire site can be brought up at a secondary data center to recover from unexpected outages. However, in my opinion, Site Recovery Manager is more than just a DR tool.
For example, some customers use it to migrate workloads between data centers. The recovery plans can be set to shut down all virtual machines gracefully, replicate all the data one last time, then procedurally bring everything back up in a prescribed order. This can be tested over, over, and over until you get a successful result, helping to ensure a successful transition.
In addition, here is a little-known trick that I like to share with people. In a former role, I liked to use Site Recovery Manager to test patches or application upgrades on my virtual machines. When you test a plan, SRM creates a sandboxed network environment where everything runs independently of production. So, once the test plan was completed and the applications were running, I would run the monthly OS updates or test application tweaks to ensure nothing would break during the actual maintenance window. The great part was that once I was done, clicking the cleanup button would automatically return the environment to its previous state.
Regardless of your reason for using Site Recovery manager, this blog will discuss the high-level steps of getting started and share some helpful step-by-step demo videos to guide you along the way.
Creating Service Subnets
The first step is to create one or more service subnets. Service subnets are used by the vSphere replication and Site Recovery Manager appliances to communicate and transfer data. These are standard VLAN networks within Google Cloud VMware Engine that operate outside the supervision of the NSX networking stack for dedicated and scalable data replication.
If you have never created a service network, here is a video explaining the process.
Deploying the appliances and configuring the solution user accounts
Once the networking is in place, you can deploy the vSphere replication and Site Recovery Manager appliances to both sites. When deploying the pairs of appliances, this can be on-premises to cloud, cloud to on-premises, or cloud to cloud. Once the appliances are deployed, the next step is configuring the solution user accounts at both sites. This is done by elevating privileges in the Google Cloud VMware Engine console and setting the password for the accounts.
vCenter Registrations and Site Pairing
Once both sites have the vSphere replication and Site Recovery Manager appliances running, the next step is to pair them together to get them to communicate with each other. For this step, it is essential to use the solution user accounts so that the appliances have the correct privileges to complete their work. If you try to use the CloudOwner@gve.local account, it will return an error message, and you will be unable to complete the process.
Site Pair Mappings and Advanced Settings
With both sites paired, the next step in the process is to configure the site pair mappings. This step will likely take a little advanced planning to research to determine which resources and their equivalents exist in the environments. Site pair mappings are what SRM uses to figure out which equivalent networks, folders, resource mappings, storage policies, and placeholder datastores exist at each site. For example, when virtual machines are migrated or failed between sites, they must land in the correct locations, resource groups, and networks to operate correctly.
The network mappings are also where an admin can define any IP address customizations between sites. For example, if all virtual machines have IPs in the 192.168.33.0/24 network at the primary site, they can all be automatically assigned their respective 192.168.53.0/24 address at the secondary site.
Replications, Protection Groups, and Recovery Plans
You can now get virtual machines to start replicating data at this point in the process. Depending on the bandwidth between sites and the volume of data to be replicated, this could take some time, so I recommend getting the process started so that data can be transferred in the background while you move on to other tasks.
The great thing about the replication wizard is that it will also allow you to create the associated protection groups and recovery plans as it creates the replications. As a timesaving tip, select batches of virtual machines dependent on each other before going through the replication wizard, as it will help group apps if you ever need to fail them independently.
This replication wizard is also where you pick the recovery point objective (RPO), how many point-in-time instances of virtual machines should be created, guest quiescing, network compression, or encryption settings for the virtual machines. This allows you to set different RPOs and customize the settings for various applications in the environment.
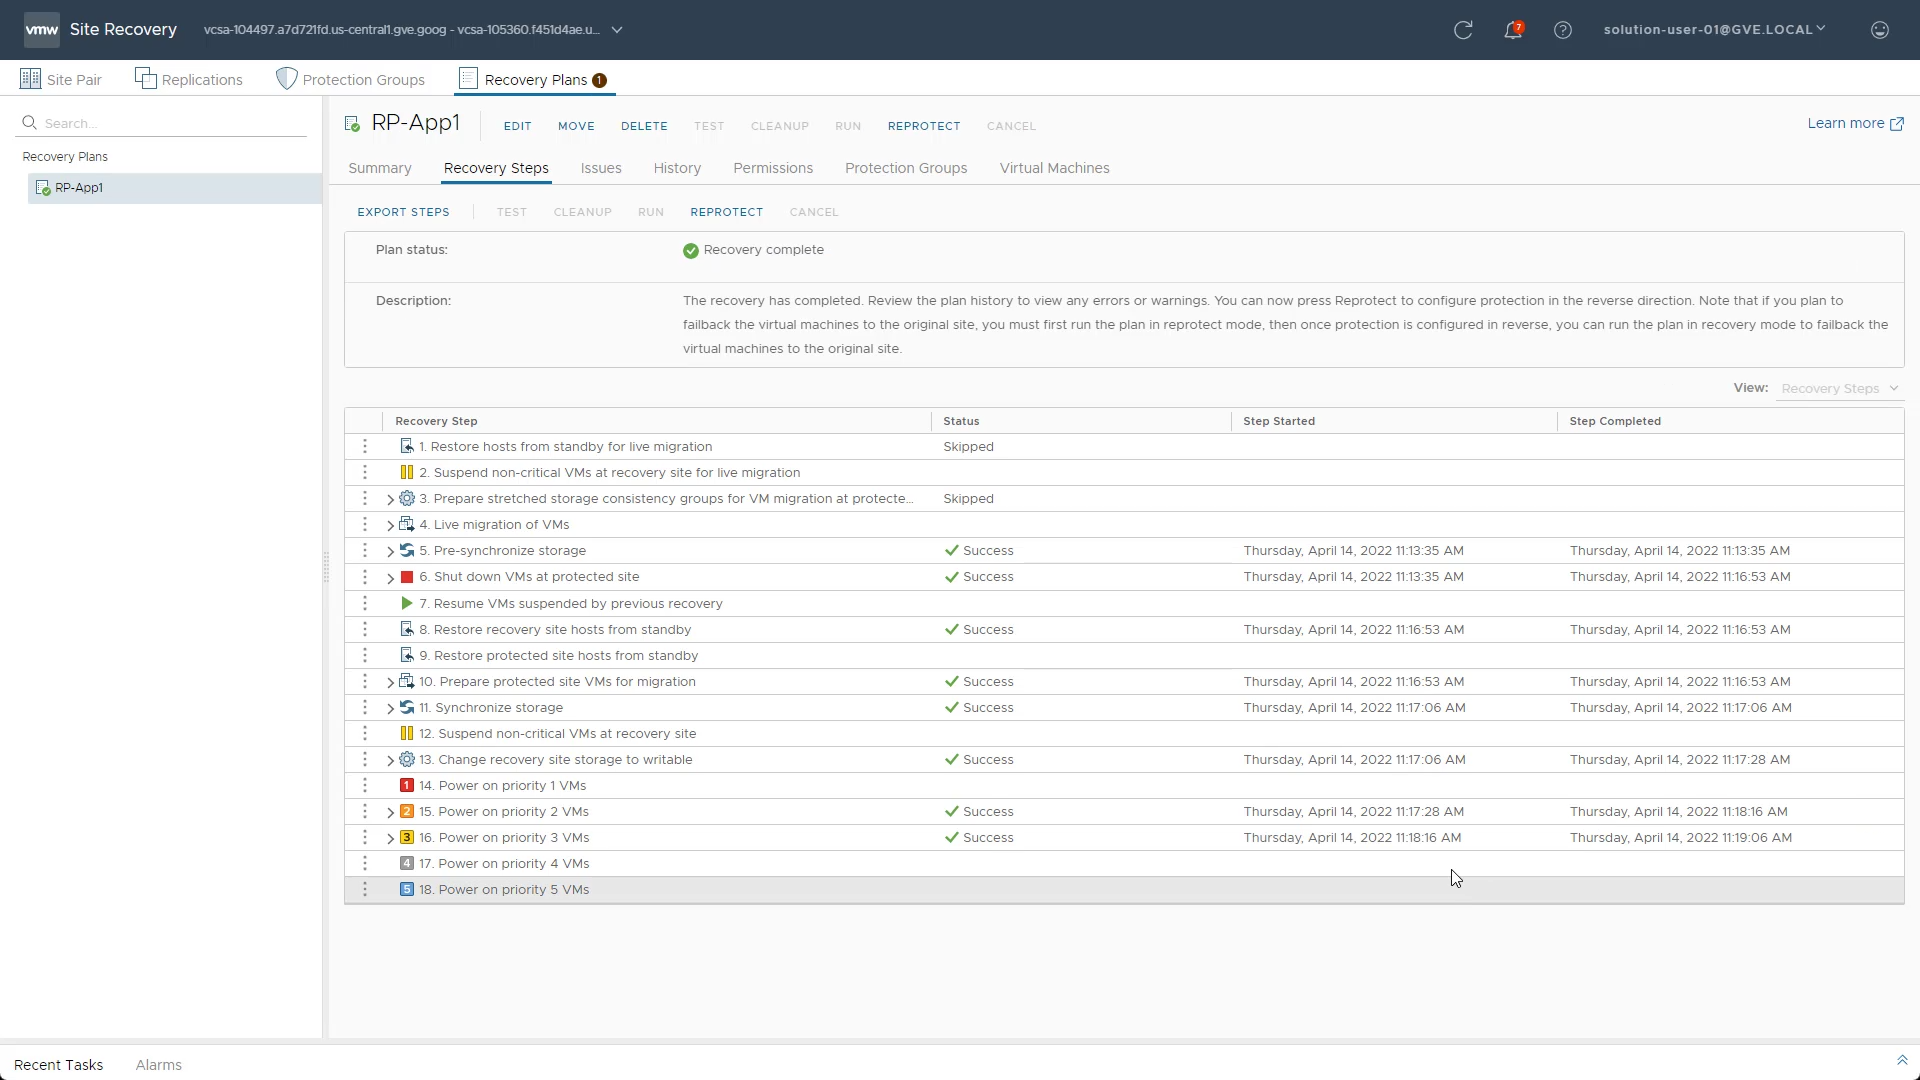
Testing, Migrations, and Disaster Recovery
After completing all the prerequisites, you start by configuring the recovery plan. The recovery plan is where you instruct SRM about all the steps to start the application successfully. For example, the startup order for the virtual machines, designating any test networks, or even whether to shut down other virtual machines to free up resources.
Once the recovery plan is complete, you can start with your first test. As mentioned earlier, the test will create a sandboxed environment for you to inspect and ensure the app starts up correctly. One tip I like to share with others is to create a dedicated testing VM that you can throw into the sandbox with the application. Remember that unless you define a specific VLAN for the VMs to be attached to, they will be inserted into an auto-created isolated test network and will not be accessible from any of your usual networks. With the dedicated testing VM, you can edit the vNIC to place it into the isolated test network to run all your tests.
Finally, once the test has been completed successfully, you can run the plan to migrate or fail over the application or virtual machines and even reprotect them in case you want the ability to send them back after the outage subsides.
Conclusion
Whether you are using it for DR, migrations, or testing, VMware Site Recovery Manager is an excellent tool to keep your environment running or even for disaster avoidance. For the latest technical guidance, blogs, or demo videos for Google Cloud VMware Engine, check out VMware Cloud Tech Zone.